如何在 WordPress 中使用 Elementor 建立即將推出的頁面
已發表: 2024-05-20即將推出的頁面是在網站或專案完全完成和啟動之前建立的。 使用 Elementor,您可以從頭開始建立即將推出的頁面或使用現成的範本。 Elementor 是一個功能強大的頁面建立器,您可以透過它建立不同類型的頁面和重要元素並將其添加到您的網站。
即將推出的頁面是一個非常寶貴的網站元素,您可以使用 Elementor 外掛程式建立。 在本文中,我們將向您展示如何使用 Elementor 建立即將推出頁面的逐步指南。
什麼是即將推出的頁面?
即將推出的頁面是在相應網站或專案最終啟動之前向訪客顯示的臨時網頁。 它實際上是一個預告片。 它提供有關即將發生的事情的信息,並允許訪問者訂閱或保持更新,直到頁面或專案正式啟動。
它通常包括即將推出的產品的簡短描述、倒數計時器以及供訪客訂閱或關注更新的選項。 它作為一種行銷工具來捕獲潛在客戶並建立發布前受眾群體,為成功發布奠定基礎。
何時以及為何應創建即將推出的頁面
從行銷的角度來看,創建即將推出的頁面可以為您的業務帶來許多好處。 但是,您必須具有足夠的策略能力來預測未來並相應地實施您的計劃。 以下是有關何時以及為何應創建即將推出的頁面的一些要點。
- 網站開發
如果您正在建立一個新網站或重新設計現有網站,當您在幕後處理網站時,即將推出的頁面可以充當佈告欄。 它可以讓您告知訪客您的網站正在建設中,並讓他們了解即將發生的事情。
- 上市前行銷
即將推出的頁面可以是一種有效的方式,可以為即將推出的產品或服務引起轟動和期待。 透過提供即將推出的產品的先睹為快,您可以保持潛在客戶的興趣並開始建立發布前的受眾群體。
- 產生潛在客戶
即將推出的頁面的一個主要目的是收集感興趣的訪客的電子郵件地址和聯絡資訊。 您可以透過提供訂閱表單或號召性用語以保持更新來收集潛在客戶並建立潛在客戶名單。 檢查最好的 WordPress 潛在客戶生成外掛。
- 品牌意識
精心設計的即將推出頁面可以幫助建立您的品牌形象並創造令人難忘的第一印象。 透過整合您的品牌顏色、徽標和訊息,您甚至可以在網站完全啟動之前就開始建立品牌認知。
- 社群媒體推廣
即將推出的頁面提供了宣傳您的社交媒體帳戶並鼓勵訪客在 Facebook、Instagram 或 Twitter 等平台上關注您的機會。 這使您可以與受眾保持聯繫,並提供有關網站進度或即將發布的最新資訊。
如何在 Elementor 中建立即將推出的頁面
現在,我們將在本節中向您展示如何在 Elementor 中建立即將推出的頁面。 但在進入教學部分之前,請確保您的網站上安裝了以下插件。
- 元素器
- 快樂插件
- 快樂外掛專業版
您可能會問 –為什麼是 HappyAddons 而不是 Elementor Pro? 答案是,您在 Elementor 中幾乎找不到任何現成的即將推出的頁面模板。 但 HappyAddons 提供了一系列即將推出的頁面模板,可立即讓您的頁面準備就緒。
您可以使用免費版本從頭開始建立即將推出的頁面。 在這種情況下,您將錯過許多令人興奮的高級插件。 但是,我們將在本節中使用 HappyAddons Pro 外掛程式來完成本教學。
有兩種方法可以建立即將推出的頁面。 下面與我們一起探索它們。
方法一:使用現成的範本建立即將推出的頁面
正如我們上面所說,HappyAddons 提供了許多現成的即將推出的頁面模板。 使用這些模板,您只需幾分鐘即可準備好即將推出的頁面。 過程如下:
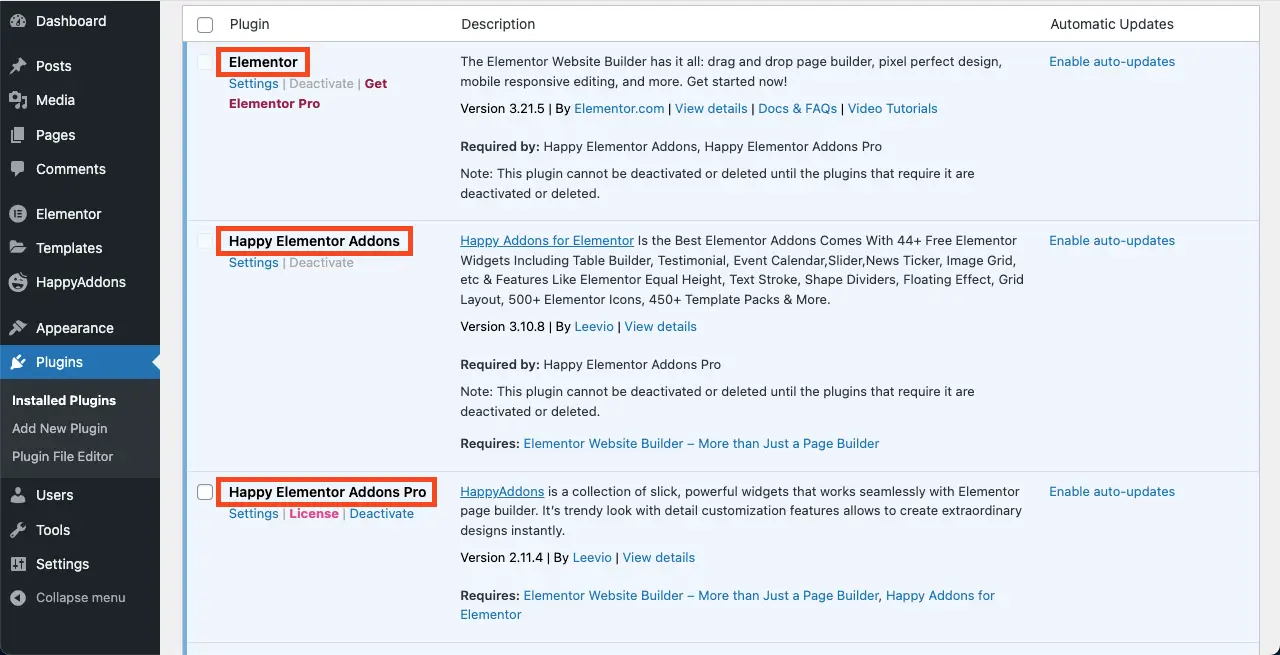
步驟01:安裝並啟用上述插件
正如我們所說,請確保在您的網站上安裝並啟動這三個外掛程式Elementor、HappyAddons和HappyAddons Pro 。
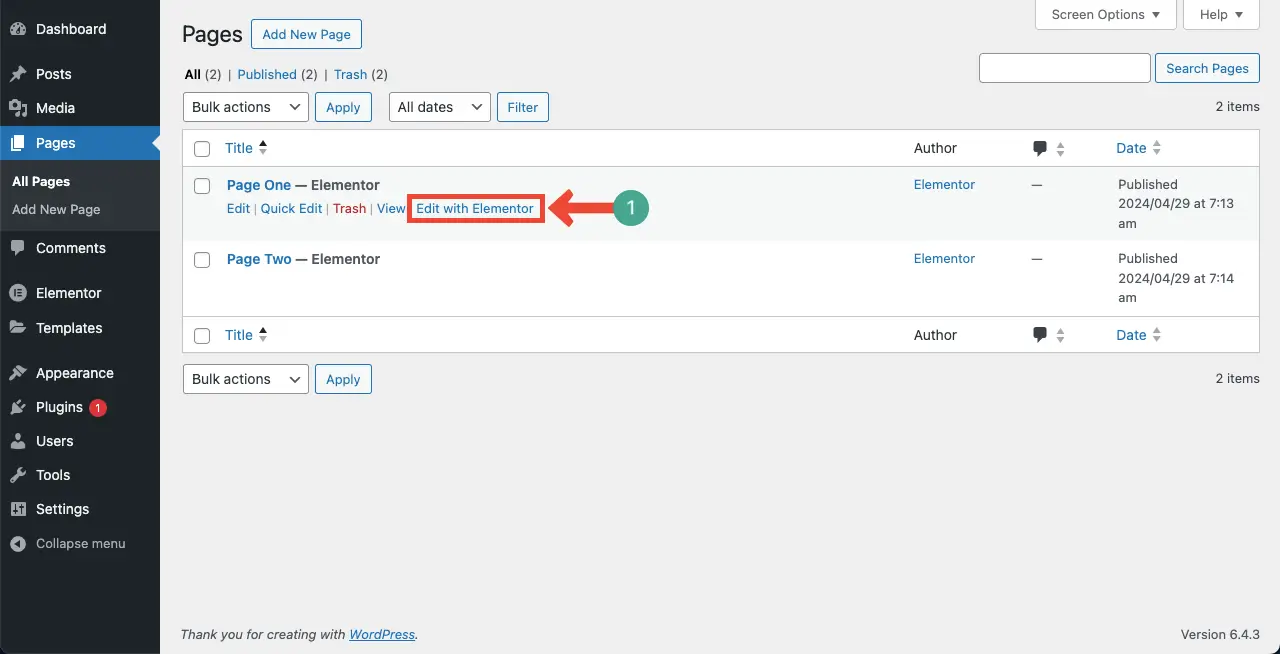
步驟02:使用 Elementor Canvas 開啟頁面
前往頁面 > 新增頁面。 然後,使用 Elementor 開啟頁面。
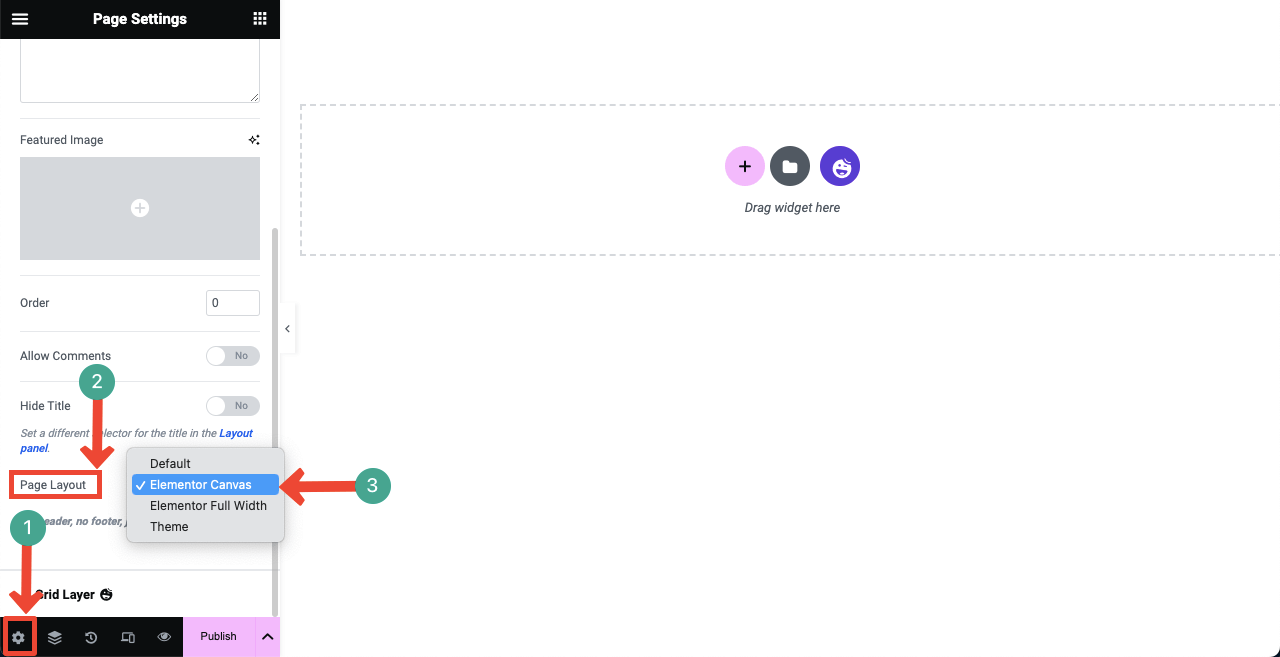
使用 Elementor 開啟頁面後,前往「設定」>「頁面佈局」 。 從下拉清單中選擇Elementor Canvas 。
Elementor Canvas 將從頁面中刪除頁首和頁尾。 實際上,即將推出的頁面不需要顯示頁首和頁尾。 因此,我們透過選擇 Elementor Canvas 選項刪除了它們。
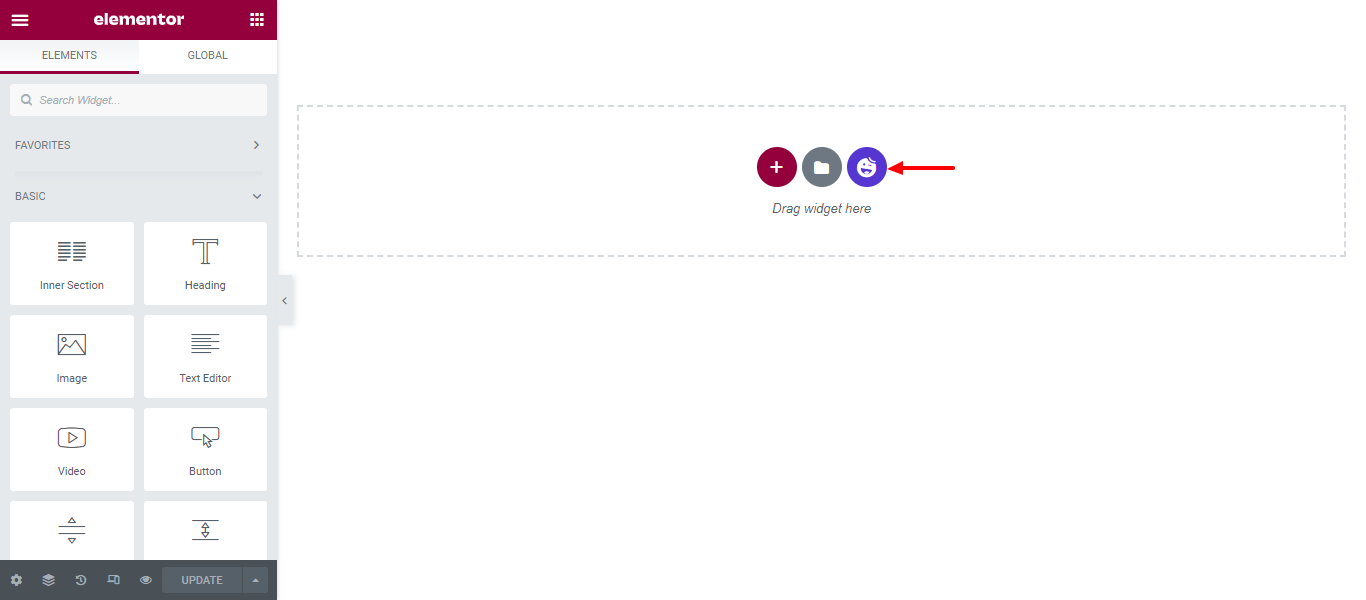
步驟 03:匯入即將推出的模板
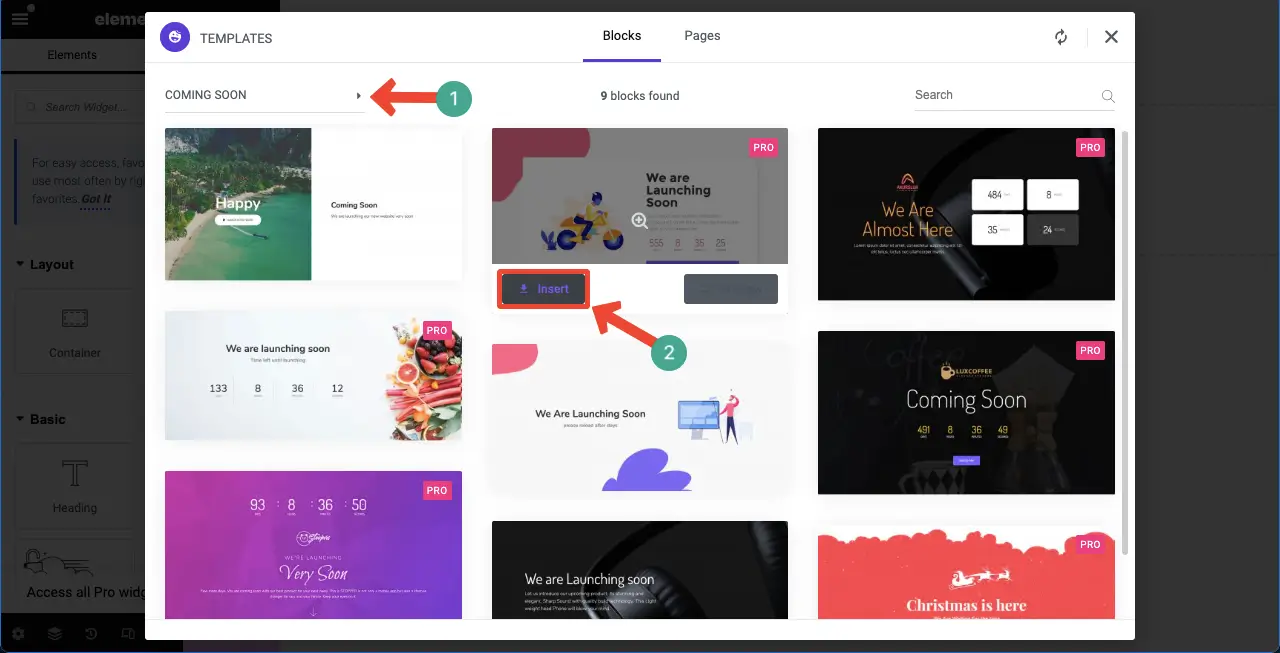
按一下 HappyAddons範本庫圖示可開啟並存取範本庫。
可以輕鬆過濾和尋找即將推出的頁面模板。 點選左上角的箭頭符號。
選擇即將推出選項。 所有即將推出的區塊和相關頁面都會出現在螢幕上。
點擊插入按鈕將您喜歡的模板新增到畫布中。
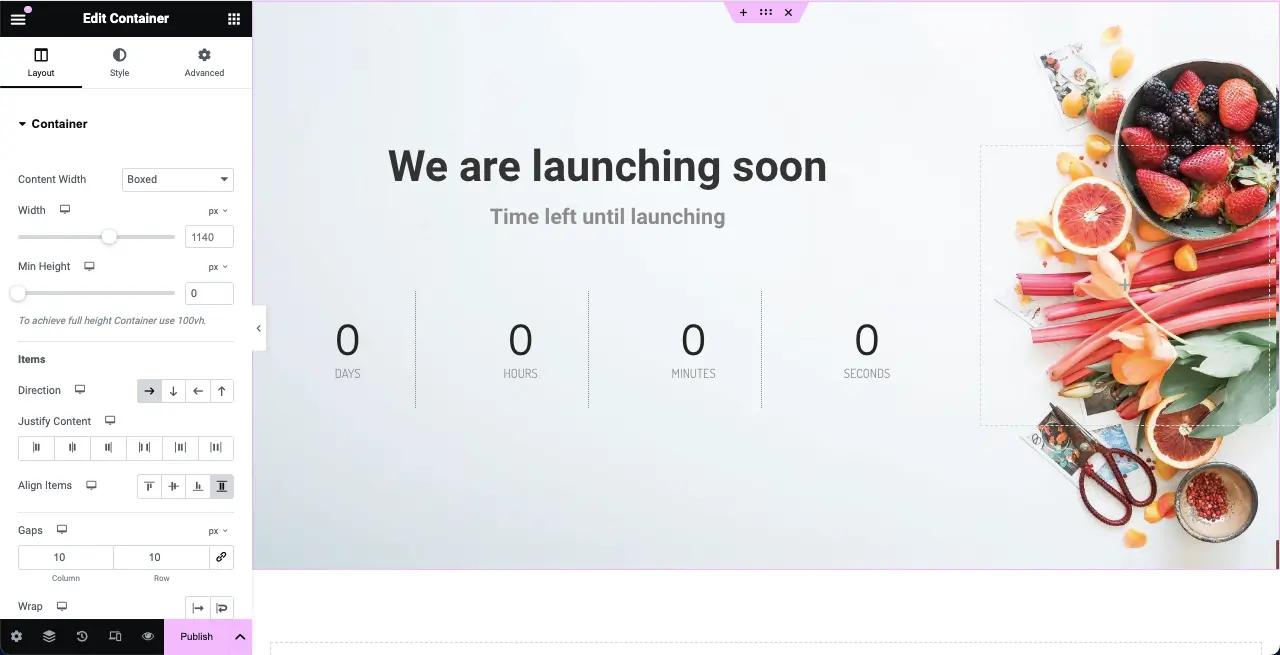
即將推出的頁面模板將在幾秒鐘內匯入畫布。 現在您可以透過新增的小部件和元素來修改它。
方法二:從頭開始建立即將推出的頁面
您將在 Elementor 面板中獲得許多有用的小部件,這將允許您從頭開始輕鬆建立即將推出的頁面。 我們將向您展示如何使用此方法進行操作。 讓我們先來看看創建即將推出的頁面所需的小部件。
現在,跳入教學。
步驟 01:選擇一個結構以在 Elementor 畫布上新增內容
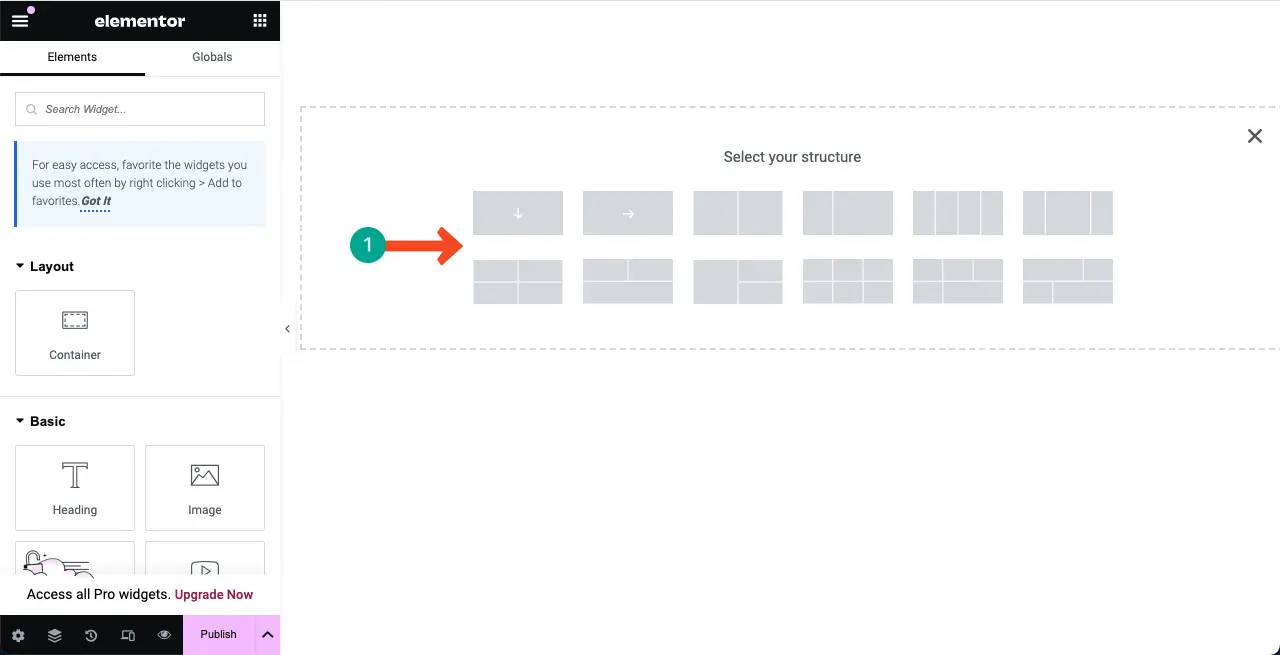
Elementor 發布了 Flexbox 容器及其更新 3.6。 它使使用 Elementor 添加內容和頁面設計變得非常容易。 在畫布上選擇 Flexbox 列結構,以便您可以新增小工具並設計即將推出的頁面。
我們將為本教學選擇第一個列結構。
步驟02:為結構列的背景新增顏色或影像
透過為列的背景添加合適的顏色,您可以創建一個充滿活力的環境來呈現即將推出的頁面的資訊和設計元素。
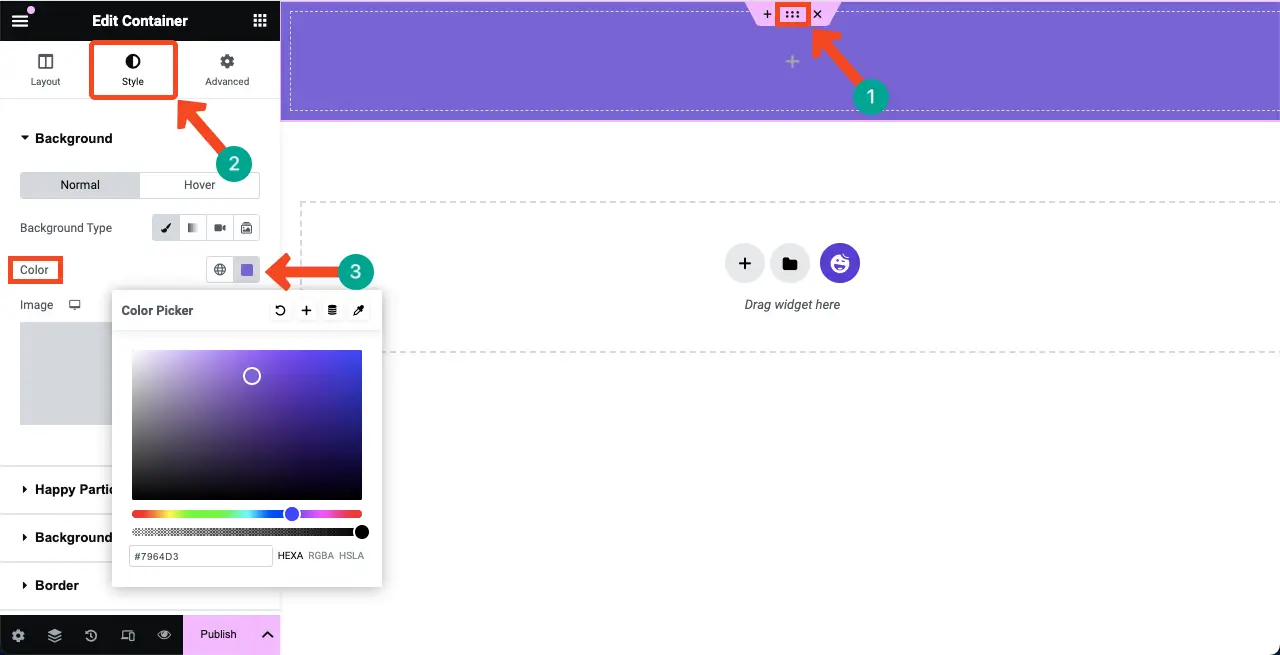
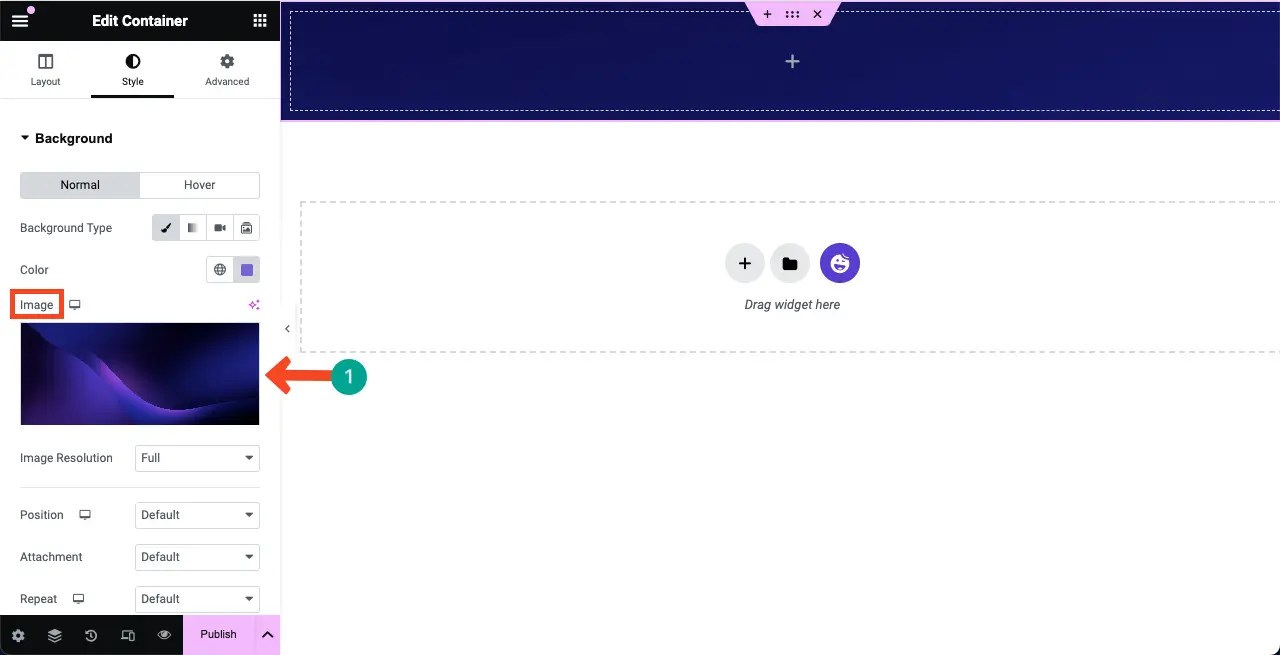
若要為列的背景新增顏色,請按一下列上的六點圖示。 轉到樣式選項卡。 點選選項卡下的顏色選項。
或者,您可以透過點擊「樣式」標籤下的「圖像」選項將圖像新增至背景。
步驟 03:在結構頂部新增間隔小工具
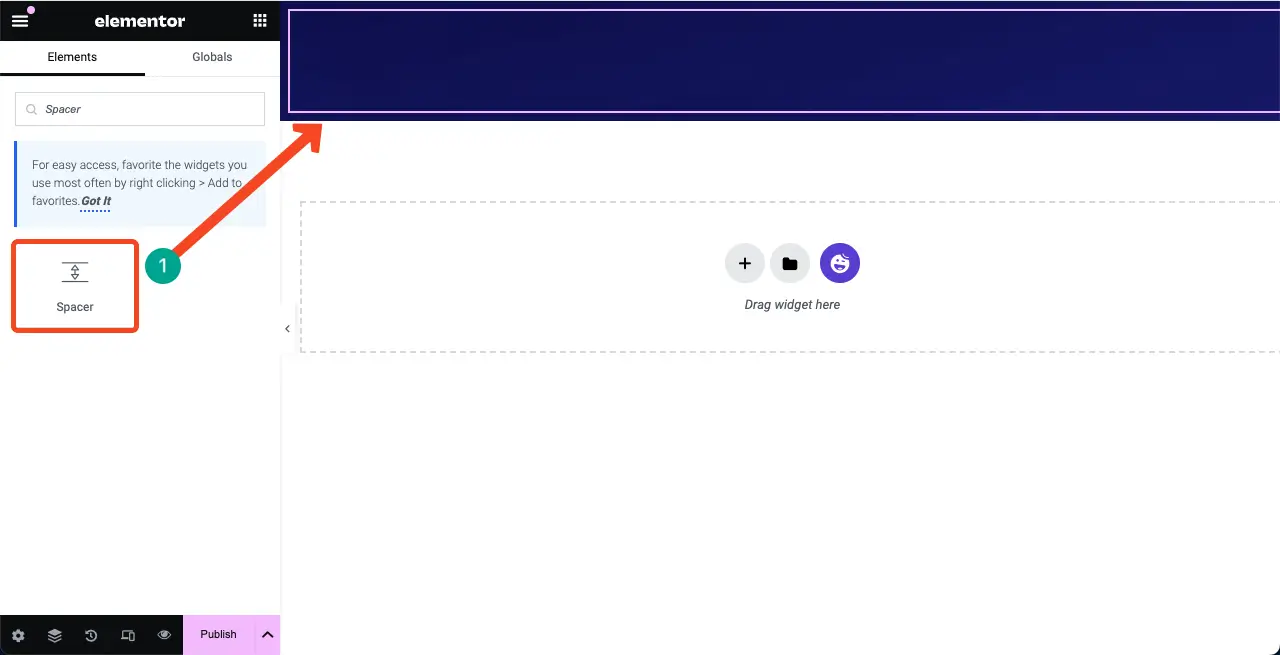
找到Spacer 小工具並將其新增至畫布上的選定區域。 它將在選定區域的頂部和其他部分之間創建一個空間。 否則,您的內容可能會與頂部邊緣對齊顯示,這看起來不太好。
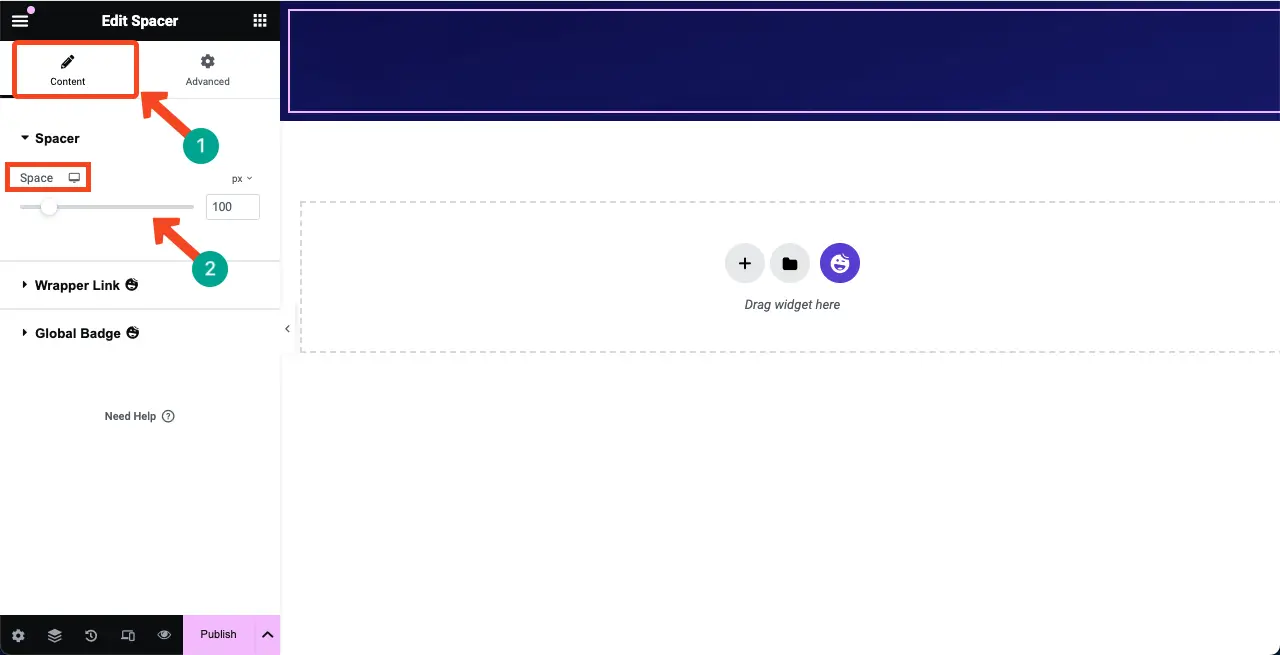
您可以從「內容」標籤自訂小工具的高度。
步驟04:將文字編輯器小工具新增到選定區域
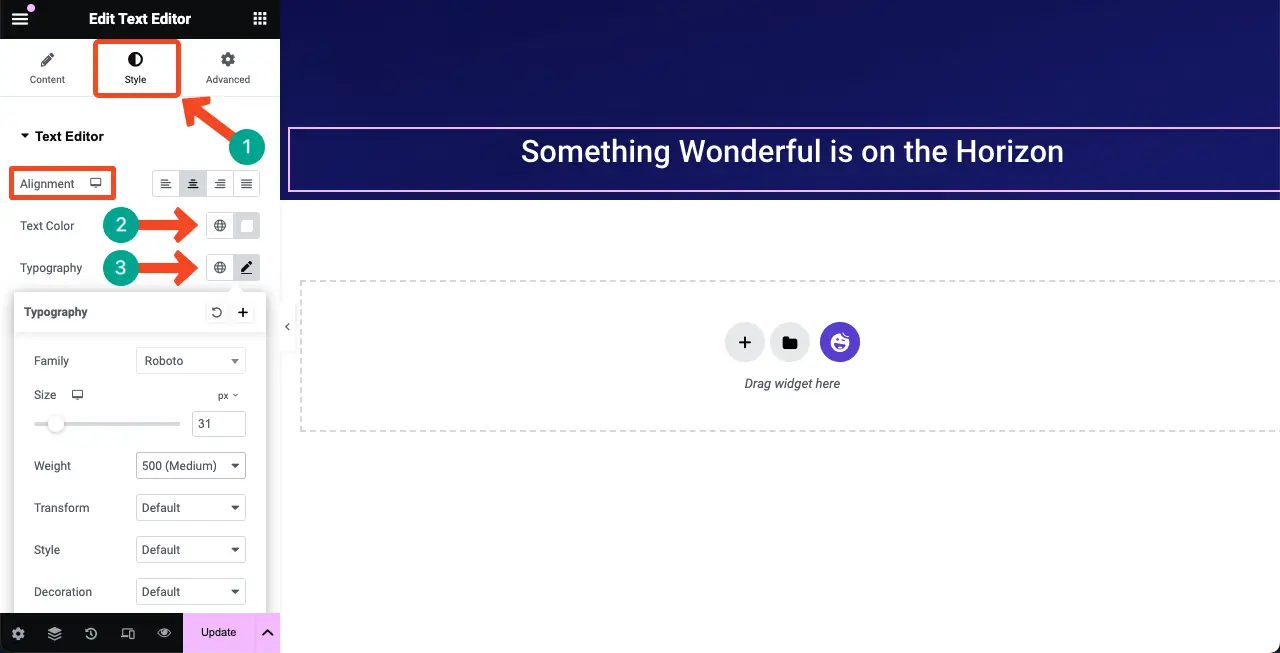
將文字編輯器小工具拖曳到畫布上所選區域。 它將允許您為即將到來的頁面撰寫副本。
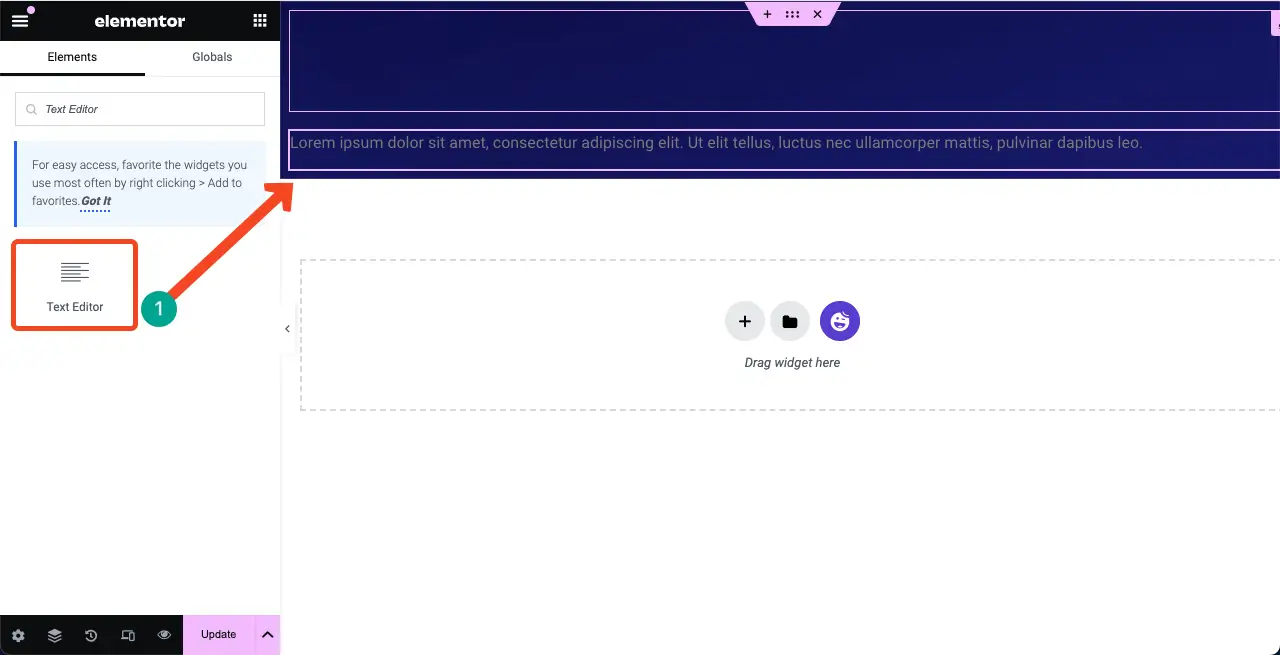
您可以看到我們在小部件上寫了一段文字。 之後,我們從「樣式」標籤自訂了其顏色、對齊方式、版式和字體粗細。
步驟 05:將倒數小工具加入 Elementor 畫布
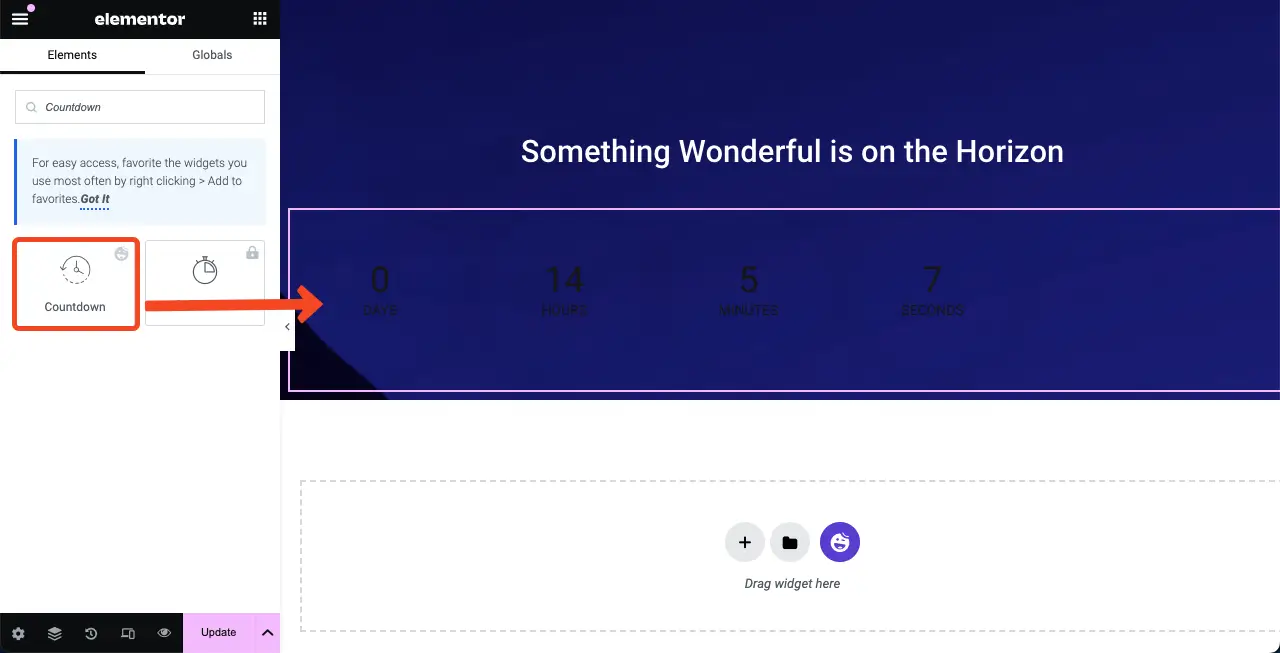
HappyAddons 有一個倒數小工具。 找到並將其添加到 Elementor 畫布中。
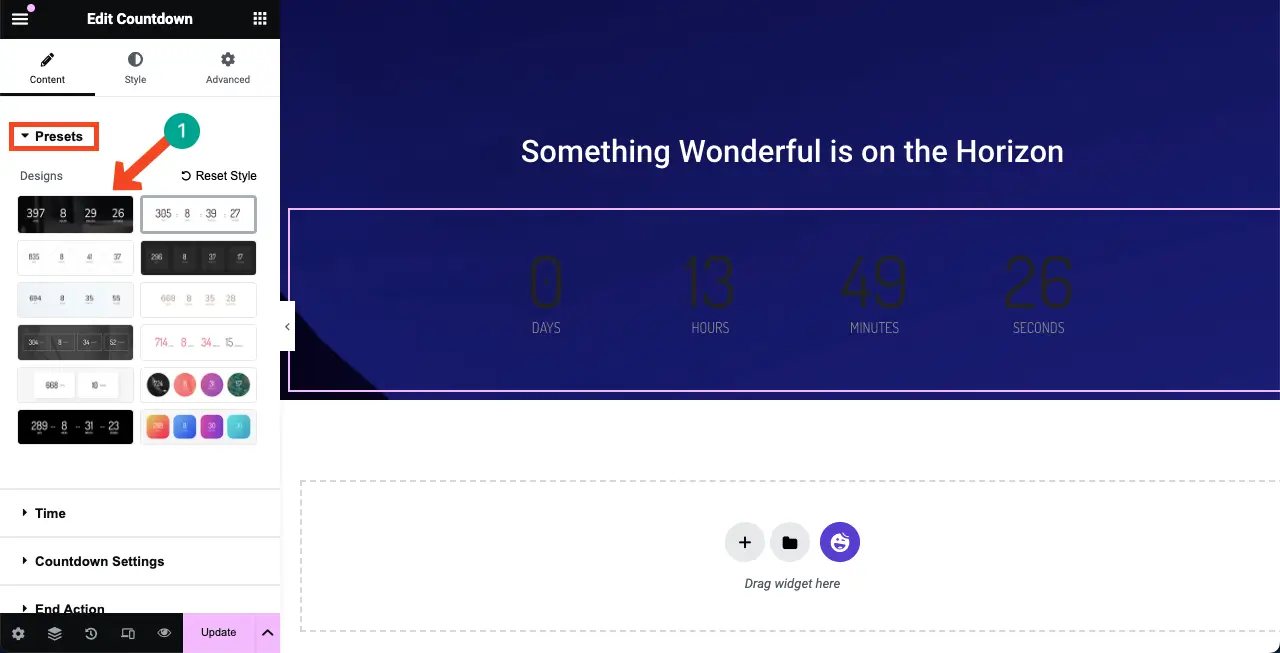
倒數小工具在預設部分下包含多個模板。 您可以選擇一個模板或從頭開始自訂它。 但是,我們將為教程選擇一個模板。

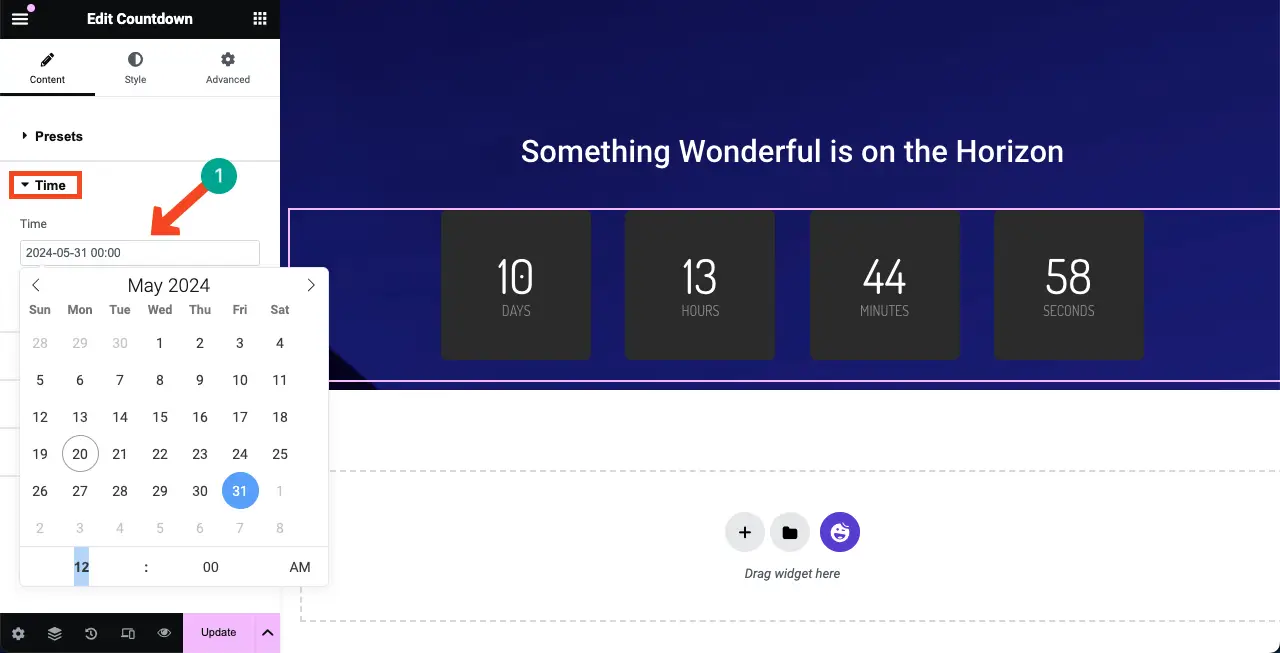
在「時間」部分,您可以設定倒數持續的時間。
從倒數計時設定中,您可以重寫倒數選項的標籤及其對齊方式。
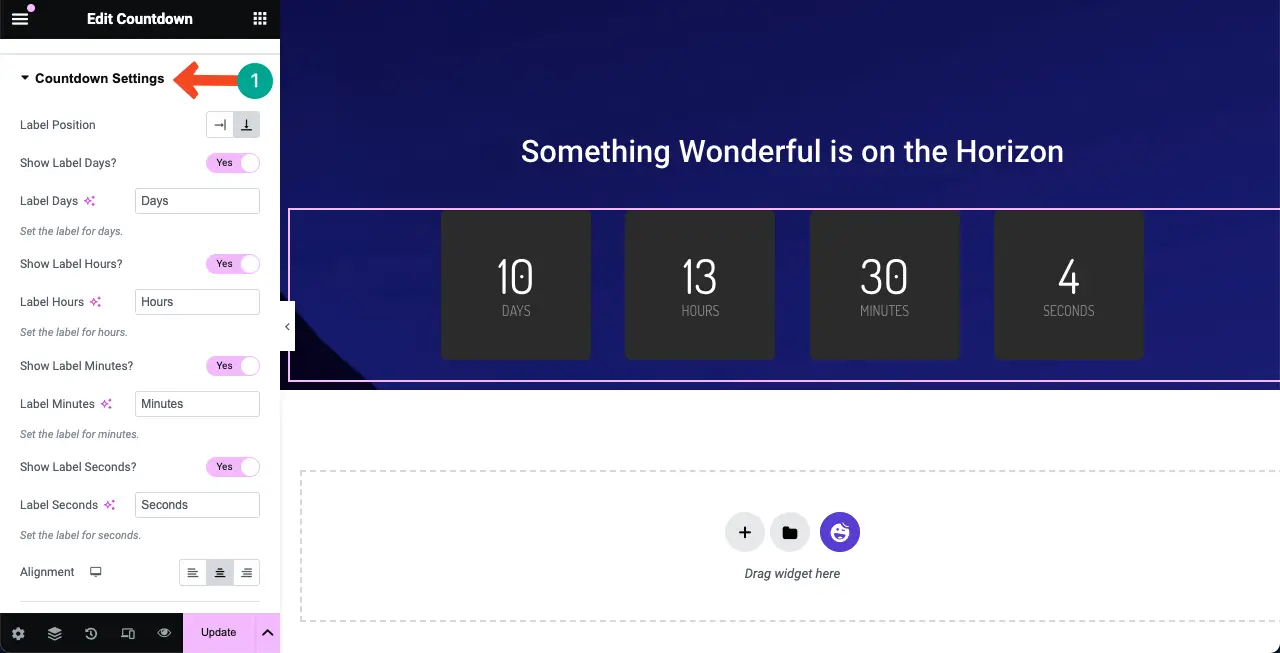
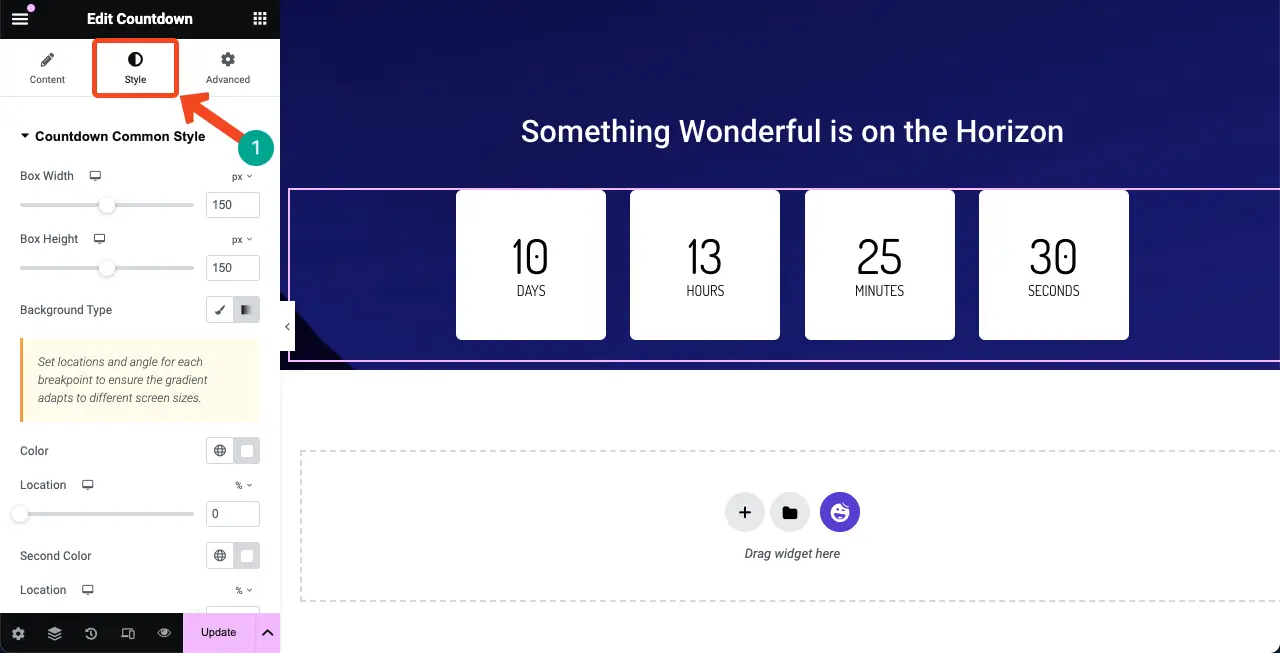
來到樣式標籤。 您將獲得使用相應設定對小部件進行風格化的選項。 您可以修改小工具顏色、字體大小、填滿、邊距等。
步驟06:新增聯絡表格
在即將推出的頁面中新增聯絡表單至關重要。 它允許您收集想要向您了解最新動態的興趣受眾的電子郵件 ID。 HappyAddons 與眾多表單產生器外掛程式集成,例如 Contact Form 7、WP Forms、Ninja Forms、Caldera Forms、weForms 等。
若要新增聯絡表單,請確保您在後端安裝了表單外掛程式。 在本教程中,我們安裝了 Contact Form 7 插件。 看看其他一些最好的 WordPress 外掛程式聯絡方式。
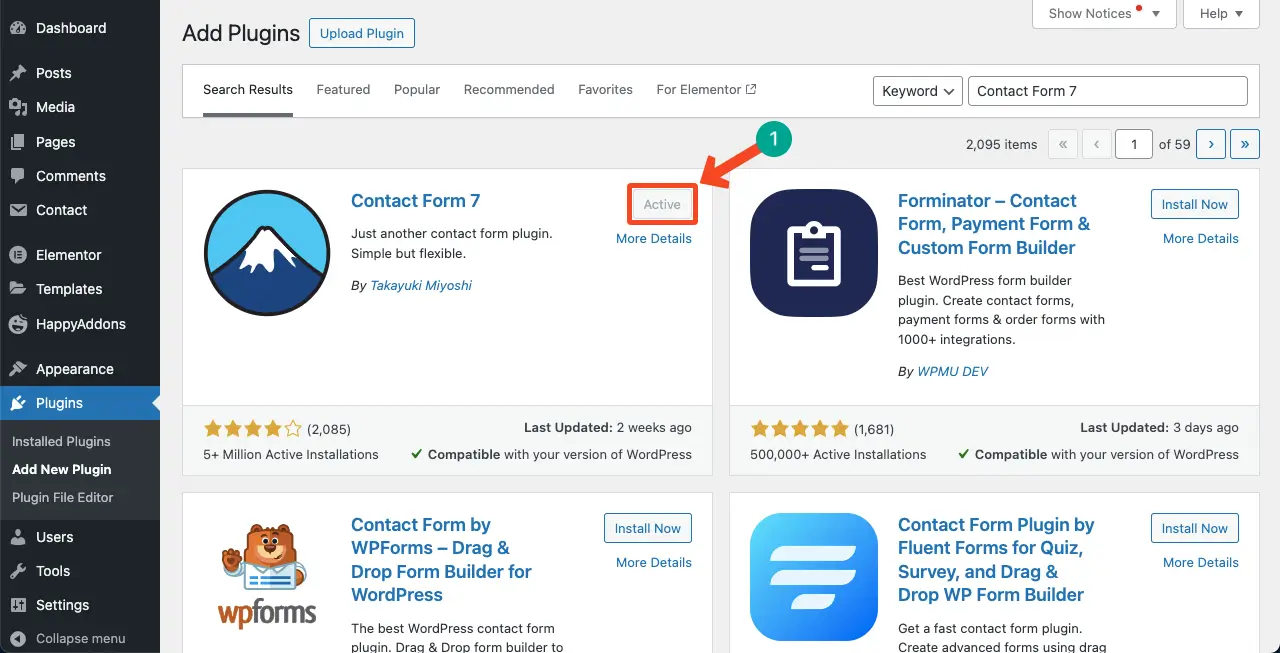
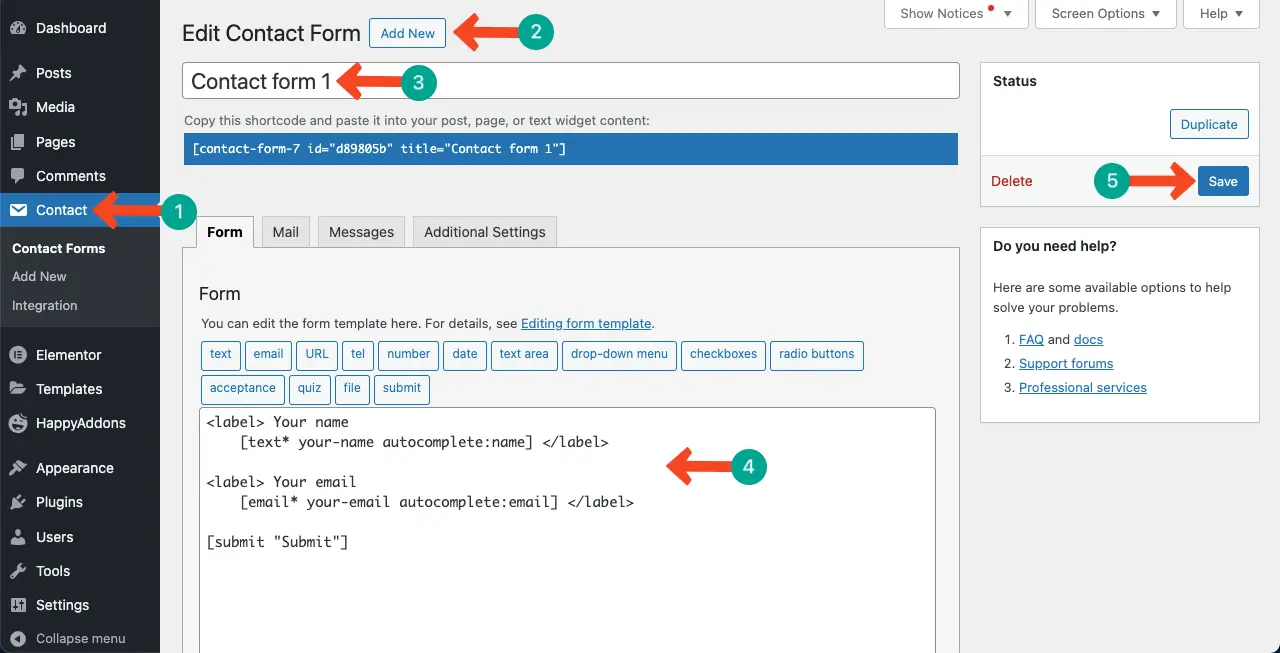
使用該插件建立聯絡表單。 我們可以看到我們已經創建了它並將其命名為Contact form 1 。
尋找Contact Form 7小工具並將其新增至 Elementor Canvas
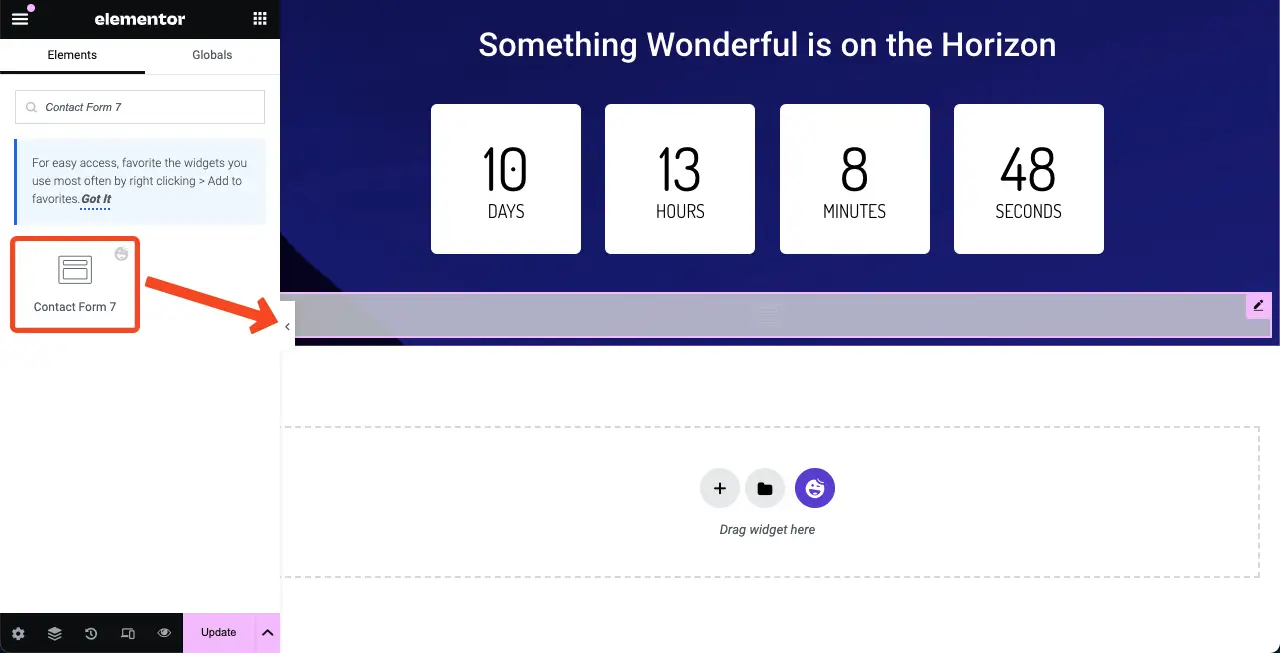
現在,您必須選擇要在畫布上顯示的聯絡表單。 前往內容 > 聯絡表 7 。 選擇您在後端建立的表單的名稱。 請觀看下面的影片來探索這個過程。
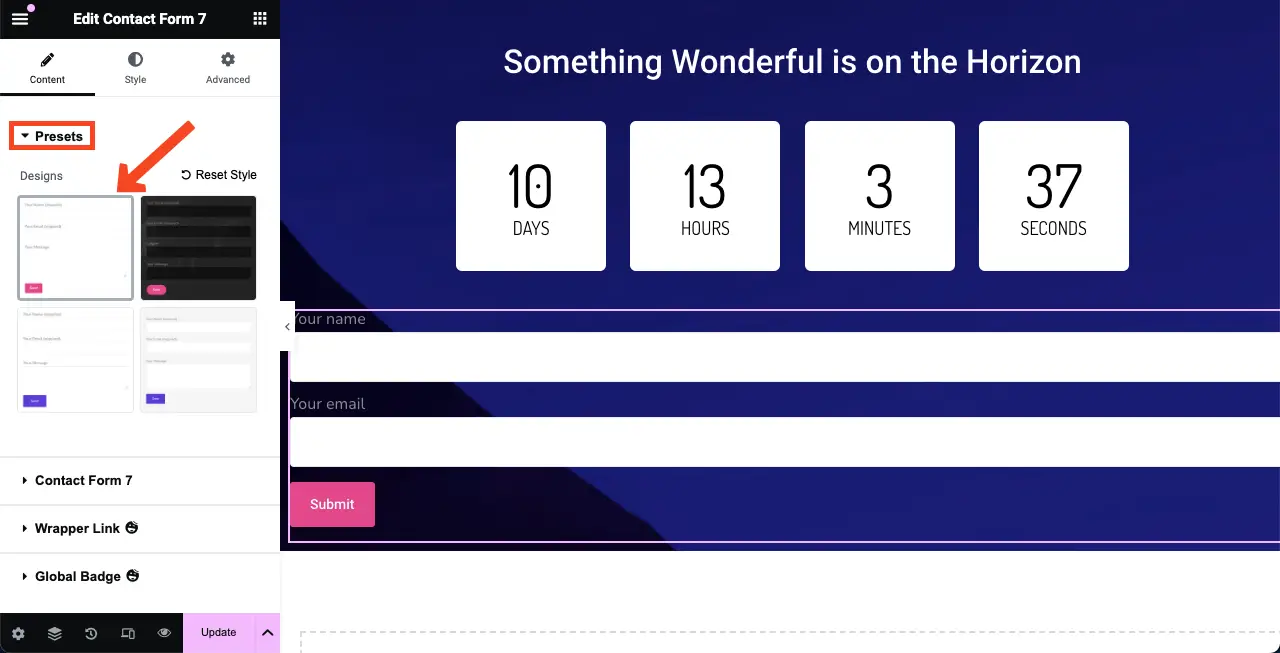
前往「內容」標籤下的「預設」選項,選擇聯絡表單的範本。
# 風格化聯絡表
正如您所看到的,接觸形式過寬,這與設計不符。 您可以按住表單的右邊緣並向左拖曳來減少表單的寬度。
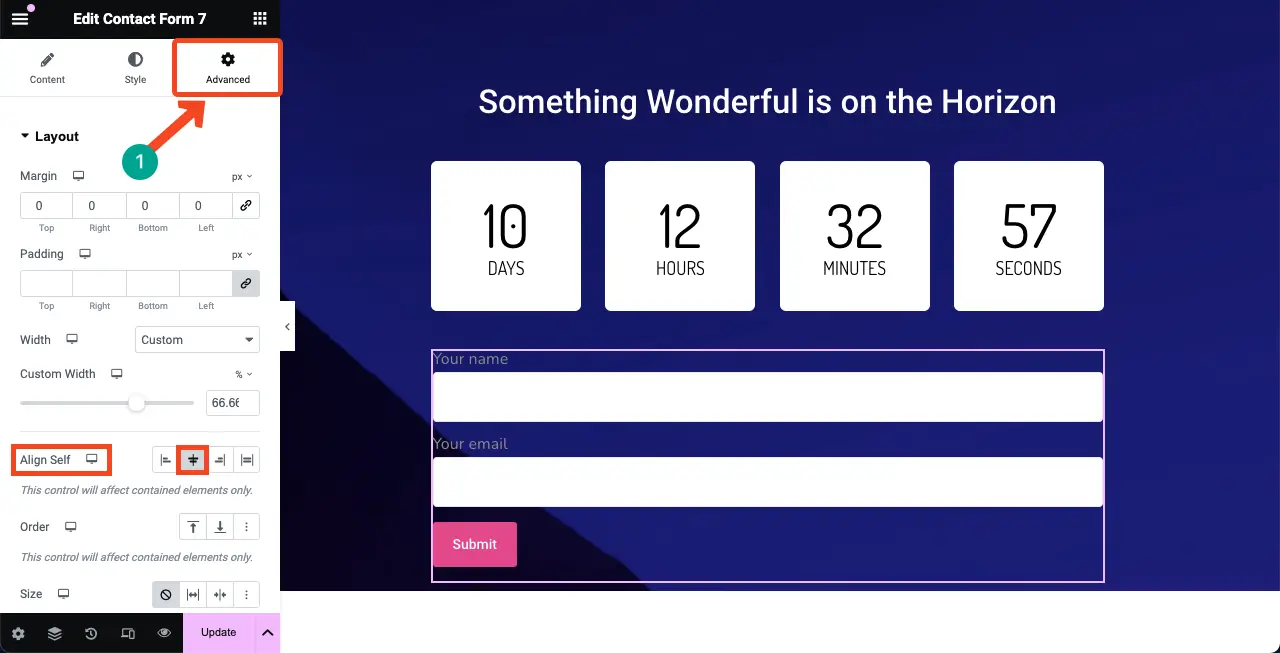
轉到“進階”選項卡。 您將在其下方看到“自我對齊”選項。 從這裡,您可以選擇居中對齊選項以在畫布的中間部分展示表單。
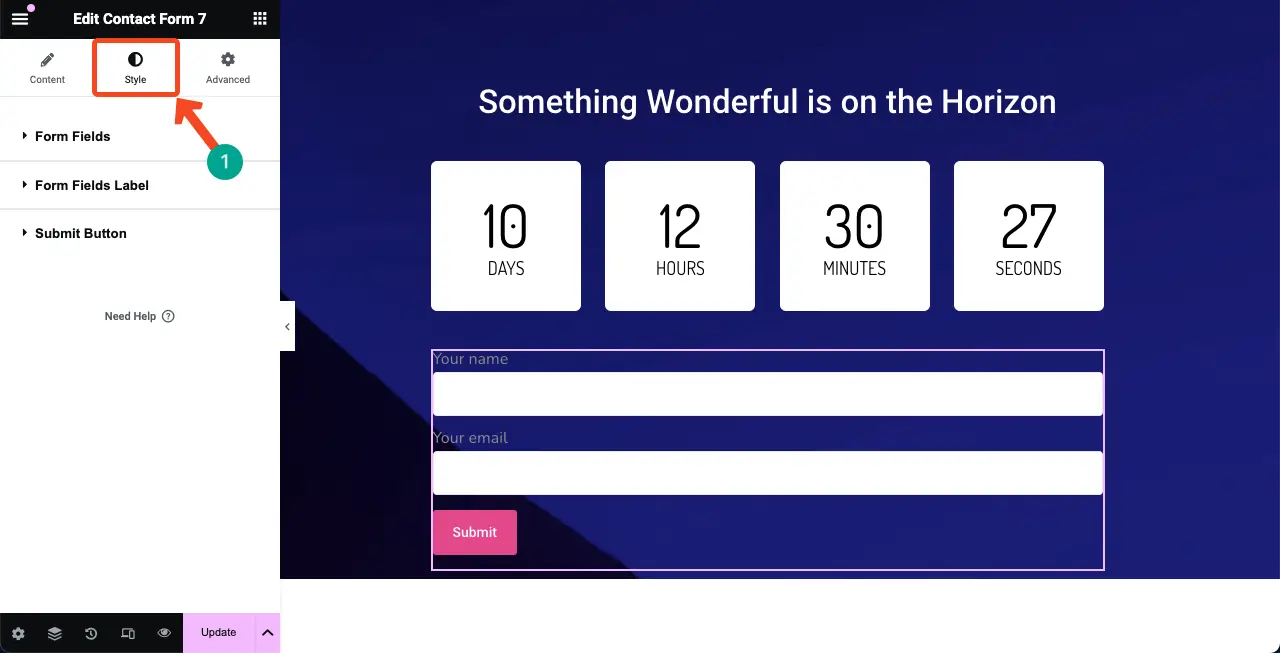
來到樣式標籤。 您將在此標籤中獲得選項來自訂標籤顏色-大小-粗細、佔位符顏色、字體大小和 CTA 按鈕。
我們在這裡不解釋細節。 希望你能自己做。
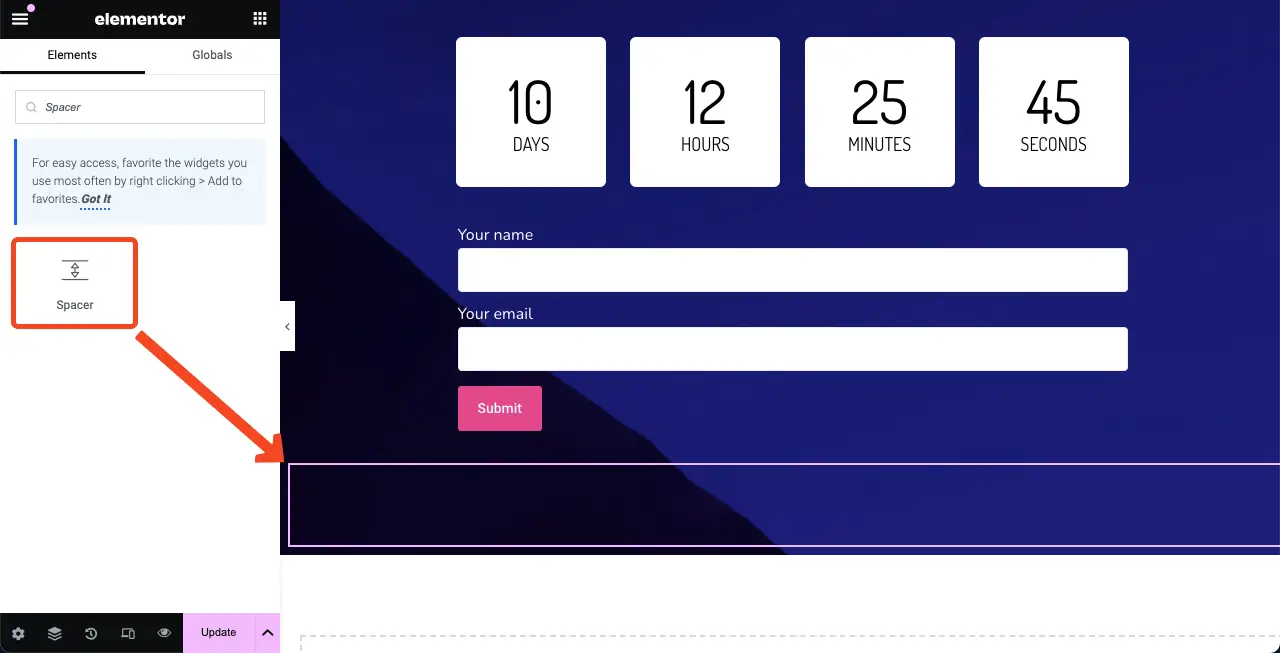
步驟07:在末端新增間隔小工具
再次添加 Spacer 小工具以在畫布底線和主要內容之間創建一個空間。 這將使即將推出的頁面設計看起來不錯。
步驟08:新增「即將推出」文本
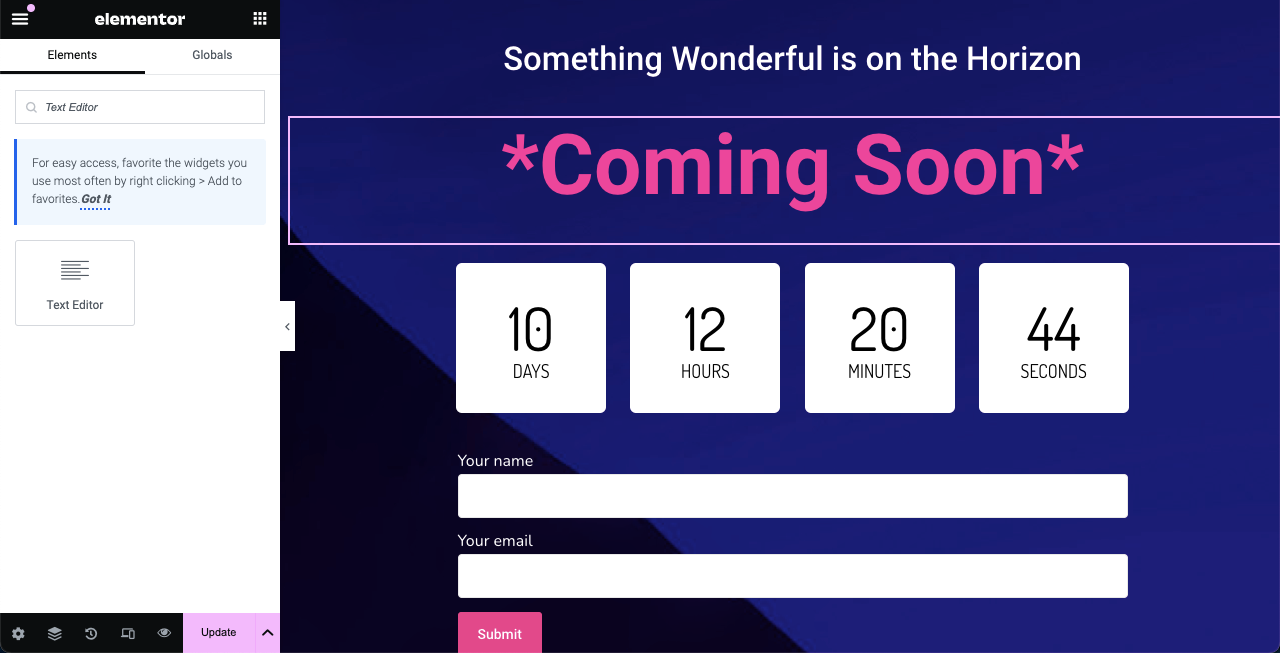
嘿,由於這是一個即將推出的頁面,因此您必須將“即將推出”添加到畫布中,以使您的設計更有意義。 我們忘記在一開始就添加它。 但一旦發現,採取正確的行動永遠不嫌晚。
使用文字編輯器小工具,您可以輕鬆地將「即將推出」文字新增至畫布。 見下圖; 我們已經做到了。
步驟 09:使即將推出的頁面具有行動響應能力
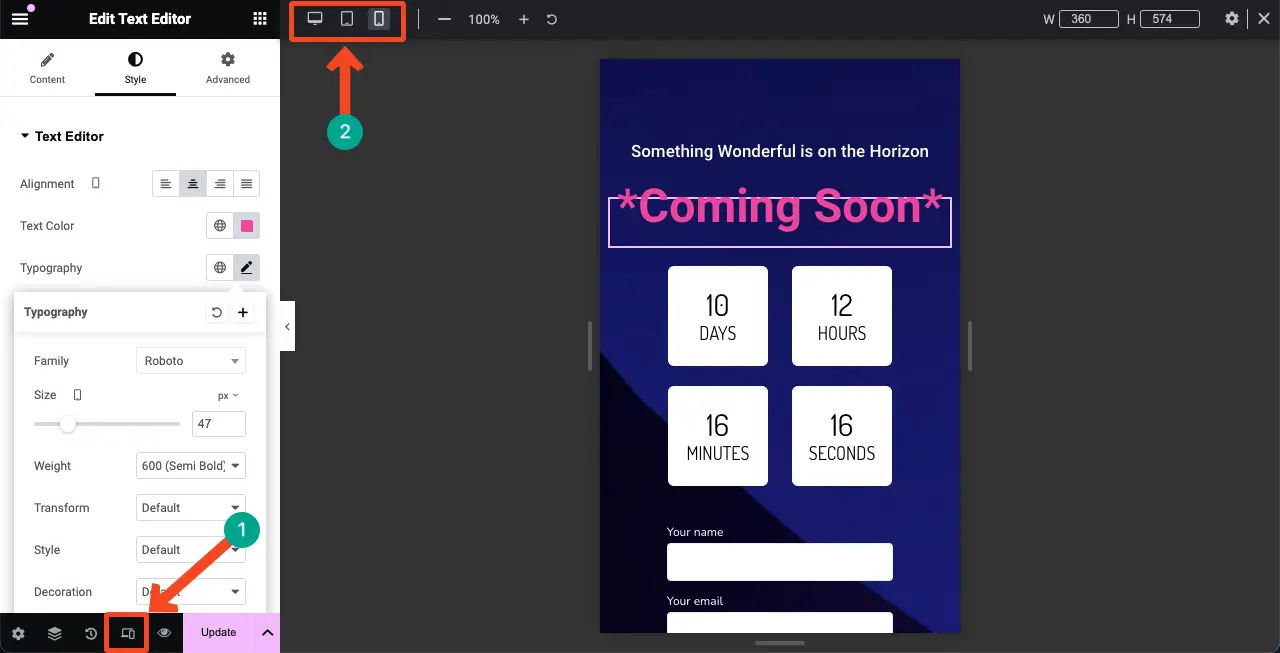
由於行動裝置和平板電腦裝置的螢幕寬度相對較窄,因此您必須縮小頁面元素的尺寸,使其完美適合螢幕。
按一下 Elementor 面板頁腳的「回應模式」選項。 它將打開根據設備在不同斷點之間切換的選項。
無論您切換到什麼設備,都可以自訂內容以使其完美適合螢幕尺寸。 將針對該裝置的螢幕尺寸儲存自訂詳細資訊。
注意:不要刪除任何螢幕上的任何元素; 它將同樣適用於所有設備模式。
檢查如何使 Elementor 網站具有行動響應能力。
第10步:保存設計
設計完成後,按一下 Elementor 面板上的「發布」或「更新」按鈕以儲存設計和所有變更。
注意:使用適當的名稱(例如「即將推出」)儲存頁面,以便您以後需要時可以找到它。
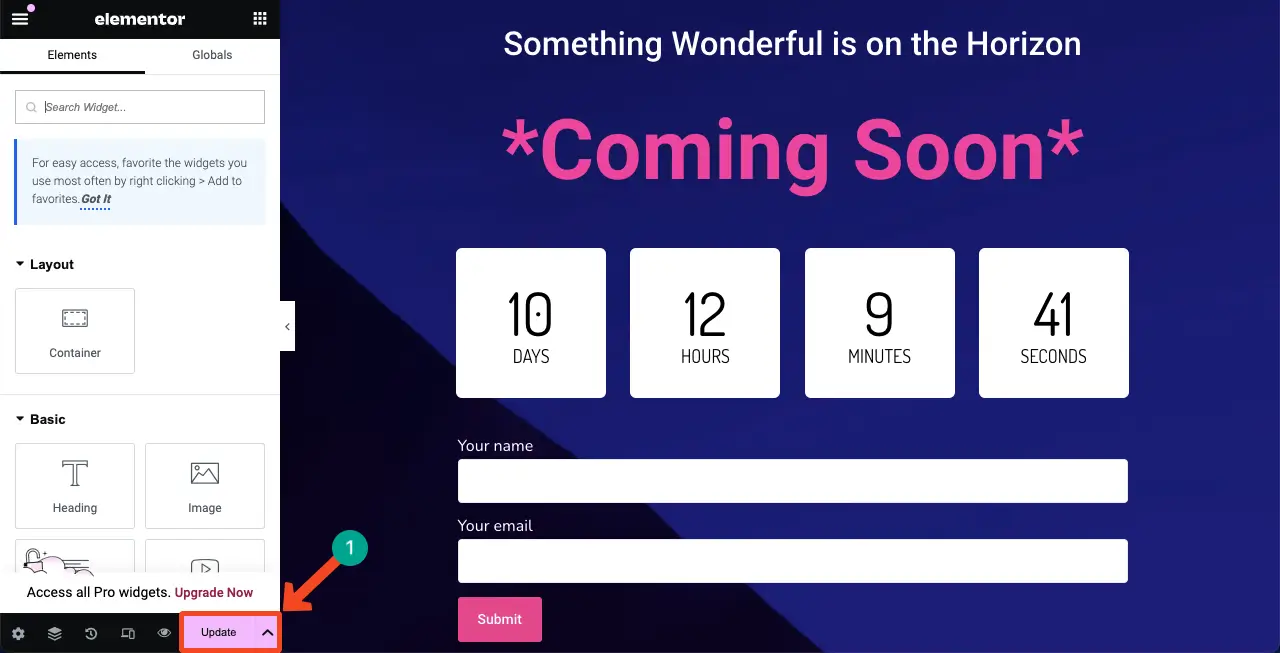
因此,您可以使用 Elementor 建立即將推出的頁面。 現在您可以將其用作即將推出的登陸頁面或模板。 此範本可以匯入並在使用 Elementor 建置的其他網站上使用。
如何在 WordPress 中啟用 Elementor 即將推出
到目前為止,您剛剛使用 Elementor 設計了「即將推出」頁面。 現在您必須完成更多配置才能將其顯示在前端。 前往您的WordPress 儀表板。 導覽至Elementor > 工具 > 維護模式。
從選擇模式選項中選擇維護。
從「誰可以訪問」中,您可以定義誰將看到即將推出的頁面。
接下來,從「選擇範本」選項中選擇您剛剛建立的頁面。
點擊最後的“儲存變更”按鈕。
您將看到維護模式已被激活,並且您的頁面將顯示在前端。
包起來!
總而言之,在 WordPress 中使用 Elementor 設定即將推出的頁面是完成網站時保持受眾參與度的絕佳方法。 使用 Elementor,您可以輕鬆建立頁面,同時保持頁面引人注目且功能齊全。
儘管新增聯絡表單不是強制性的,但我們建議您透過新增由強大外掛程式支援的聯絡表單來完成頁面,這樣您就不會錯過潛在的潛在客戶。 如果您遇到任何問題,只需在評論框中輸入或透過我們的聊天框將其發送給我們的支援人員。
