
第 6 部分 – WordPress 和面向对象编程:一个 WordPress 示例 – 实现:注册部分
已发表: 2022-02-04欢迎回到我们的面向对象编程系列。
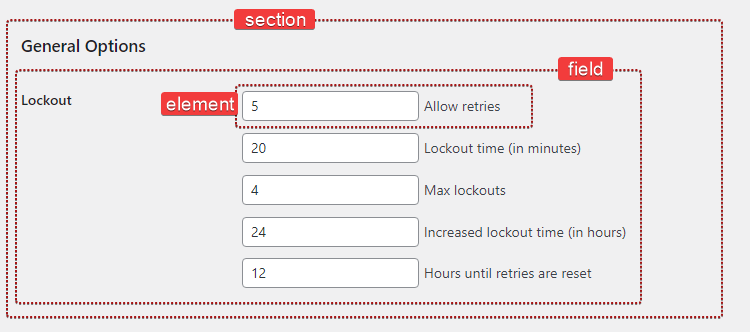
正如我们在本系列的设计部分中所解释的,管理页面由多个部分组成。 每个部分都包含一个或多个字段,并且每个字段都包含一个或多个元素。
这在代码中看起来如何?
public function register_sections() { $my_section = $this->register_section( /* ... */ ); $my_field = $my_section->add_field( /* ... */ ); $my_element = $my_field->add_element( /* ... */ ); } 好吧,这看起来很容易使用,我们已经可以看出我们可能需要创建三个新类: Section 、 Field和Element 。
class Section {} class Field {} class Element {}让我们花点时间问问自己,到目前为止我们对这些课程了解多少。
-
$my_section->add_field()→Section类应该能够添加(和存储)一个新的Field对象 $my_field->add_element()→Field类应该能够添加(和存储)一个新的Element对象。
我们首先将我们的 Field 对象存储在一个数组中,就像我们通常做的那样:
class Section { /** * @var Field[] Section field objects. */ protected $fields = array(); 这个$fields变量是一个类成员,它就是我们所说的属性。 属性是 PHP 变量,存在于一个类中,它们可以是任何数据类型( string 、 integer 、 object等)。
我们还将编写add_field()方法来创建和添加新字段。
public function add_field() { $field = new Field( /* ... */ ); $this->fields[] = $field; return $field; } 此方法创建一个新的Field对象,将其添加到 fields 属性并返回该新创建的对象。 很简单。
让我们对Field类也重复相同的过程。
class Field { /** * @var Element[] Field elements. */ private $elements = array(); /** * Create a new element object. * * @return Element */ private function create_element() { return new Element( /* ... */ ); } /** * Add a new element object to this field. */ public function add_element() { $element = $this->create_element(); $this->elements[] = $element; } }那是一个开始! 下一步是什么?
部分类
创建新部分时,我们需要调用 add_settings_section()。 再一次,构造方法是执行初始化的好方法。 让我们在类中添加它:
class Section { // ... public function __construct() { add_settings_section( $this->id, $this->title, array( $this, 'print_description' ), $this->page ); } }似乎 Section 需要一个 slug-name 来标识它(用于标签的 id 属性)。 它还可以有标题、描述和属于特定页面。
class Section { /** * @var Field[] Section field objects. */ protected $fields = array(); /** * @var string Section title. */ public $title; /** * @var string Section id. */ public $id; /** * @var string Slug-name of the settings page this section belongs to. */ public $page; /** * @var string Section description. */ public $description;我们可以通过执行以下操作来设置部分的标题:
$section = new Section(); $section->title = __( 'Hello world', 'prsdm-limit-login-attempts' );嗯,这不太对。 尽管上面的代码是完全有效的,但它实际上并没有做我们期望它做的事情。
构造函数方法在创建新的 Section 对象时执行。 所以add_settings_section()将在我们有机会设置标题之前被调用。 因此,该部分将没有标题。

使用 Pressidium 托管您的网站
60 天退款保证
标题需要在我们的对象初始化期间可用,因此我们需要在构造函数中执行此操作。
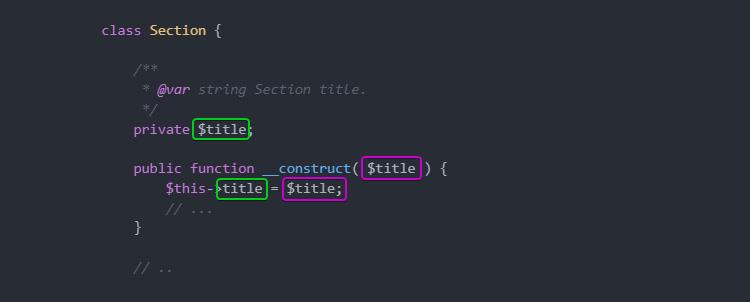
class Section { /** * @var string Section title. */ private $title; public function __construct( $title ) { $this->title = $title; // ... } // .. 注意$this->title指的是 title 类属性,其中$title指的是构造函数的参数。
在这里,我们还利用了可见性。 由于我们的$title属性只能被定义它的类访问,我们可以将其声明为private 。 因此,我们阻止它在类外被访问。
哦,我们还必须添加一个print_description()方法,该方法将打印该部分的描述。
/** * Print the section description. */ public function print_description() { echo esc_html( $this->description ); }总而言之,我们的 Section 类看起来像这样。
class Section { /** * @var Field[] Section field objects. */ protected $fields = array(); /** * @var string Section title. */ private $title; /** * @var string Section id. */ private $id; /** * @var string Slug-name of the settings page this section belongs to. */ private $page; /** * @var string Section description. */ private $description; /** * Section constructor. * * @param string $id Section id. * @param string $title Section title. * @param string $page Slug-name of the settings page. * @param string $description Section description. */ public function __construct( $id, $title, $page, $description ) { $this->id = $id; $this->title = $title; $this->page = $page; $this->description = $description; add_settings_section( $this->id, $this->title, array( $this, 'print_description' ), $this->page ); } /** * Print the section description. */ public function print_description() { echo esc_html( $this->description ); } /** * Create and add a new field object to this section. */ public function add_field() { $field = new Field( /* ... */ ); $this->fields[] = $field; return $field; } }字段类
以与Section类似的方式,我们现在可以继续并构建Field类,它将利用add_settings_field() WordPress 函数。
class Field { /** * @var Element[] Field elements. */ private $elements = array(); /** * @var string ID of the section this field belongs to. */ private $section_id; /** * @var string Field description. */ private $description; /** * Field constructor. * * @param string $id Field ID. * @param string $label Field label. * @param string $page Slug-name of the settings page. * @param string $section_id ID of the section this field belongs to. * @param string $description Field description. */ public function __construct( $id, $label, $page, $section_id, $description ) { $this->section_id = $section_id; $this->description = $description; add_settings_field( $id, $label, array( $this, 'render' ), $page, $this->section_id ); } }在这里,我们还想为字段的 ID、标签和描述提供默认值。 我们可以通过将选项数组传递给构造函数并使用 wp_parse_args() WordPress 函数来解析这些选项来做到这一点。
class Field { /** * @var int Number of fields instantiated. */ private static $number_of_fields = 0; // ... /** * Field constructor. * * @param string $section_id ID of the section this field belongs to. * @param string $page Slug-name of the settings page. * @param array $options Options. */ public function __construct( $section_id, $page, $options = array() ) { self::$number_of_fields++; $options = wp_parse_args( $options, array( 'label' => sprintf( __( 'Field #%s', 'prsdm-limit-login-attempts' ), self::$number_of_fields 'id' => 'field_' . self::$number_of_fields, 'description' => '' ) ); $this->section_id = $section_id; $this->description = $options['description']; add_settings_field( $options['id'], $options['label'], array( $this, 'render' ), $page, $this->section_id ); } } wp_parse_args() 函数将允许我们将用户定义的值( $options数组)与默认值合并。
array( 'label' => sprintf( __( 'Field #%s', 'prsdm-limit-login-attempts' ), self::$number_of_fields 'id' => 'field_' . self::$number_of_fields, 'description' => '' ) 我们还必须为每个字段设置唯一的标签。 我们可以通过将标签设置为前缀( 'field_' )后跟一个数字来处理这个问题,每次创建新的 Field 对象时都会增加该数字。 我们将把这个数字存储在$number_of_fields静态属性中。
/** * @var int Number of fields instantiated. */ private static $number_of_fields = 0;可以直接访问静态属性,而无需先创建类的实例。
'id' => 'field_' . self::$number_of_fields self关键字用于引用当前类,并且在范围解析运算符:: :(通常称为“双冒号”)的帮助下,我们可以访问我们的静态属性。
这样,在构造函数中,我们总是访问相同的$number_of_fields属性,每次创建对象时都会增加它的值,从而为每个字段附加一个唯一的标签。
展望未来, render()方法在打印描述(如果存在)之后,会遍历所有元素并渲染它们中的每一个。
public function render() { if ( ! empty( $this->description ) ) { printf( '<p class="description">%s</p>', esc_html( $this->description ) ); } foreach ( $this->elements as $key => $element ) { $element->render(); } }把它们放在一起……
class Field { /** * @var int Number of fields instantiated. */ private static $number_of_fields = 0; /** * @var Element[] Field elements. */ private $elements = array(); /** * @var string ID of the section this field belongs to. */ private $section_id; /** * @var string Field description. */ private $description; /** * Field constructor. * * @param string $section_id ID of the section this field belongs to. * @param string $page Slug-name of the settings page. * @param array $options Options. */ public function __construct( $section_id, $page, $options = array() ) { self::$number_of_fields++; $options = wp_parse_args( $options, array( 'label' => sprintf( /* translators: %s is the unique s/n of the field. */ __( 'Field #%s', 'prsdm-limit-login-attempts' ), self::$number_of_fields 'id' => 'field_' . self::$number_of_fields, 'description' => '' ) ); $this->section_id = $section_id; $this->description = $options['description']; add_settings_field( $options['id'], $options['label'], array( $this, 'render' ), $page, $this->section_id ); } /** * Create a new element object. * * @return Element */ private function create_element() { return new Element( /* ... */ ); } /** * Add a new element object to this field. */ public function add_element() { $element = $this->create_element(); $this->elements[] = $element; } /** * Render the field. */ public function render() { if ( ! empty( $this->description ) ) { printf( '<p class="description">%s</p>', esc_html( $this->description ) ); } foreach ( $this->elements as $key => $element ) { $element->render(); } } }元素类
展望未来,我们将以类似的方式构建Element类!

我们将开始编写这样的类:
class Element { /** * @var int Number of elements instantiated. */ private static $number_of_elements = 0; /** * @var string Element label. */ private $label; /** * @var string Element name. */ private $name; /** * @var mixed Element value. */ private $value; /** * Element constructor. * * @param string $section_id Section ID. * @param array $options Options. */ public function __construct( $section_id, $options = array() ) { self::$number_of_elements++; $options = wp_parse_args( $options, array( 'label' => sprintf( /* translators: %s is the unique s/n of the element. */ __( 'Element #%s', 'prsdm-limit-login-attempts' ), self::$number_of_elements ), 'name' => 'element_' . self::$number_of_elements ) ); $this->label = $options['label']; $this->name = $options['name']; $this->value = ''; } /** * Render the element. */ public function render() { ?> <fieldset> <label> <input type="number" name="<?php echo esc_attr( $this->name ); ?>" value="<?php echo esc_attr( $this->value ); ?>" /> <?php echo esc_html(); ?> </label> </fieldset> <?php } }确保您正在转义您的输出——就像我们在这里所做的那样,使用 esc_attr() 和 esc_html() WordPress 函数——以防止任何跨站点脚本攻击。 即使我们只在管理页面中呈现我们的元素,始终转义任何输出数据仍然是一个好主意。
注意:跨站点脚本(或 XSS)是一种通常在 Web 应用程序中发现的安全漏洞。 XSS 使攻击者能够将客户端代码注入其他用户查看的网页中。 攻击者可能会利用跨站脚本漏洞绕过同源策略等访问控制。
当我们收集插件的需求时,我们注意到有多种元素类型——复选框、单选按钮、数字字段等。当我们提出我们的设计时,我们决定构建一个旨在扩展的Element类。 所以,我们知道我们最终会为每个元素类型创建一个子类。
输出应根据元素类型而有所不同,因此我们将render()转换为抽象方法。 当然,这意味着类本身也应该是抽象的。
abstract class Element { /** * @var int Number of elements instantiated. */ private static $number_of_elements = 0; /** * @var string Element label. */ protected $label; /** * @var string Element name. */ protected $name; /** * @var mixed Element value. */ protected $value; /** * Element constructor. * * @param string $section_id Section ID. * @param array $options Options. */ public function __construct( $section_id, $options = array() ) { self::$number_of_elements++; $options = wp_parse_args( $options, array( 'label' => sprintf( /* translators: %s is the unique s/n of the element. */ __( 'Element #%s', 'prsdm-limit-login-attempts' ), self::$number_of_elements ), 'name' => 'element_' . self::$number_of_elements ) ); $this->label = $options['label']; $this->name = $options['name']; $this->value = ''; } /** * Render the element. */ abstract public function render(); } 例如,一个Number_Element类看起来像这样:
class Number_Element extends Element { /** * Render the element. */ public function render() { ?> <fieldset> <label> <input type="number" name="<?php echo esc_attr( $this->name ); ?>" value="<?php echo esc_attr( $this->value ); ?>" /> <?php echo esc_html(); ?> </label> </fieldset> <?php } } 同样,我们可以为其余元素构建一个Checkbox_Element 、一个Radio_Element甚至一个Custom_Element类。
请注意,我们正在构建我们的类,因此它们都可以以相同的方式使用。 在 Element 的任何子节点上调用render()方法都会输出一些 HTML。
这是多态性的一个例子,它是面向对象编程的核心概念之一。
多态性
“多态性”的字面意思是“多种形式”(来自希腊语“poly”的意思是“许多”,“morphe”的意思是“形式”)。 Element 子类可以有多种形式,因为它可以采用其父层次结构中的任何形式的类。
我们可以在任何需要Element对象的地方使用Number_Element 、 Checkbox_Element或任何其他子类型,因为所有子对象都可以以完全相同的方式使用(即调用它们的render()方法),同时仍然能够表现不同(每种元素类型的输出会有所不同)。
您可能会说,多态性和继承是密切相关的概念。
可替代性
Liskov 替换原则(或 LSP) ,即 SOLID 中的“L”,指出:
“在计算机程序中,如果 S 是 T 的子类型,则类型 T 的对象可以替换为类型 S 的对象(即,类型 T 的对象可以替换为子类型 S 的任何对象)而不改变任何程序的理想属性。”
用外行的话来说,您应该能够使用任何子类代替其父类,而不会出现任何意外行为。
工厂
让我们回到我们的Field类,我们目前有一个create_element()方法创建一个新的Element 。
/** * Create a new element object. * * @return Element */ private function create_element() { return new Element( /* ... */ ); } /** * Add a new element object to this field. */ public function add_element() { $element = $this->create_element(); $this->elements[] = $element; }返回新对象的方法通常称为简单工厂(不要与“工厂方法”混淆,后者是一种设计模式)。
知道任何子类型都可以用来代替Element父类,我们将继续修改这个工厂,以便它能够创建任何子类的对象。
/** * Create a new element object. * * @throws Exception If there are no classes for the given element type. * @throws Exception If the given element type is not an `Element`. * * @param string $element_type * @param array $options * * @return Element */ private function create_element( $element_type, $options ) { $element_type = __NAMESPACE__ . '\\Elements\\' . $element_type; if ( ! class_exists( $element_type ) ) { throw new Exception( 'No class exists for the specified type' ); } $element = new $element_type( $this->section_id, $options ); if ( ! ( $element instanceof Element ) ) { throw new Exception( 'The specified type is invalid' ); } return $element; } /** * Add a new element object to this field. * * @param string $element_type * @param array $options */ public function add_element( $element_type, $options ) { try { $element = $this->create_element( $element_type, $options ); $this->elements[] = $element; } catch ( Exception $e ) { // Handle the exception } }我们首先在元素类型前加上当前名称:
$element_type = __NAMESPACE__ . '\\Elements\\' . $element_type; __NAMESPACE__魔术常量包含当前命名空间名称。
然后,我们确保有一个指定元素类型的类:
if ( ! class_exists( $element_type ) ) { throw new Exception( 'No class exists for the specified type' ); }接下来,我们创建一个新对象:
$element = new $element_type( $this->section_id, $options );最后,我们确保新创建的对象确实是 Element 的一个实例:
if ( ! ( $element instanceof Element ) ) { return; }扩展
值得指出的是,我们已经构建了可扩展的插件。 添加不同类型的页面、部分、元素就像创建一个扩展Admin_Page 、 Section 、 Element等的新类一样容易。这些基类不包含任何需要更改以添加新页面、部分或元素的代码。
开放/封闭原则(或 OCP),即 SOLID 中的“O”,指出:
“软件实体(类、模块、函数等)应该对扩展开放,对修改关闭。”
这意味着我们应该能够扩展像Admin_Page这样的类并重用它,但我们不必修改它来做到这一点。
结论
在本文中,我们注册了我们的部分、字段和元素。 在实现这些时,我们仔细研究了多态性是什么以及它为什么有用。 我们还浏览了一些 SOLID 原则,“Liskov 替换原则”和“开放/封闭原则”。
在此旅程的下一部分中,我们将继续关注我们,在那里我们将仔细研究如何改进我们管理 WordPress 钩子的方式。
单击此处阅读面向对象编程系列的第 7 部分
也可以看看
- WordPress 和面向对象的编程——概述
- 第 2 部分 – WordPress 和面向对象编程:一个真实世界的示例
- 第 3 部分 – WordPress 和面向对象编程:A WordPress 示例 – 定义范围
- 第 4 部分 – WordPress 和面向对象编程:一个 WordPress 示例 – 设计
- 第 5 部分 – WordPress 和面向对象编程:WordPress 示例 – 实施:管理菜单