如何通过 HappyAddons 在 WordPress 上使用 Elementor Loop Grid Widget
已发表: 2024-11-26设计具有视觉吸引力且功能良好的网站对于任何人来说都是创造参与度、吸引受众和推动销售的必备条件。为了简化这个过程,Elementor 等网页设计工具及其插件不断引入创新功能和模块。
Loop Grid 是 Elementor 及其插件最近为我们开发和发布的一个新小部件。创新的小部件可让您以组织精美的网格布局创建和显示内容。
如果您对这个小部件不太了解,也不必担心。在本教程文章中,我们将介绍如何通过 HappyAddons 在 WordPress 上使用 Elementor Loop Grid 小部件的分步指南。希望您会发现本教程既有帮助又有趣。
Elementor 中的循环网格是什么?
Loop Grid 是一个多功能 Elementor 小部件,允许您创建动态布局以在网站上显示不同类型的内容并随时自定义它们。该小部件在以网格格式显示博客文章、产品和作品集内容时特别有用。
该小部件对于显示动态内容非常有用。一旦发布新的帖子、产品或所需内容,它们就会通过小部件自动显示,无需手动输入。您可以创建独特的模板来显示您想要的内容。
在下一节中,我们将解释如何在 WordPress 上使用该小部件。继续阅读!
如何使用 Elementor 循环网格小部件
您必须安装以下插件才能在您的网站上使用此小部件。单击下面附加的链接即可获取它们。
- 元素器
- 快乐插件
- 快乐插件专业版
准备就绪后,开始按照所述教程的步骤进行操作。
步骤 01:将循环网格小部件拖放到您的页面
打开要添加小部件的页面。然后,决定添加小部件的部分。
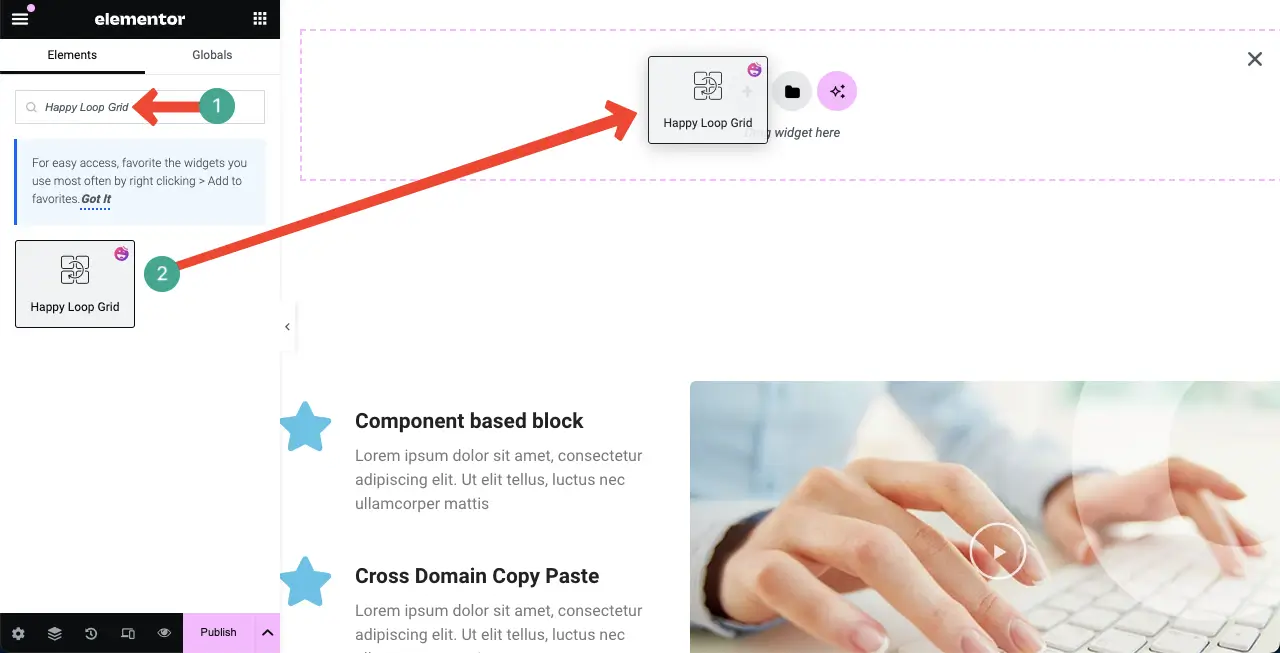
在 Elementor 面板搜索框中输入Happy Loop Grid 。小部件出现后,将其拖放到画布上所需的区域。
步骤02:创建循环网格模板
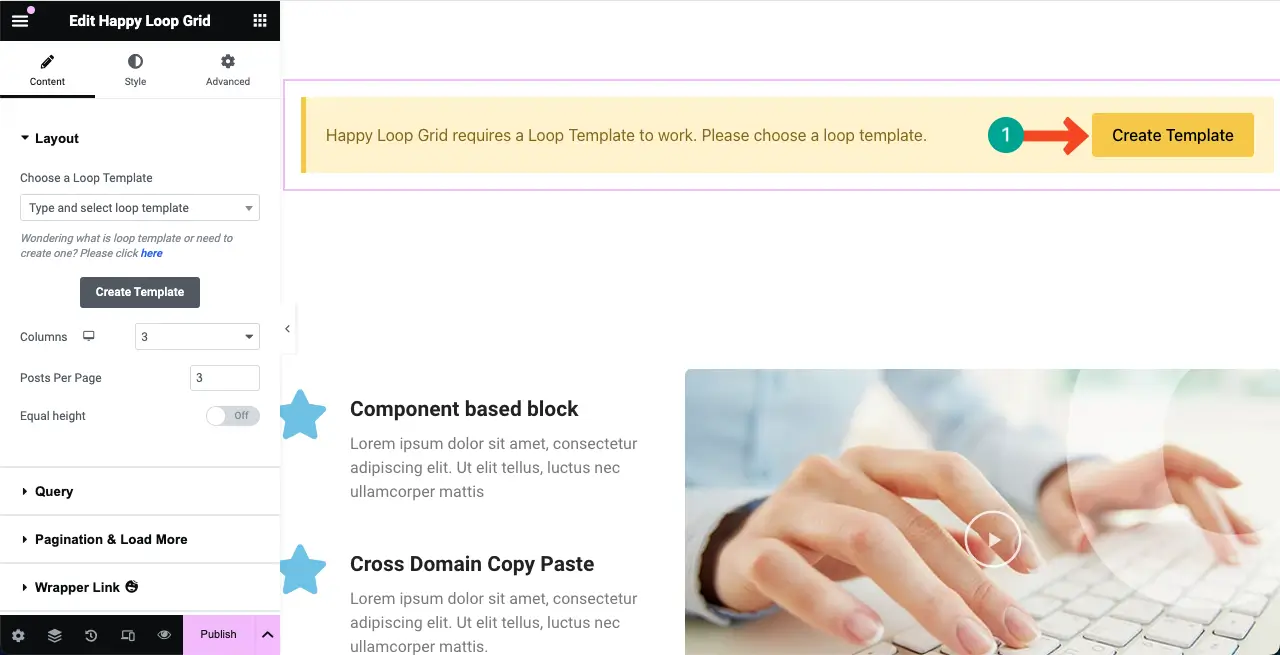
添加小部件后,系统会要求您选择循环模板。如果您已经有现成的模板,则可以选择它。否则,您必须从头开始创建一个。
因此,要从头开始创建,请单击“创建模板”按钮。
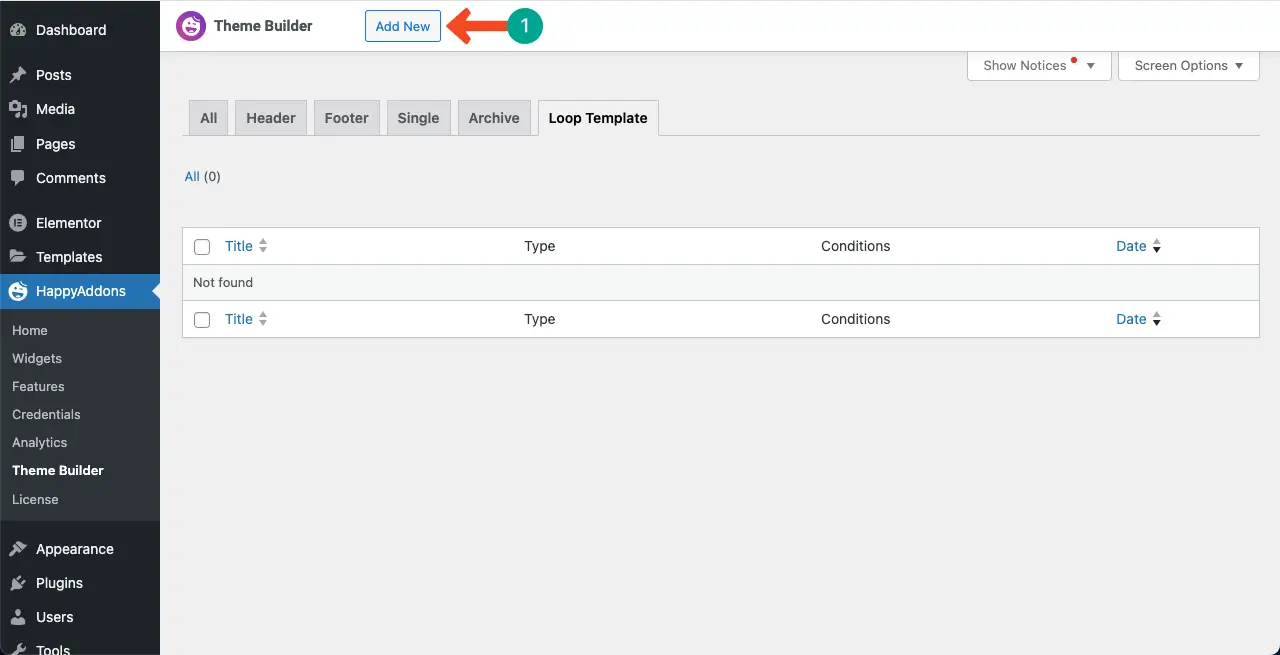
您将被带到一个新页面。选择循环模板选项卡后,单击添加新按钮。
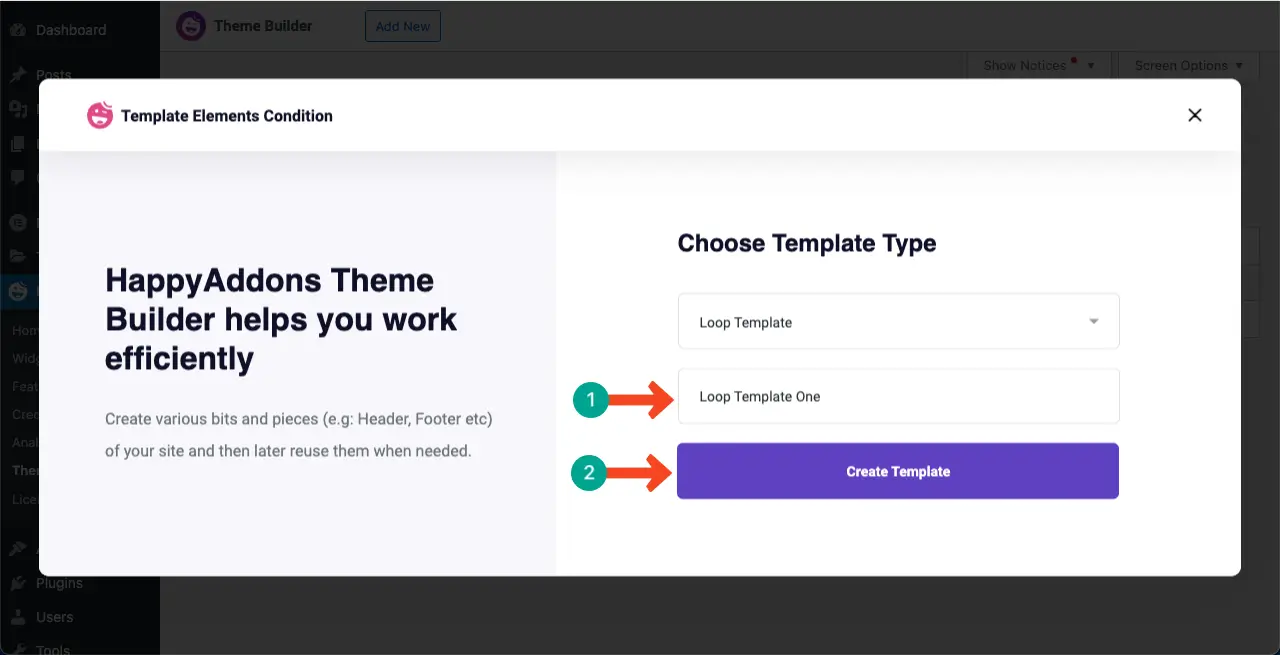
为模板命名。例如,我们将其命名为“循环模板一”。然后,点击创建模板按钮。
一个新的画布将被打开。同样,您可以拖放要设计循环网格模板布局的小部件。
查看本指南,了解如何在 Elementor 网站上创建弹出窗口。
步骤03:设计循环网格模板的布局
假设我们将创建此循环网格来动态展示我们的博客文章。因此,我们将使用帖子小部件来创建模板。
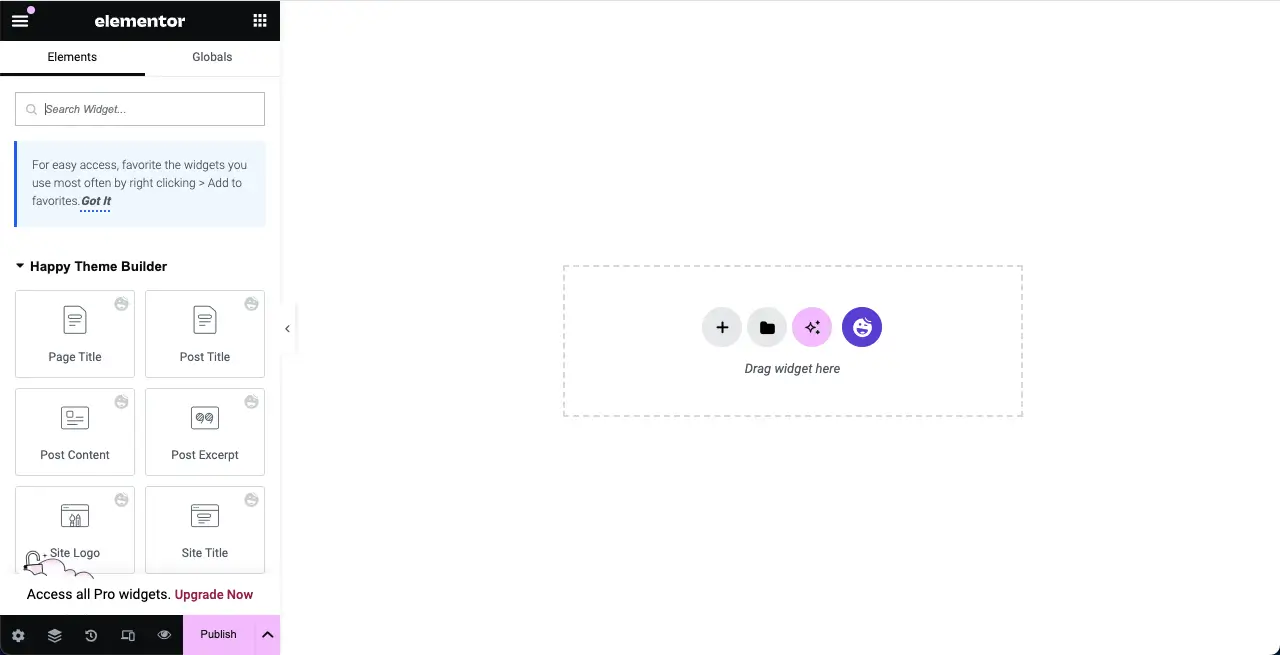
# 发布特色图片
在帖子网格部分显示帖子特征图像是必须的。为此,请找到该小部件并将其放在画布上。
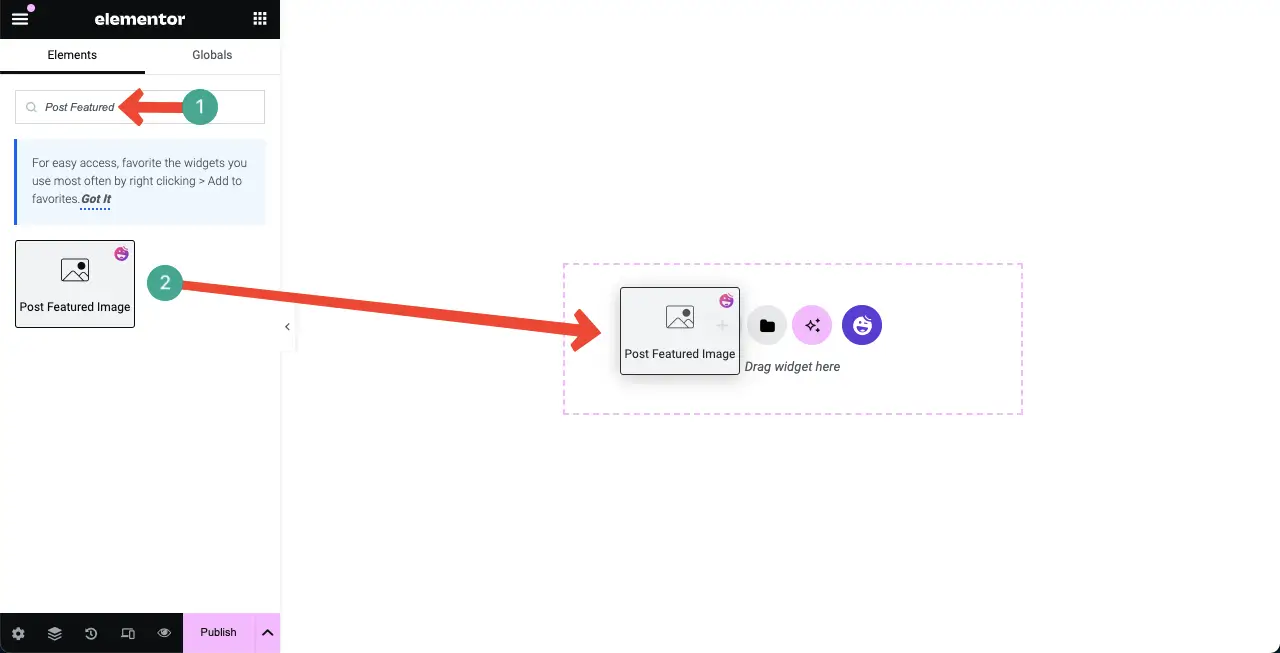
# 发布信息
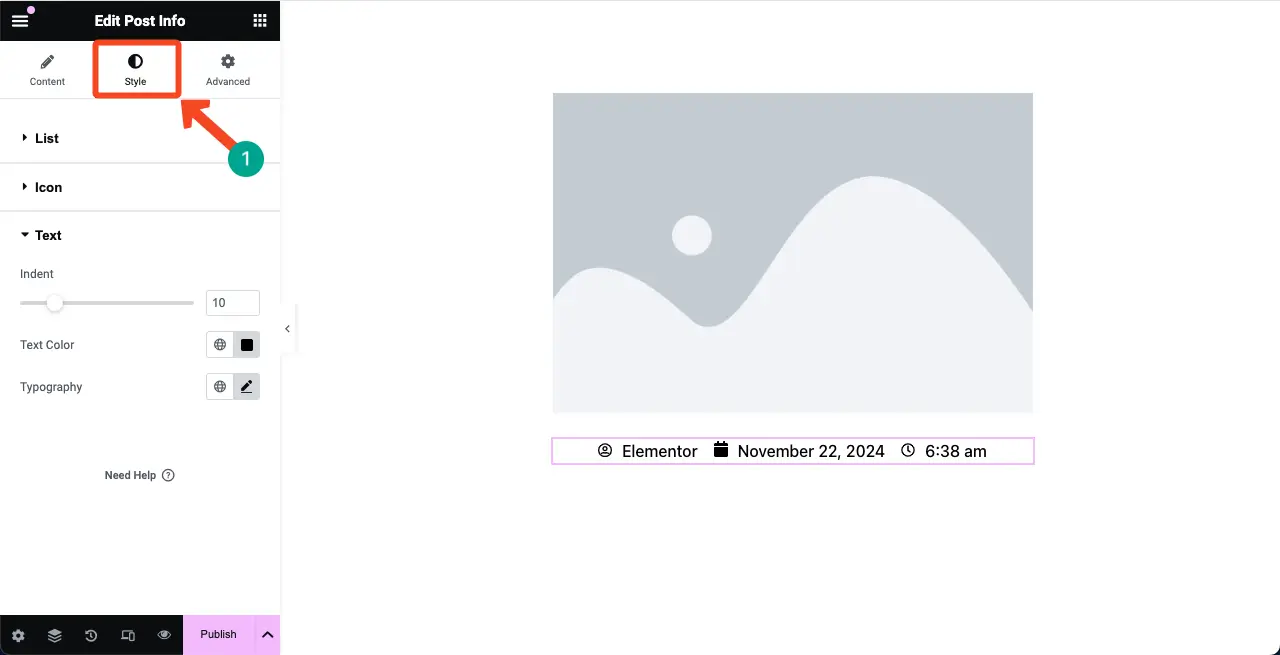
通过添加帖子信息小部件,您可以显示帖子的作者、发布日期以及发布时间。最好将小部件添加到特色图像下。
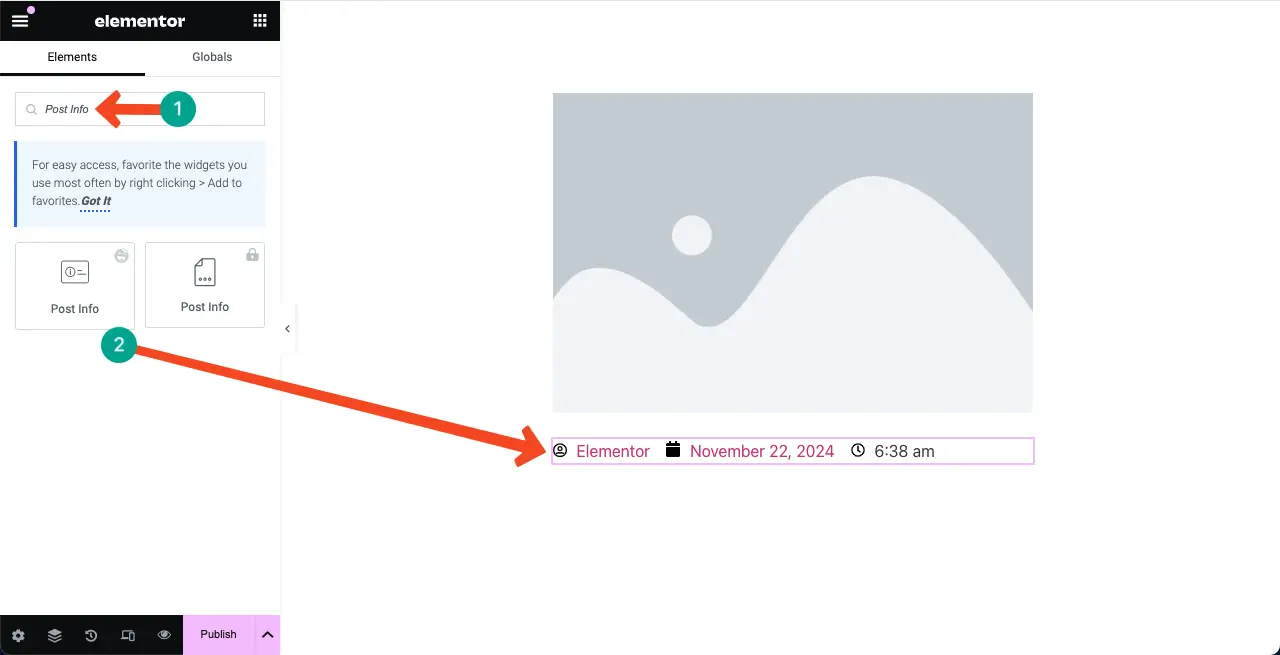
如果您想删除小部件的任何元素,只需单击其旁边的十字 (x) 图标即可。同样,要添加新元素,请单击+ 添加项目按钮。
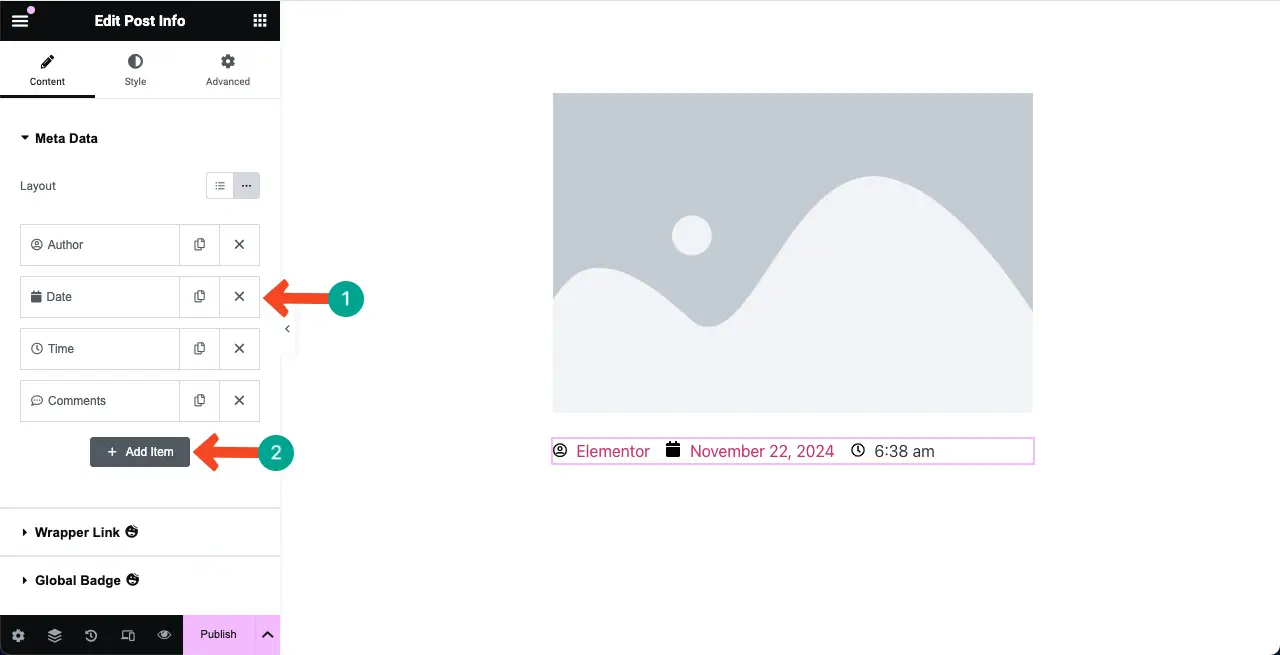
来到样式选项卡。您将在此选项卡中获得用于更改小部件文本和图标的颜色、粗细和对齐方式的选项。
# 帖子标题
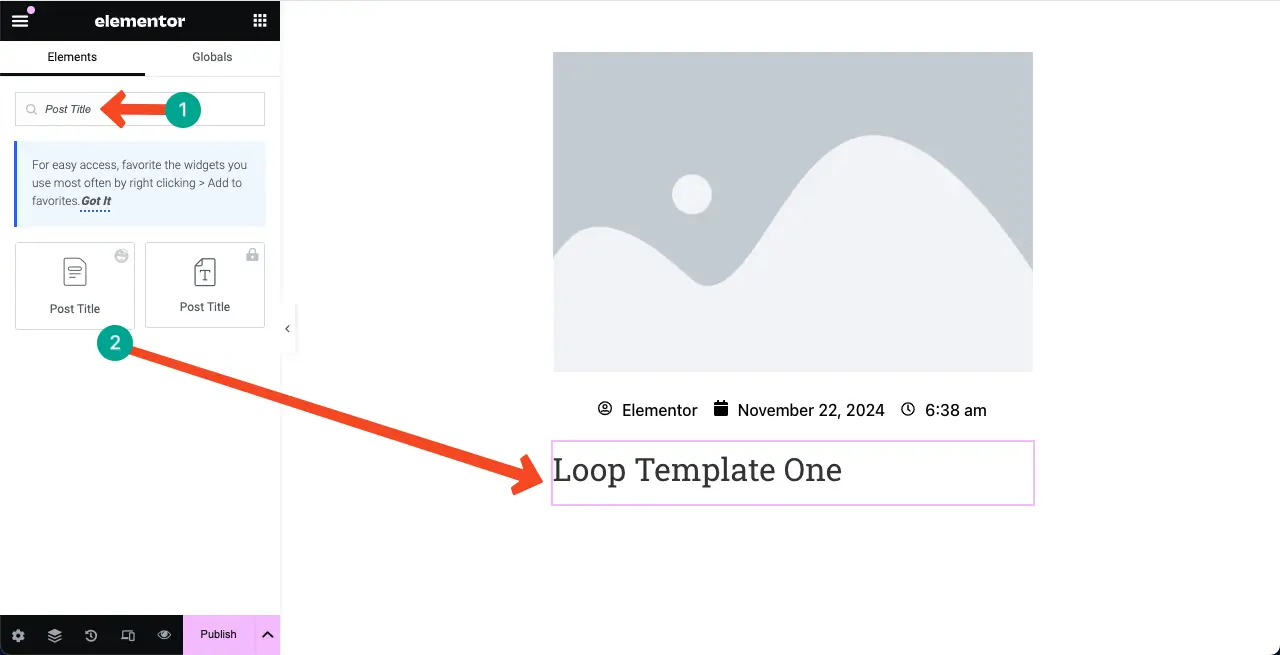
将帖子标题小部件拖放到帖子信息小部件下方。
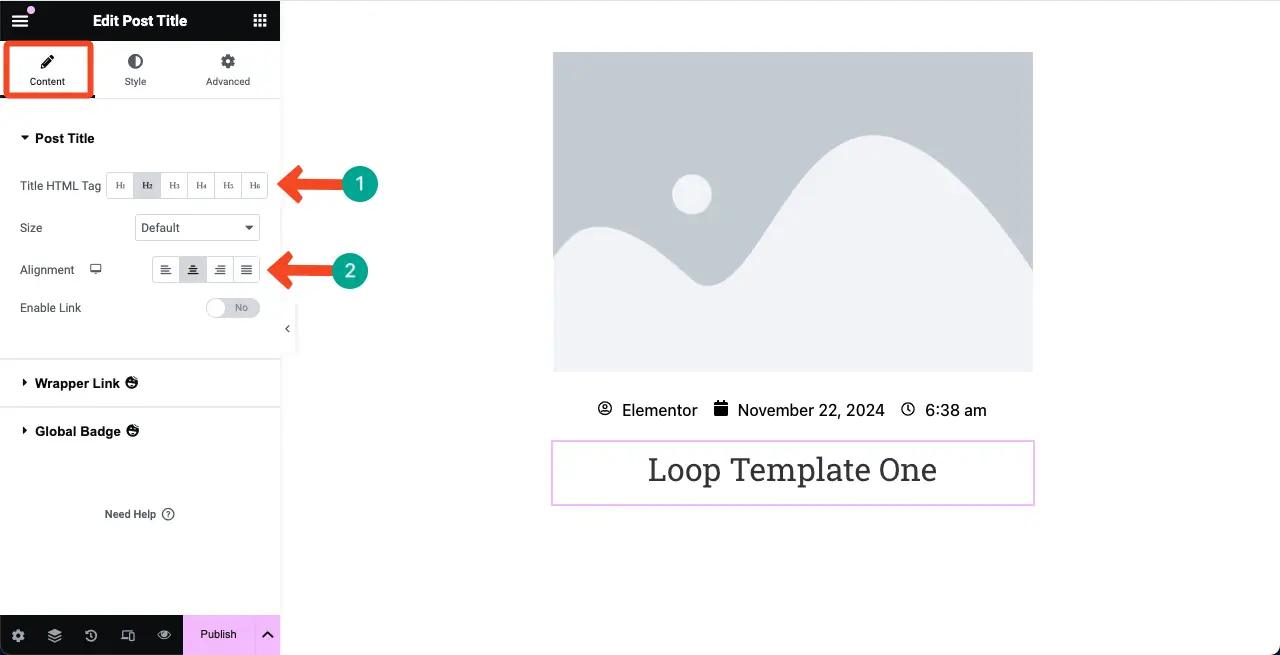
在“内容”选项卡下,您将获得用于自定义 HTML 标记、大小和对齐方式的选项。根据需要进行必要的更改。
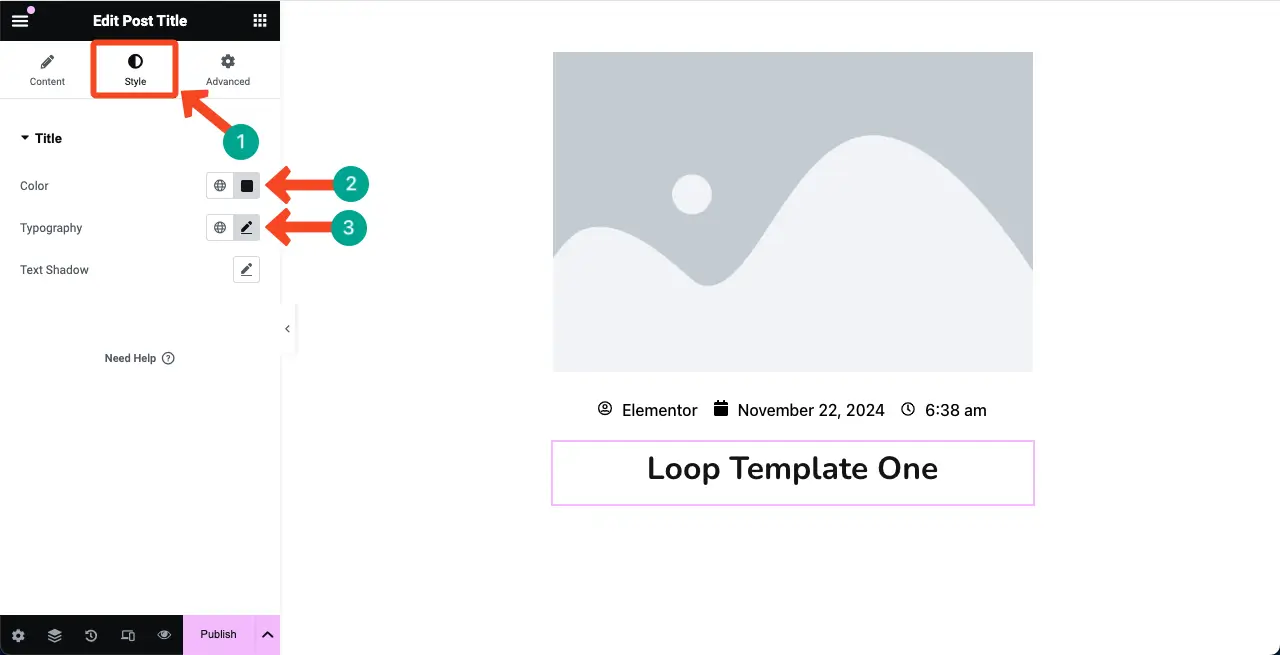
来到样式选项卡。您可以根据需要对标题颜色和排版进行样式化。
# 帖子摘录
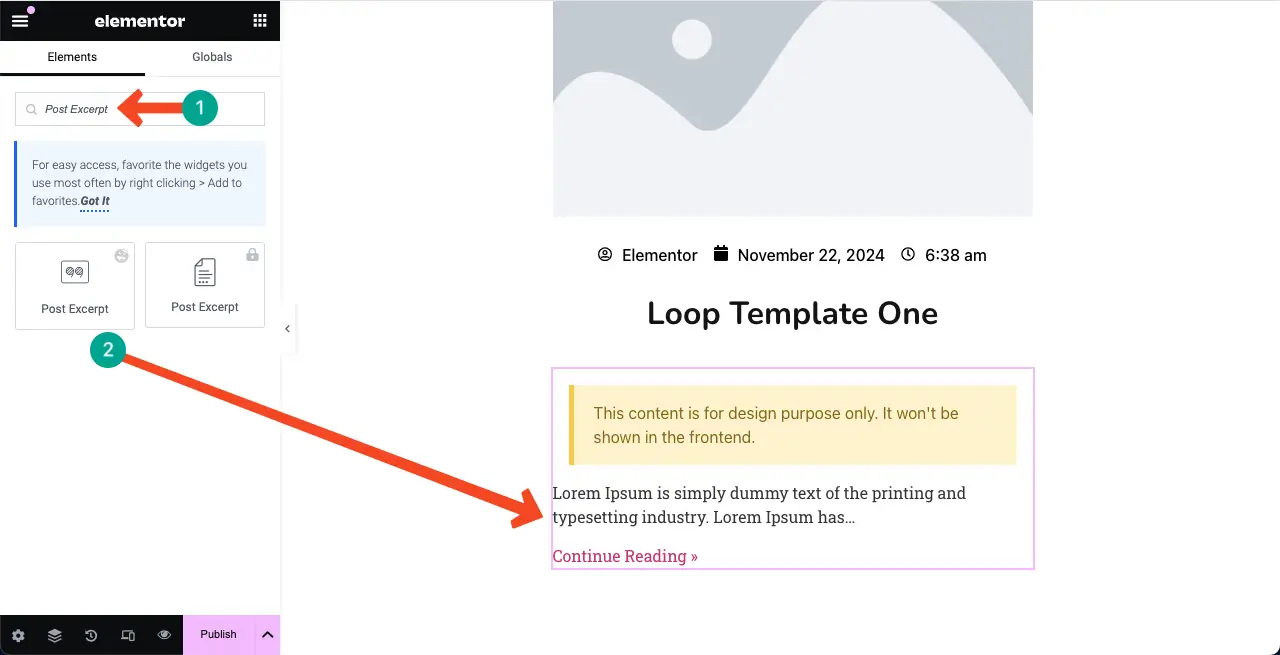
通过在模板中添加“帖子摘录”小部件,您可以在“循环网格”部分中显示相应帖子的摘要或摘录。在标题下找到并添加帖子摘录小部件。
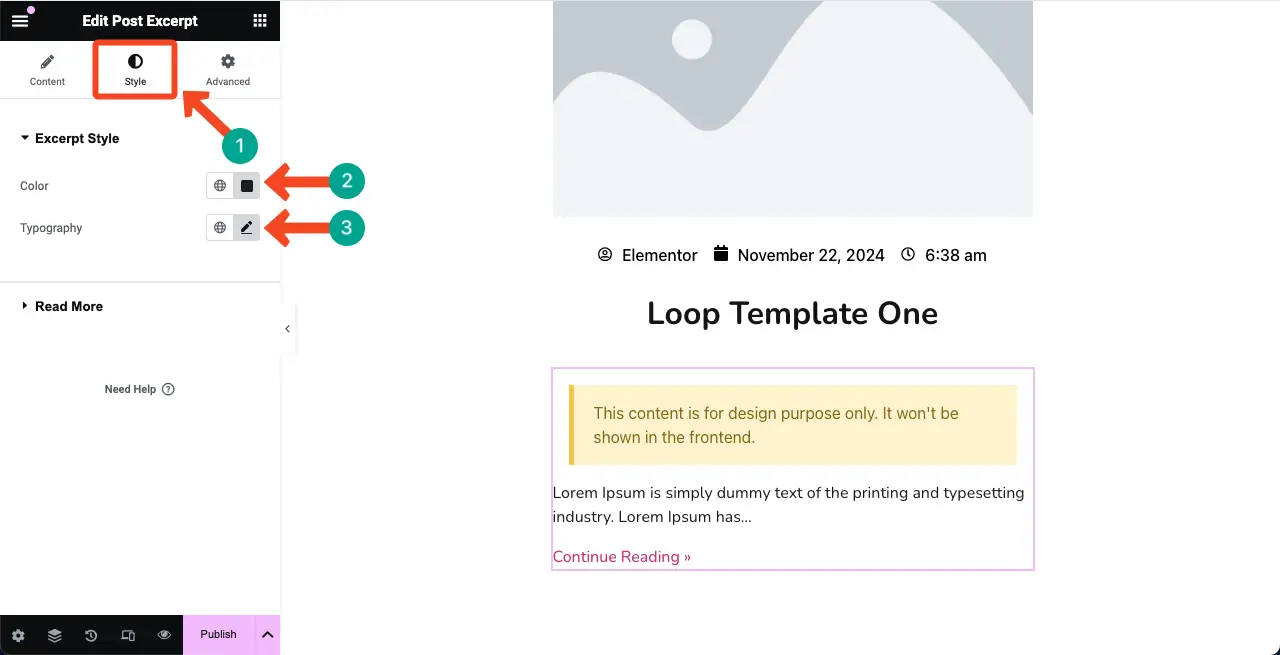
同样,如上所示,您可以从“样式”选项卡自定义文本颜色和版式。
步骤04:优化移动设备的模板布局
您必须针对所有设备类型(平板电脑和手机)以及台式机优化模板布局。否则,其他设备的用户在通过移动设备和平板电脑设备探索此小部件时将不会获得良好的体验。
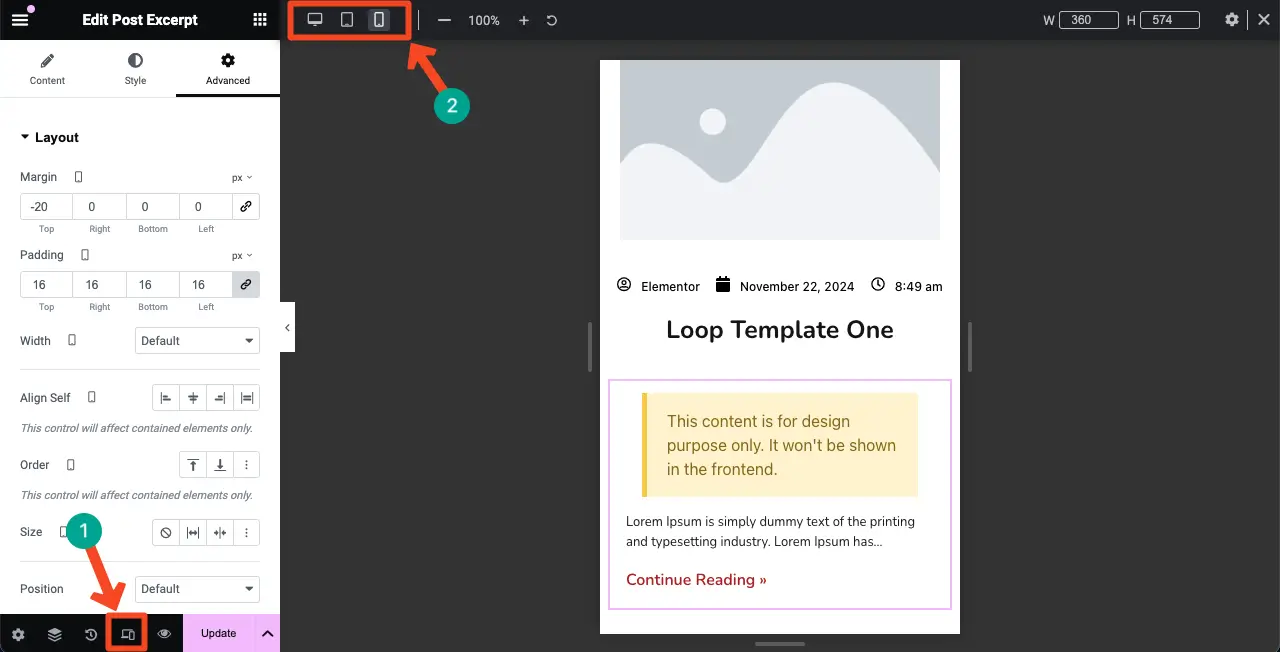
因此,要优化模板布局,请单击 Elementor 面板页脚上的响应模式选项。模板上将出现一个顶栏,包括在不同设备模式(台式机、平板电脑和手机)之间切换的选项。
现在,切换到不同的设备模式,看看模板布局是否适合不同的特定设备。如果不完美,请根据需要调整模板元素的大小和自定义模板元素。
希望通过这样做,您可以使模板响应所有屏幕尺寸。
以下是有关使网站具有移动响应能力时需要考虑的事项的指南。
# 发布模板
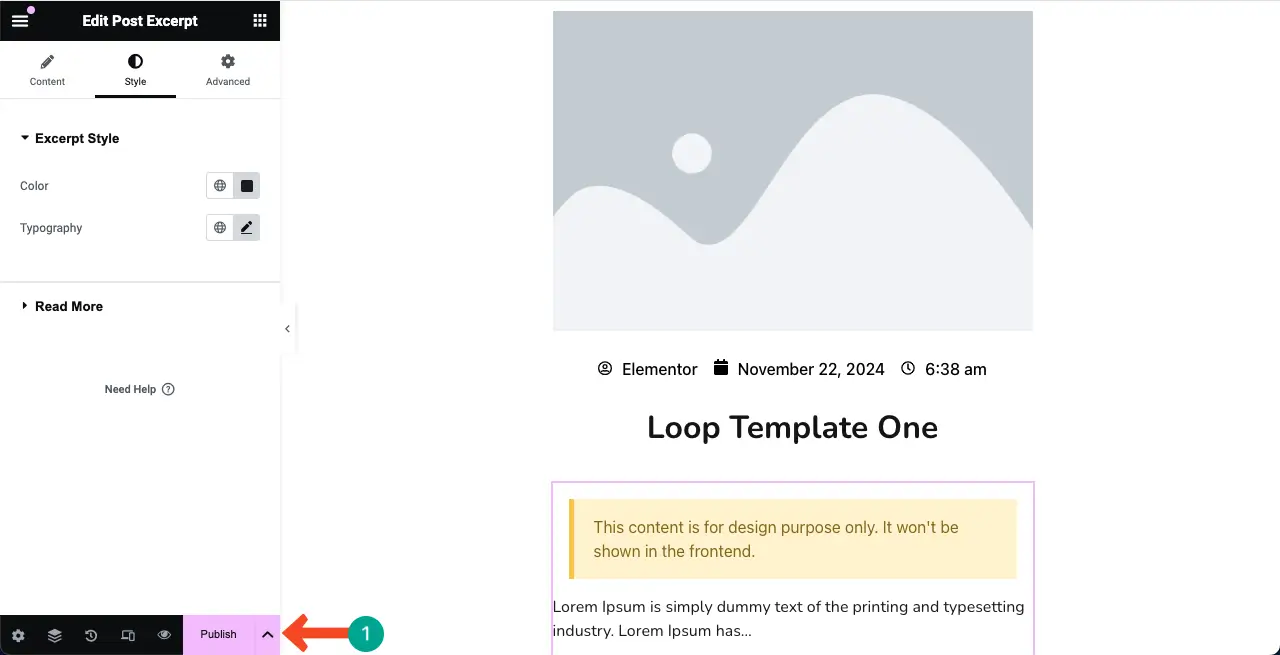
完成后,通过单击 Elementor 面板上的“发布”按钮来发布模板。
步骤04:来到主画布并选择循环模板
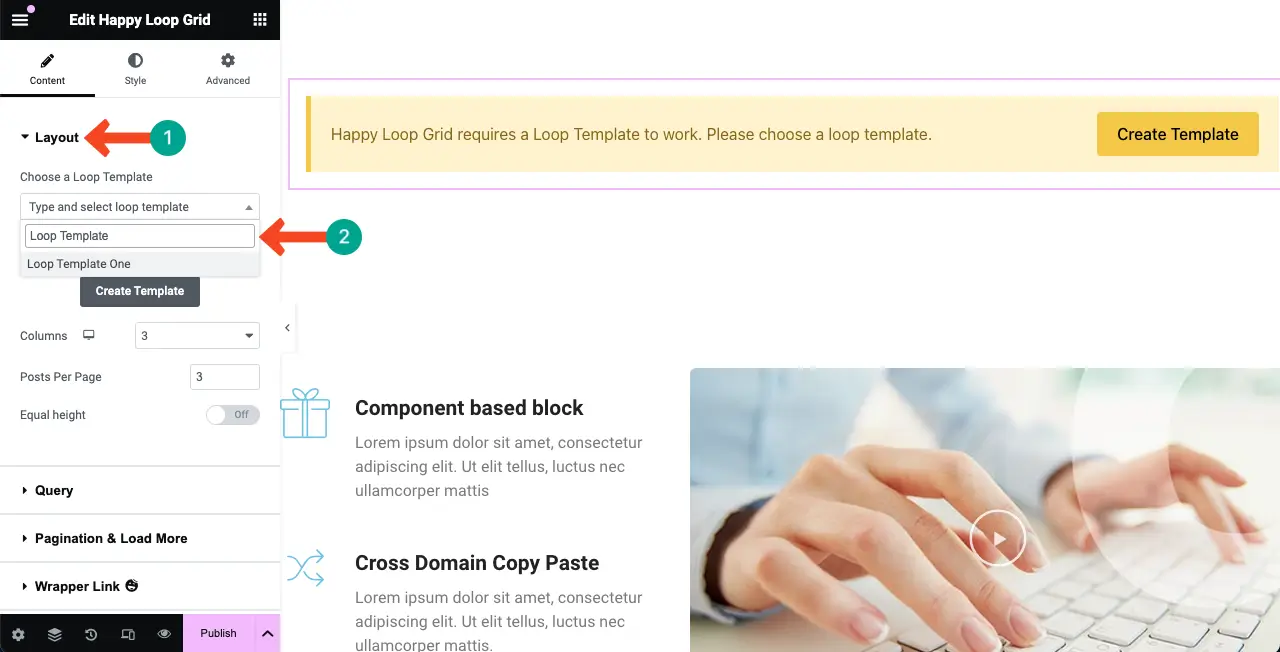
来到 Elementor 主画布。选择循环网格部分。在“布局”部分下,您将找到“选择循环模板”选项。
输入保存模板的名称。输入后,模板将实时显示。单击模板将其显示在画布上。
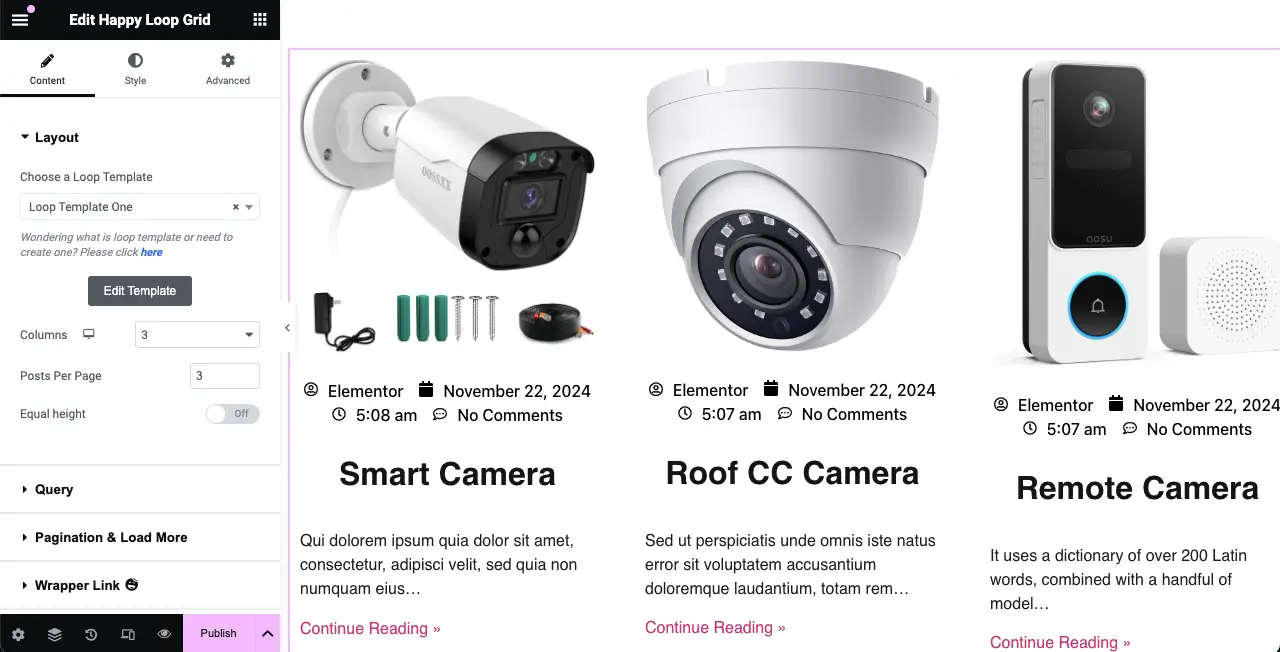
选择循环网格模板后,它将以网格格式显示您发布的帖子,如下图所示。

网格可能看起来很尴尬,因为它带有默认设置。您现在可以进一步自定义其布局。
步骤05:自定义循环网格部分并使其风格化
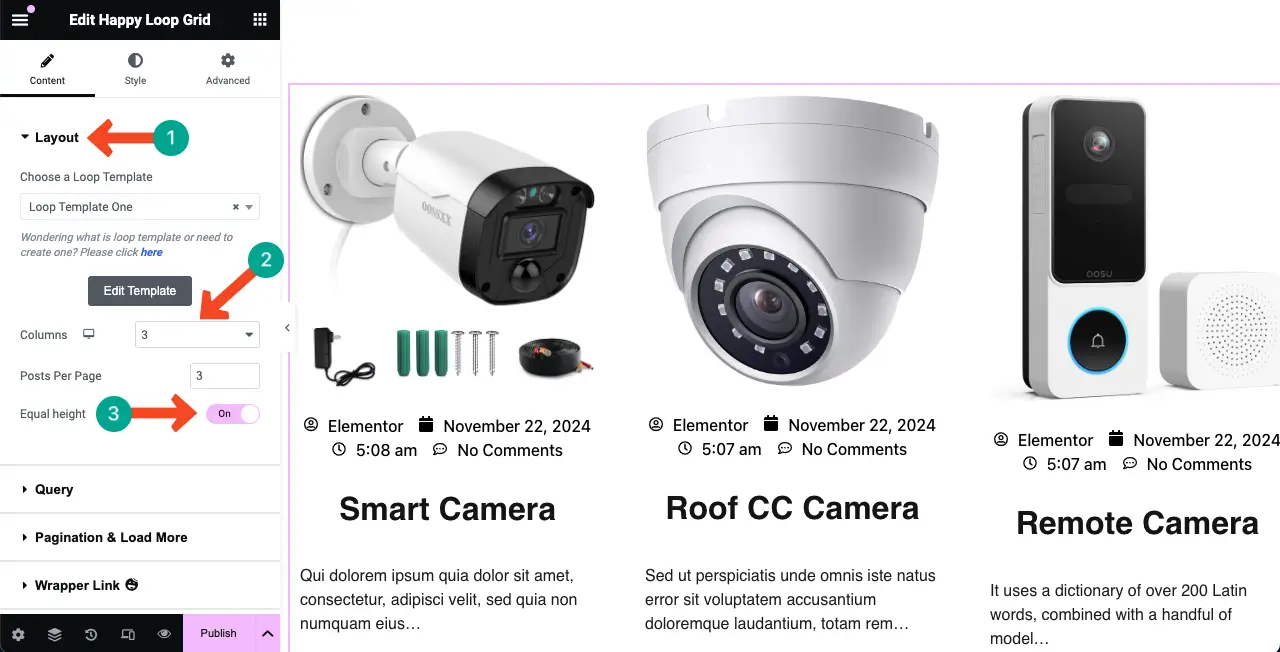
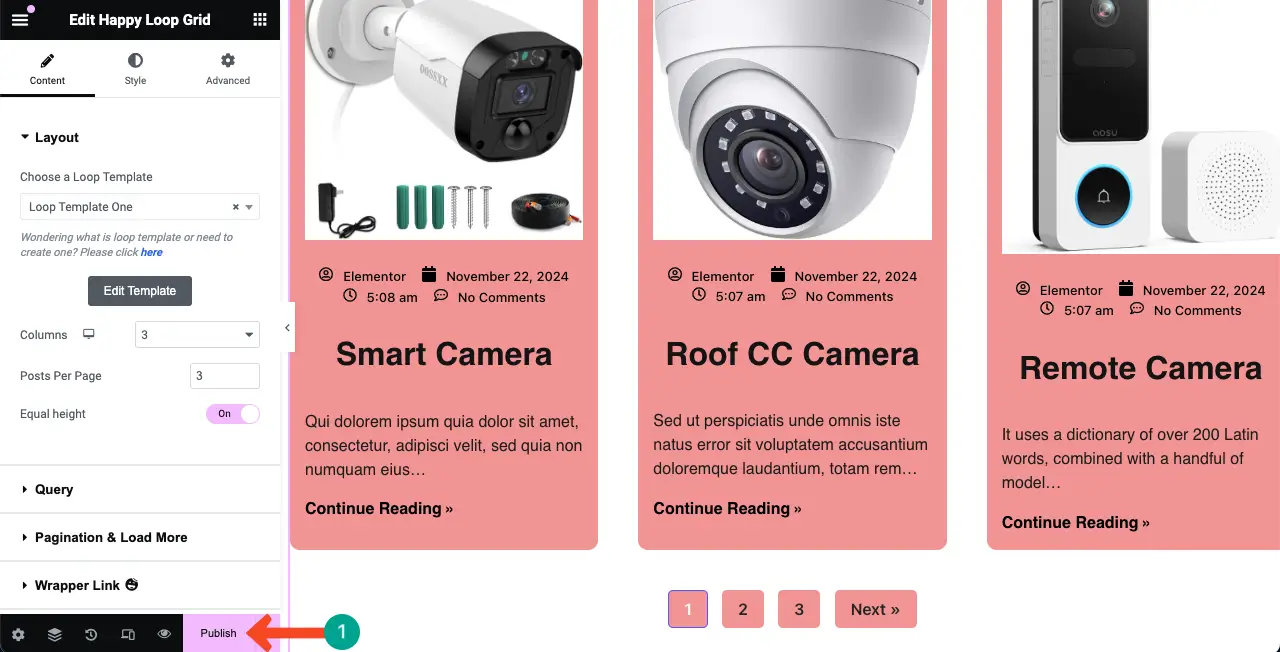
从“布局”部分,您可以选择列号、每页帖子和等高。根据需要进行必要的配置。
我们为本教程保留了三栏和每页三篇文章。
# 配置查询
之后,来到查询部分。
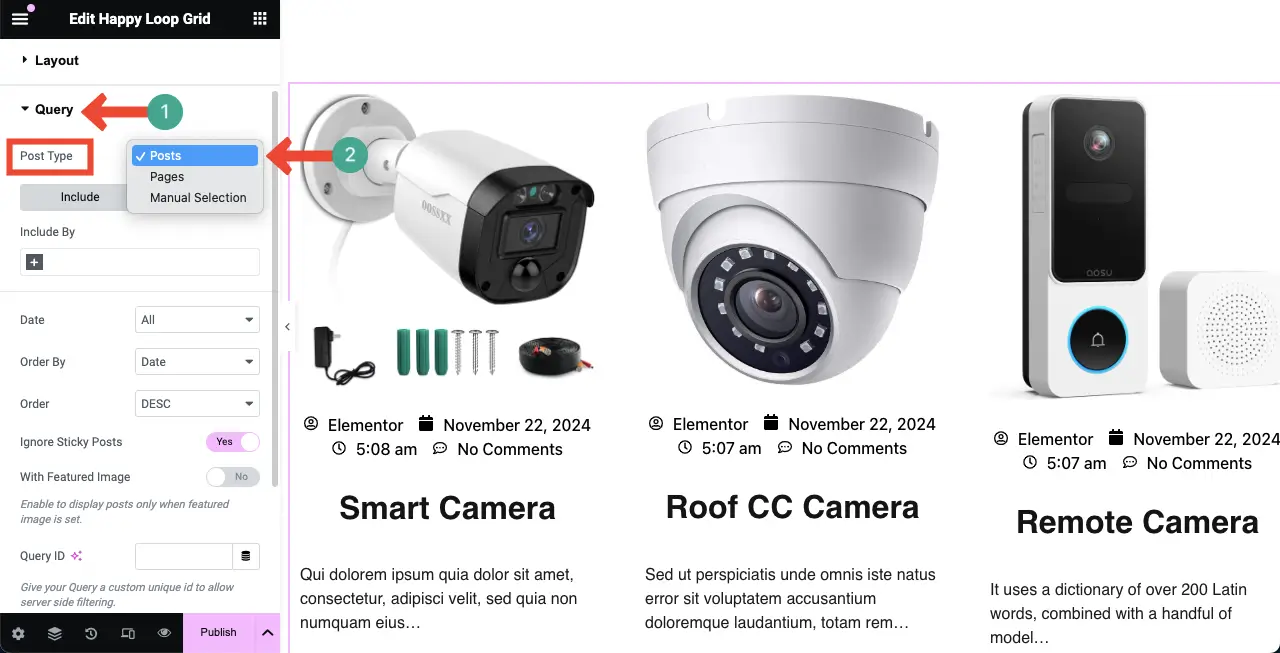
您可以在循环网格小部件中显示来自各种来源的内容。默认情况下,帖子以网格格式显示。但如果您愿意,您可以显示页面或登录页面。
单击“帖子类型”选项旁边的下拉图标。选择您想要的内容类型。
您必须使用标签或类别保存每个帖子。如果您只想显示特定作者、标签或类别的内容,请单击“包含者”下方的+ 加号图标。
选择作者或术语。您也可以选择两者。
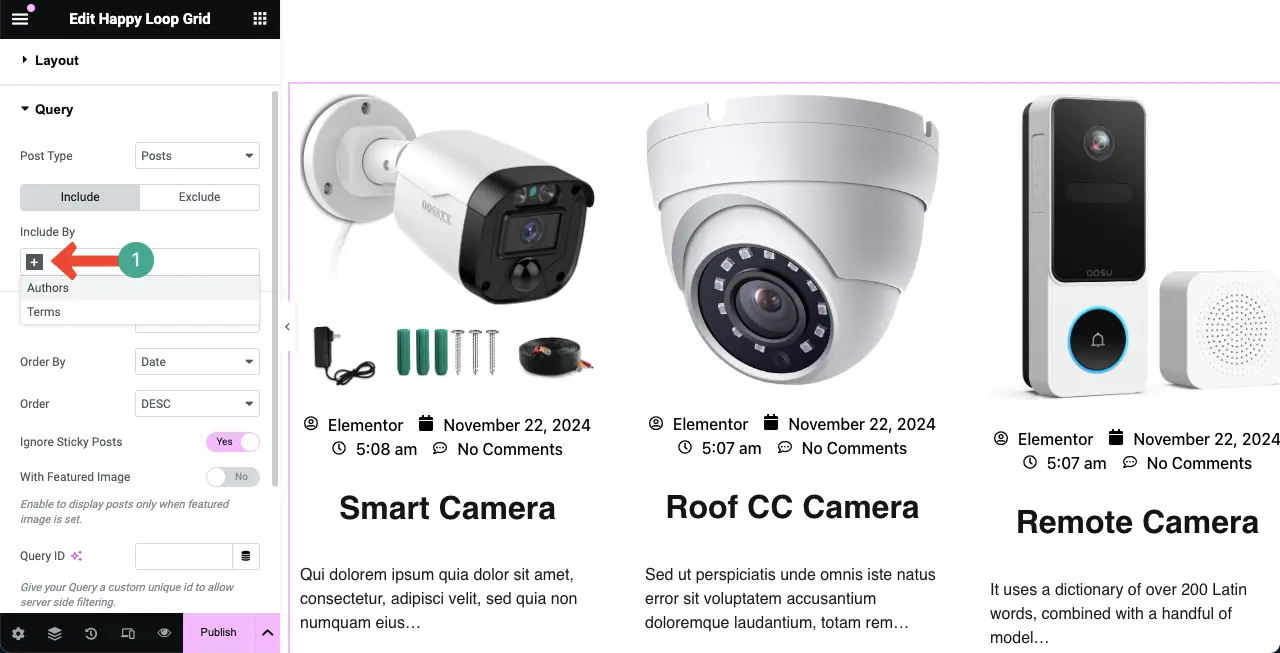
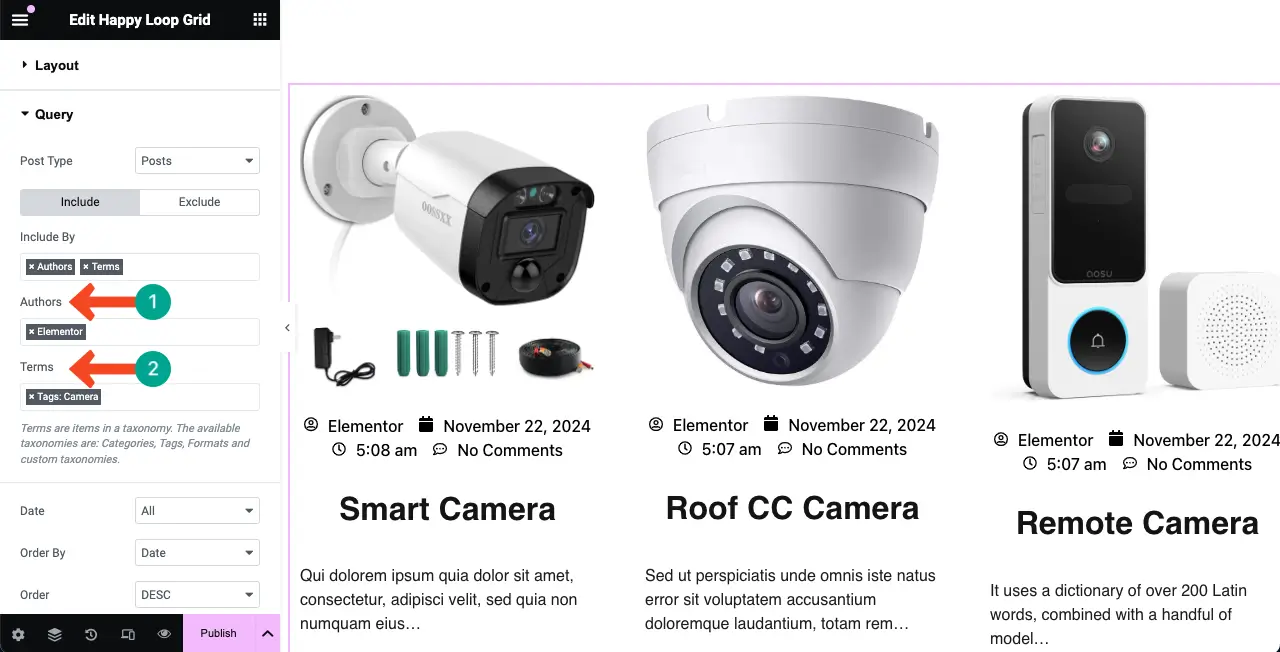
选择“包含者”选项后,在相应字段中输入作者姓名和术语。立即,内容将被过滤,并且只有该特定作者和术语的内容才会显示在循环网格中。
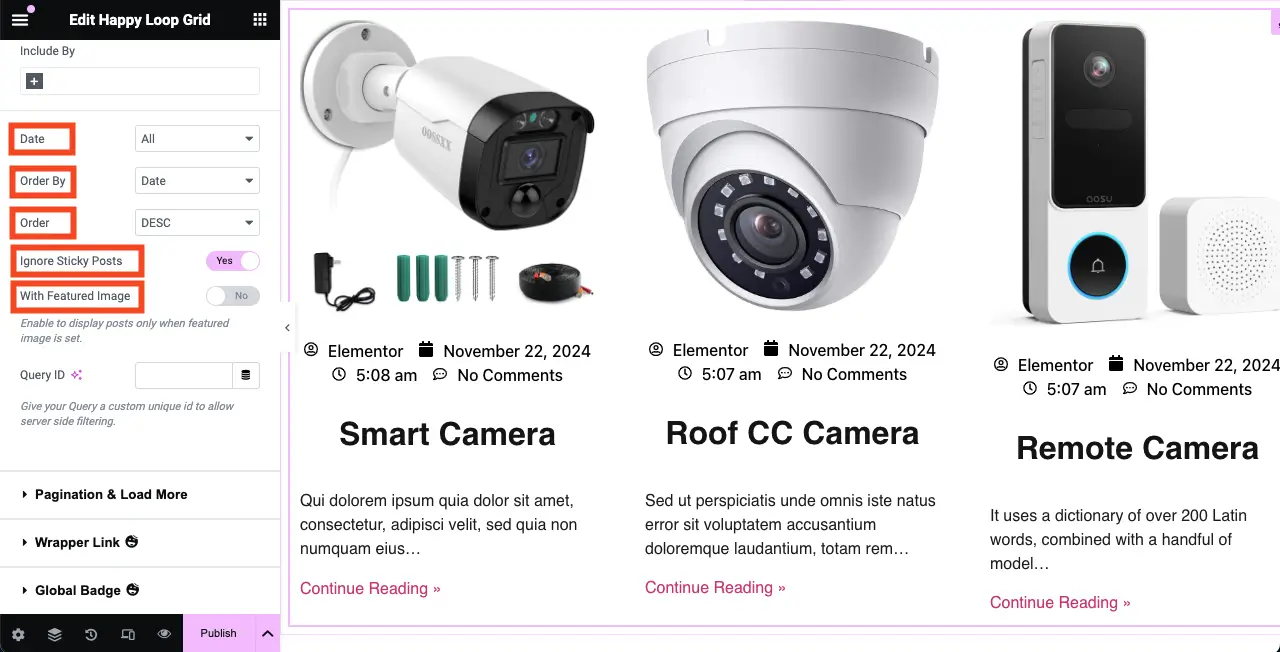
根据需要配置其他查询选项。希望你能自己做。
步骤06:配置循环网格部分的分页选项
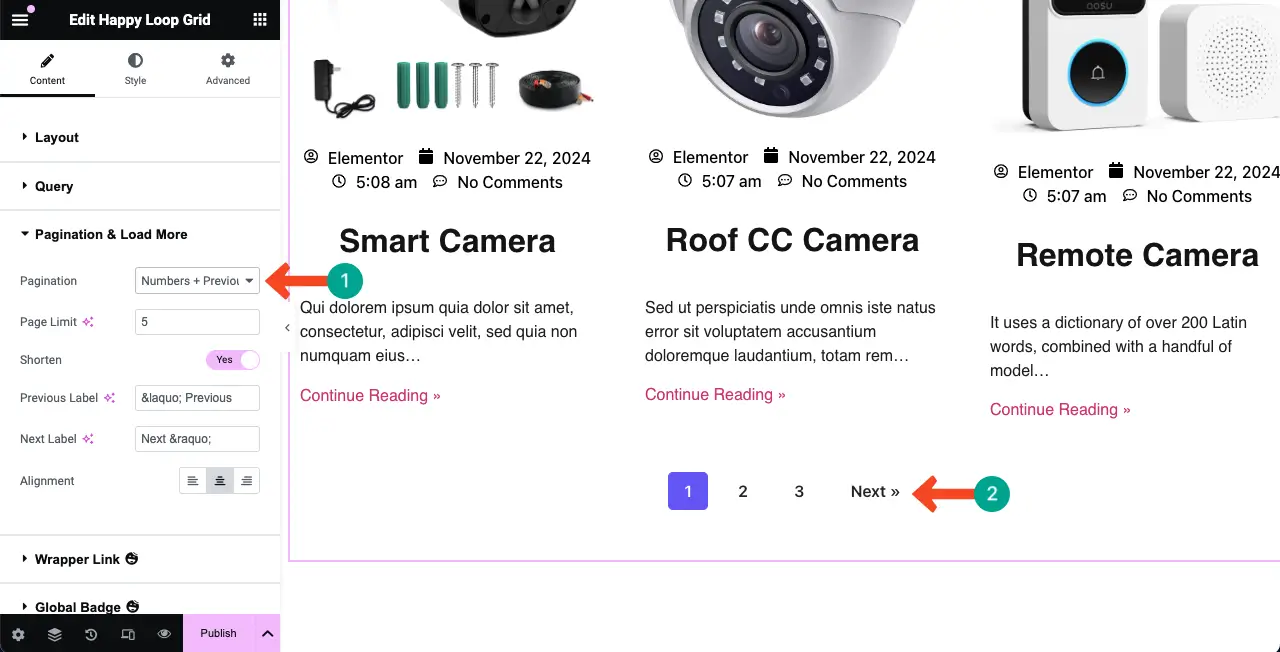
展开分页和加载更多部分。
单击分页旁边的下拉图标。选择您想要的选项。
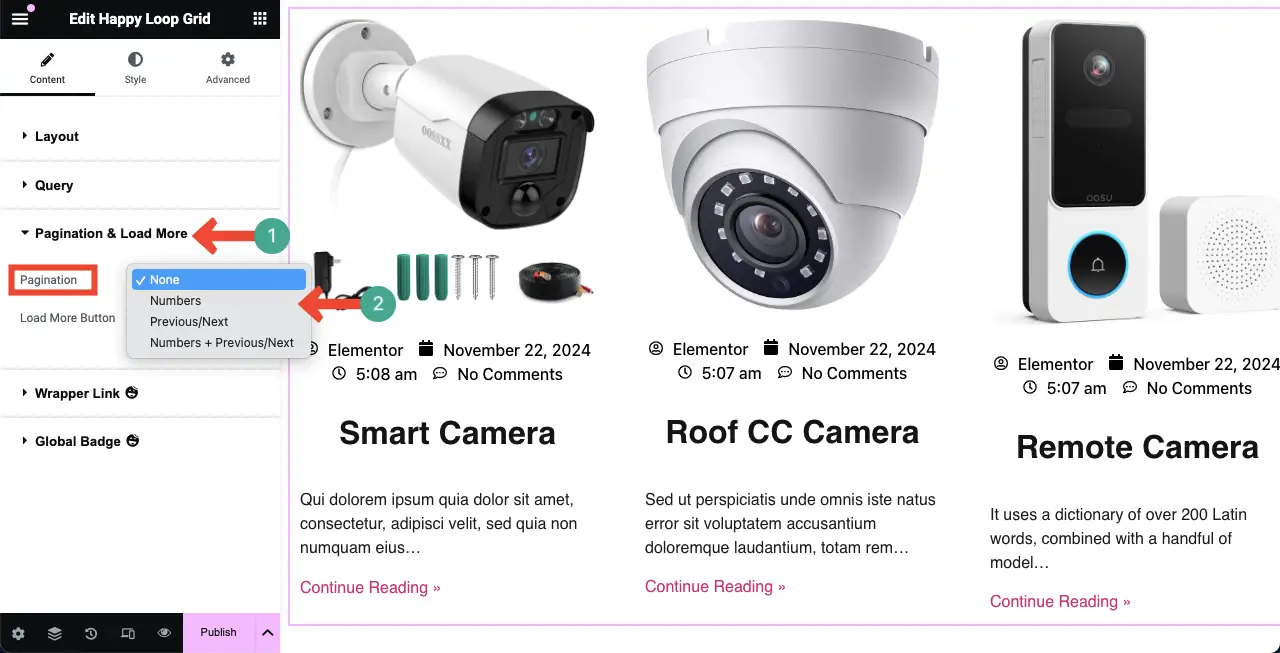
我们选择了Numbers + Previous/Next 。您可以在图像中看到此分页选项已显示在小部件下。
步骤07:风格化循环网格小部件的布局
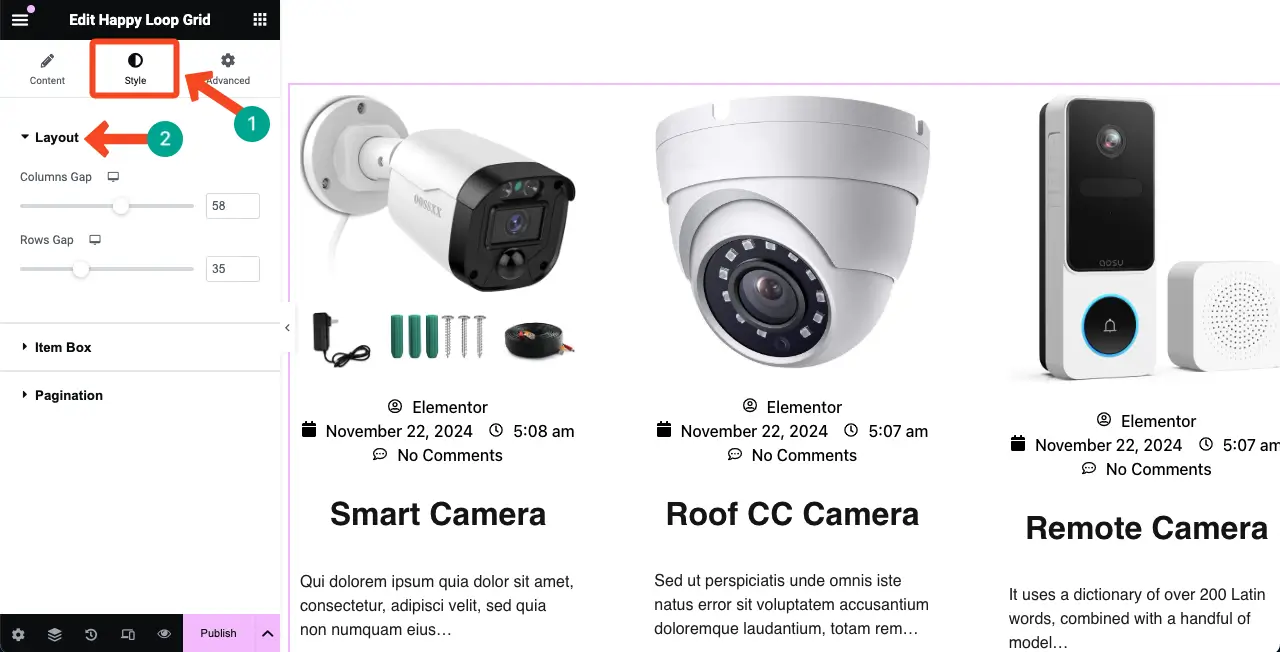
转到“样式”选项卡。您将找到用于自定义和风格化小部件的布局、项目框和分页的选项。
我们首先展开布局部分。它将允许您配置Column Gap和Row Gap 。根据需要执行此操作。
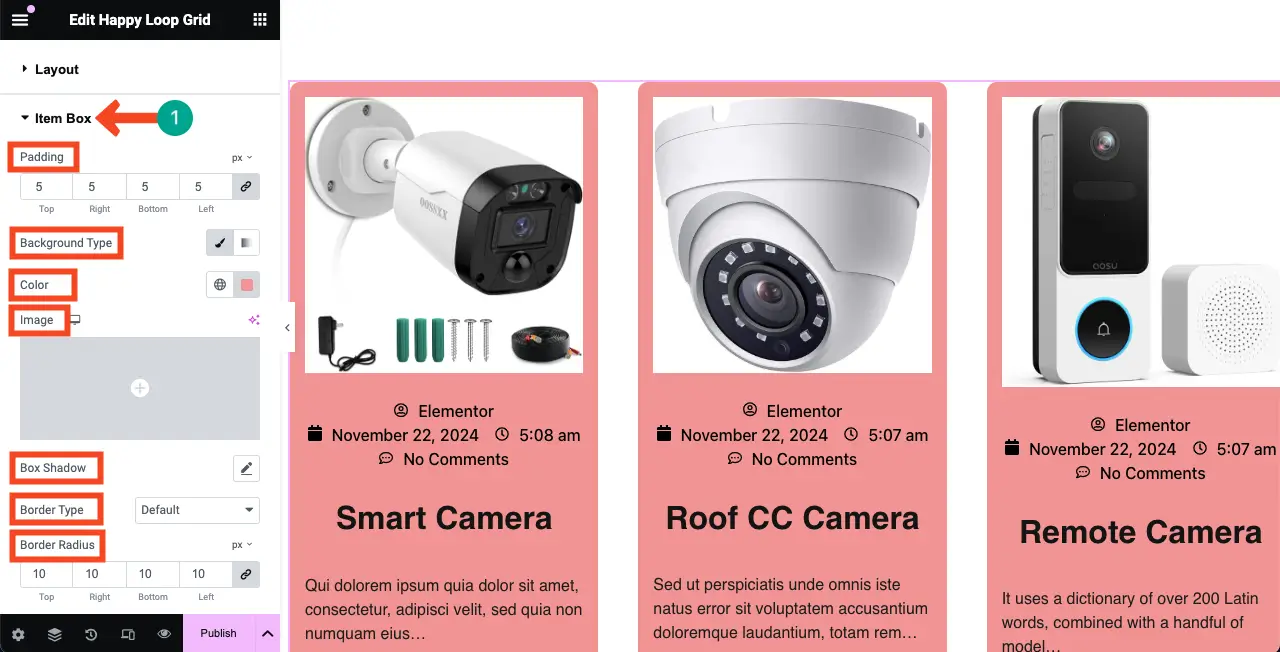
同样,展开项目框部分。您可以添加填充、背景类型(颜色或图像)、框阴影、边框类型和边框半径。
在本教程中,我们添加了填充、半径和背景颜色。你自己也这样做。
以同样的方式,您可以对小部件的颜色、版式、填充、半径、空间和分页选项进行样式化。
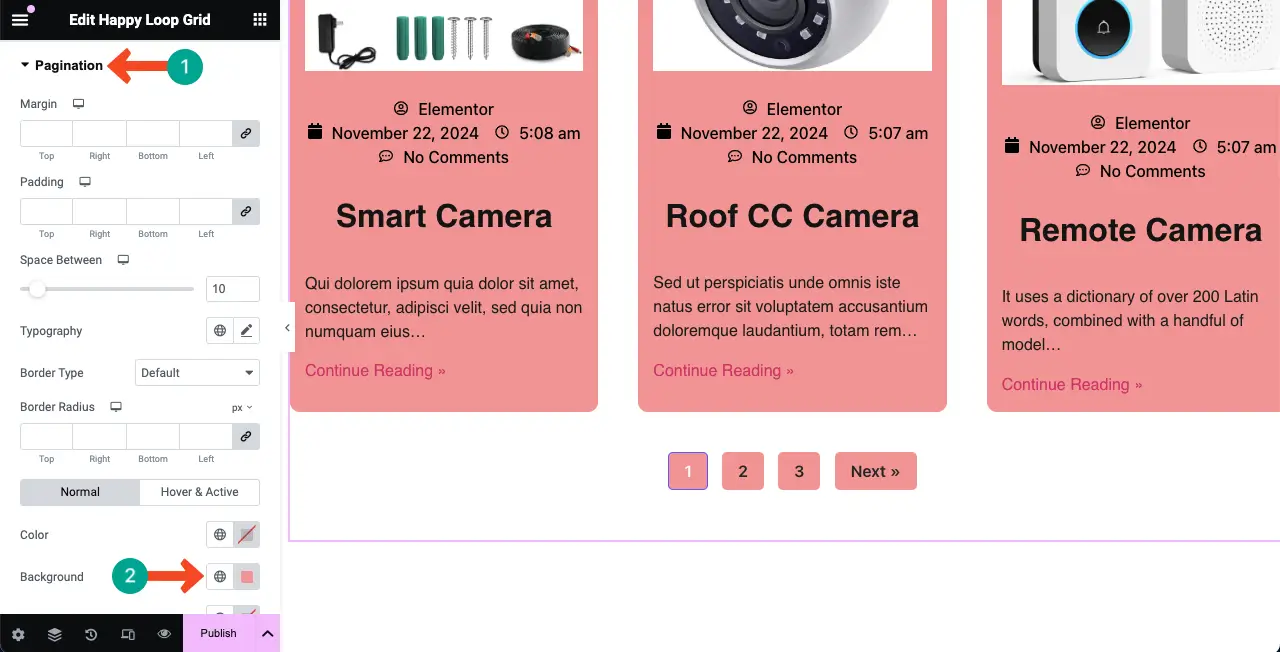
注意:看起来有点令人眼花缭乱,对吧?在设计的这个阶段,您可能会发现循环网格模板需要进行更多的风格化和自定义。但怎么办呢?它会在下一步中显示。
步骤08:重新自定义循环网格模板
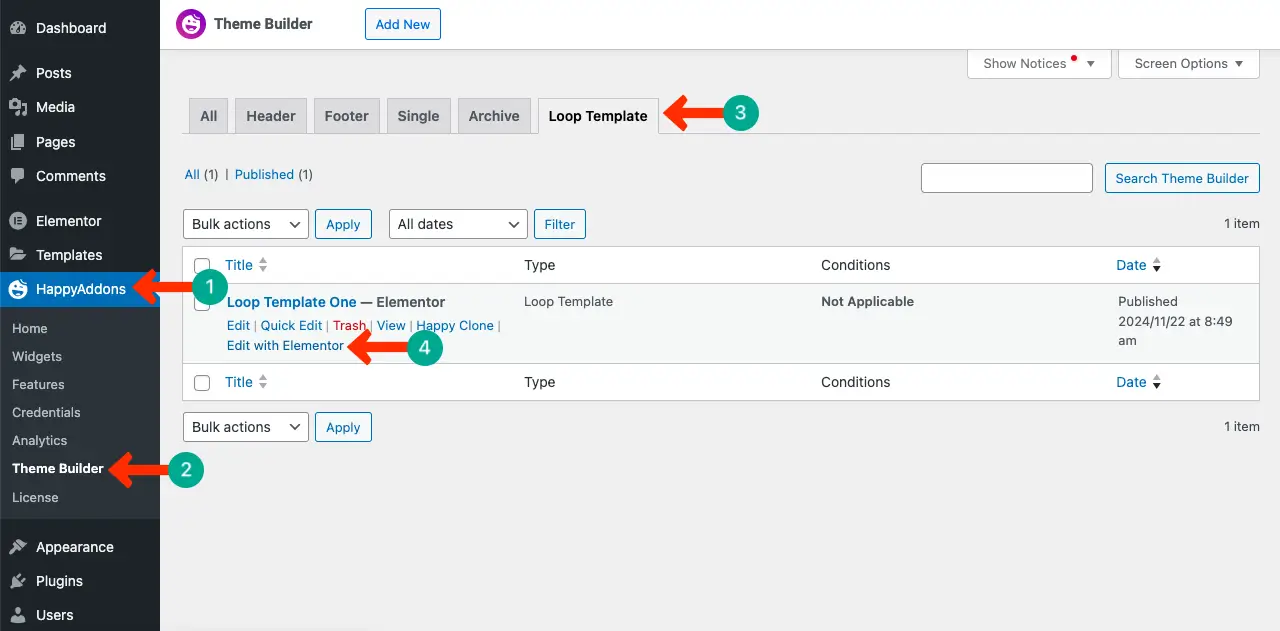
首先,你必须找到模板。正如您使用 HappyAddons 进行设计一样,请转到您的WordPress 仪表板。然后,导航到HappyAddons > 主题生成器 > 循环模板。
找到模板并使用“使用 Elementor 编辑”选项将其打开。
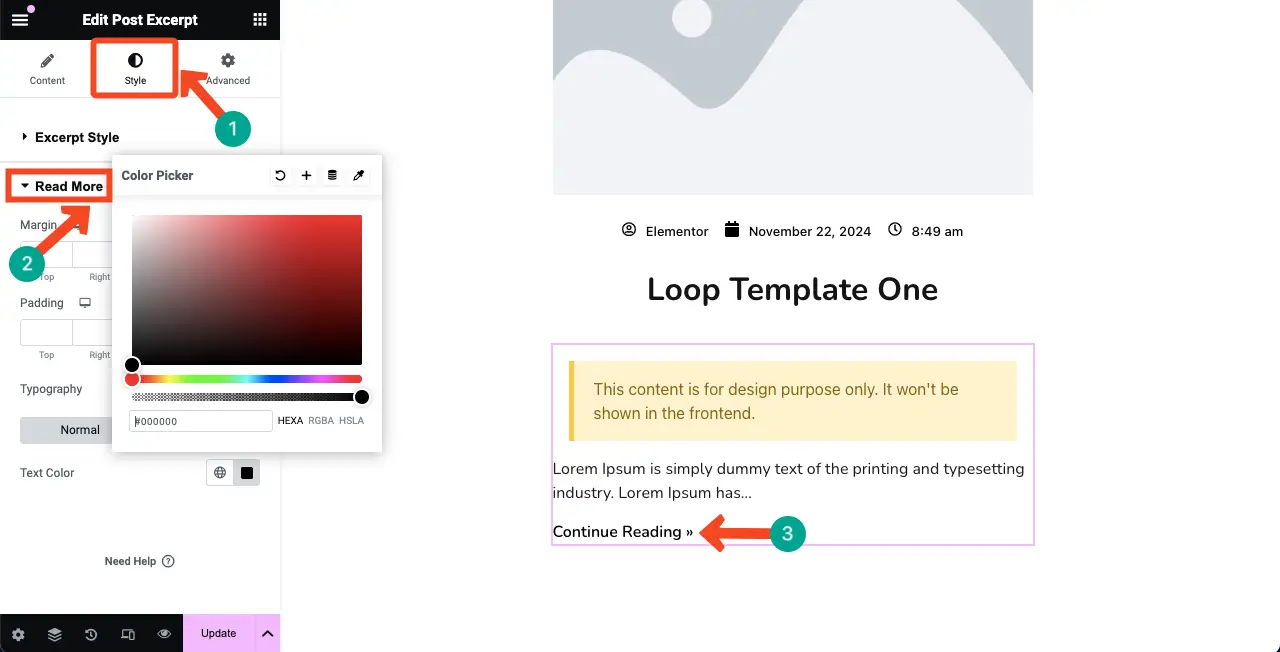
例如,我们更改了“继续阅读>>”文本的排版。
完成后,更新更改。
步骤 09:预览更改
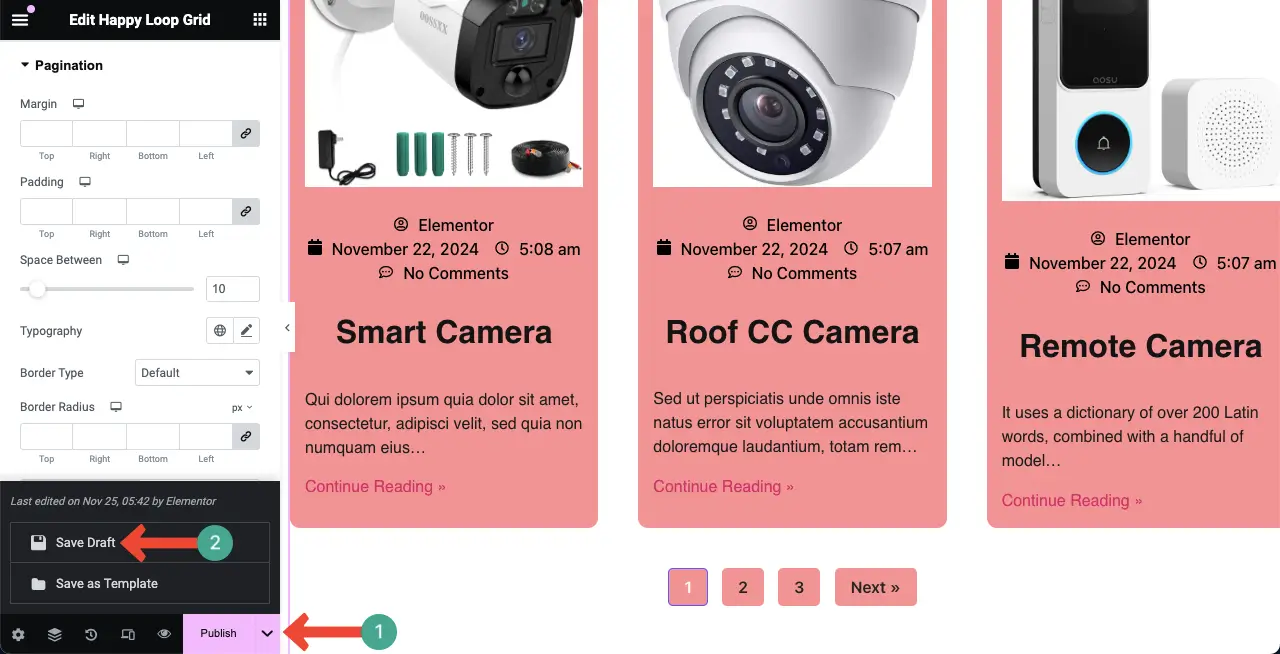
再次转到主画布。选择下拉图标。然后,单击“保存草稿”选项。
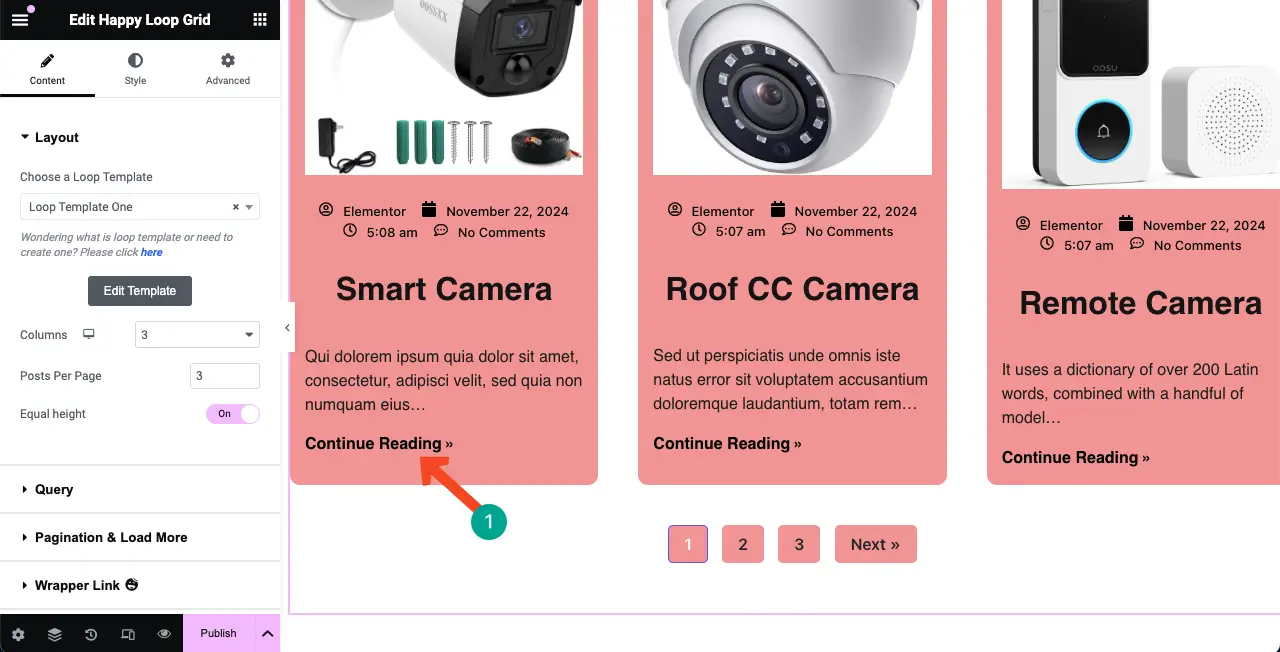
保存草稿后,重新加载画布。您将在页面上看到您在模板上所做的更改。
因此,您可以随时自定义循环网格模板。
第10步:发布循环网格设计
希望您的循环网格部分已经准备好发布。单击 Elementor 面板底部的“发布”按钮。
注意:确保您已针对移动响应能力完美优化了小部件,正如我们在上面优化循环网格模板时向您展示的那样。这里的过程也将是相同的。
Elementor 循环网格小部件的常见用例
到目前为止,我们已经描述了 Loop Grid 小部件是什么以及如何在 Elementor 网站上使用它。现在让我们快速浏览一下该小部件的一些关键用例,在这些用例中它可以给人留下宝贵的印象。
1.博客布局
Elementor Loop Grid 使博客布局变得简单,因为它允许您在动态且令人愉悦的网格中呈现帖子。您可以自定义内容(帖子或页面)的显示方式,包括帖子标题、摘录、图像、元数据等,以确保外观一致。
了解如何使用 Elementor 设计博客文章模板。
2. 产品网格
循环网格在电子商务网站上非常有用,可以在整洁的网格上显示产品。它允许您显示产品图片、价格和描述,以便客户在您网站上探索产品时可以享受良好的体验。
3. 作品集展示
循环网格小部件允许您以引人注目的布局排列您的绘图、文章、案例研究和作品集。您甚至可以更改网格以匹配您的品牌,以便为您的客户和员工突出显示您的产品组合。
了解如何创建作品集网站。
4. 活动列表
您可以使用循环网格以图形形式组织事件。它允许您直观地列出事件信息,例如日期、地点和描述,以便人们可以快速了解即将发生的事情。
5. 服务清单
您还可以通过样式选项以网格格式提供服务。您可以显示服务标题、描述和照片等关键元素,以便客户一目了然地了解您所提供的服务。
关闭
我们希望您现在了解 Elementor 循环网格小部件的详细信息。一旦您知道如何很好地使用小部件,您就可以为您的网站创造无限的设计可能性。凭借其直观的功能和用户友好性,您可以为您的网站留下专业的影响力,吸引访客。
我们已尽力涵盖您可能在这篇文章中寻找的所有内容。如果您发现我们遗漏了任何内容,请通过下面的评论框告诉我们。如果您想了解有关我们产品的更多信息,您也可以在支持框中留言。
最后,感谢您抽出时间并与我们在一起直到最后。享受,快乐阅读!
