如何在 WordPress 中使用 Elementor 创建即将推出的页面
已发表: 2024-05-20即将推出的页面是在网站或项目完全完成和启动之前创建的。 使用 Elementor,您可以从头开始创建即将推出的页面或使用现成的模板。 Elementor 是一个功能强大的页面构建器,您可以通过它创建不同类型的页面和重要元素并将其添加到您的网站。
即将推出的页面是一个非常宝贵的网站元素,您可以使用 Elementor 插件创建。 在本文中,我们将向您展示如何使用 Elementor 创建即将推出页面的分步指南。
什么是即将推出的页面?
即将推出的页面是在相应网站或项目最终启动之前向访问者显示的临时网页。 它实际上是一个预告片。 它提供有关即将发生的事情的信息,并允许访问者订阅或保持更新,直到页面或项目正式启动。
它通常包括即将推出的产品的简短描述、倒计时器以及供访问者订阅或关注更新的选项。 它作为一种营销工具来捕获潜在客户并建立发布前受众群体,为成功发布奠定基础。
何时以及为何应创建即将推出的页面
从营销的角度来看,创建即将推出的页面可以为您的业务带来很多好处。 但是,您必须具有足够的战略能力来预测未来并相应地实施您的计划。 以下是有关何时以及为何应创建即将推出的页面的一些要点。
- 网站开发
如果您正在构建一个新网站或重新设计现有网站,当您在幕后处理网站时,即将推出的页面可以充当布告栏。 它可以让您告知访问者您的网站正在建设中,并让他们了解即将发生的事情。
- 上市前营销
即将推出的页面可以是一种有效的方式,可以为即将推出的产品或服务引起轰动和期待。 通过提供即将推出的产品的先睹为快,您可以保持潜在客户的兴趣并开始建立发布前的受众群体。
- 产生潜在客户
即将推出的页面的一个主要目的是收集感兴趣的访问者的电子邮件地址和联系信息。 您可以通过提供订阅表格或号召性用语以保持更新来收集潜在客户并建立潜在客户列表。 检查最好的 WordPress 潜在客户生成插件。
- 品牌意识
精心设计的即将推出页面可以帮助建立您的品牌形象并创造令人难忘的第一印象。 通过整合您的品牌颜色、徽标和消息,您甚至可以在网站完全启动之前就开始建立品牌认知度。
- 社交媒体推广
即将推出的页面提供了宣传您的社交媒体帐户并鼓励访问者在 Facebook、Instagram 或 Twitter 等平台上关注您的机会。 这使您可以与受众保持联系,并提供有关网站进度或即将发布的最新信息。
如何在 Elementor 中创建即将推出的页面
现在,我们将在本节中向您展示如何在 Elementor 中创建即将推出的页面。 但在进入教程部分之前,请确保您的网站上安装了以下插件。
- 元素器
- 快乐插件
- 快乐插件专业版
您可能会问 –为什么是 HappyAddons 而不是 Elementor Pro? 答案是,您在 Elementor 中几乎找不到任何现成的即将推出的页面模板。 但 HappyAddons 提供了一系列即将推出的页面模板,可以立即让您的页面准备就绪。
您可以使用免费版本从头开始创建即将推出的页面。 在这种情况下,您将错过许多令人兴奋的高级插件。 但是,我们将在本节中使用 HappyAddons Pro 插件来完成本教程。
有两种方法可以创建即将推出的页面。 下面与我们一起探索它们。
方法一:使用现成的模板创建即将推出的页面
正如我们上面所说,HappyAddons 提供了许多现成的即将推出的页面模板。 使用这些模板,您只需几分钟即可准备好即将推出的页面。 过程如下:
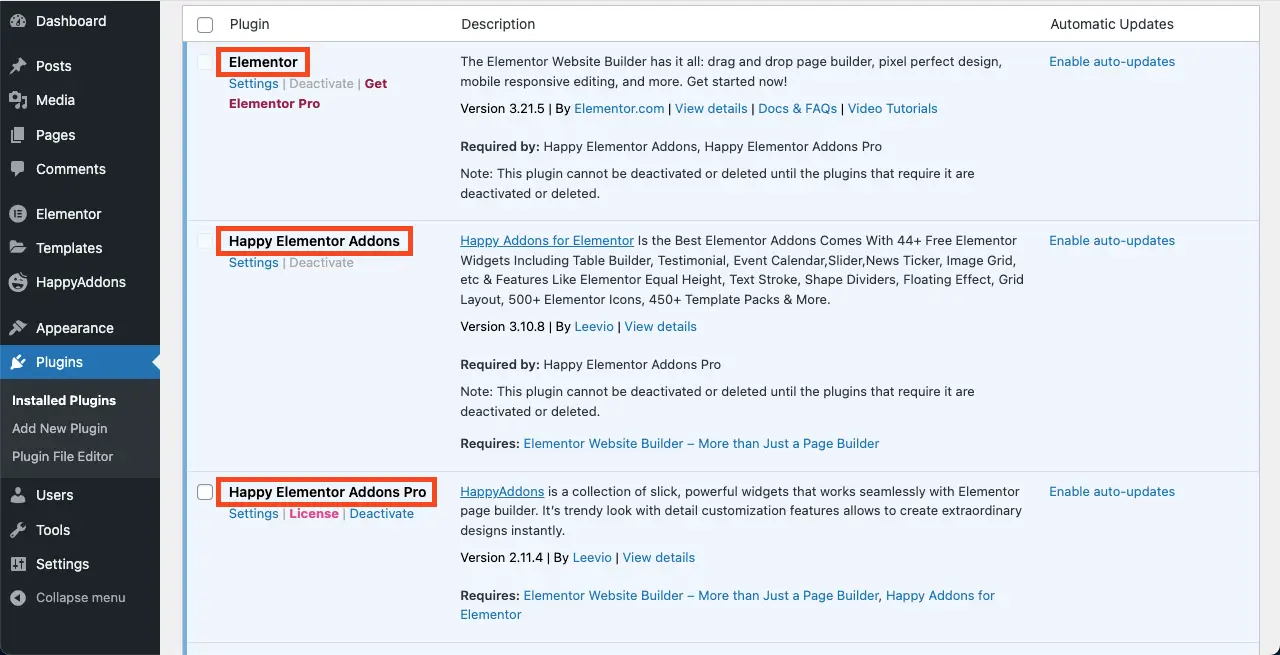
步骤01:安装并激活上述插件
正如我们所说,确保在您的网站上安装并激活这三个插件Elementor、HappyAddons和HappyAddons Pro 。
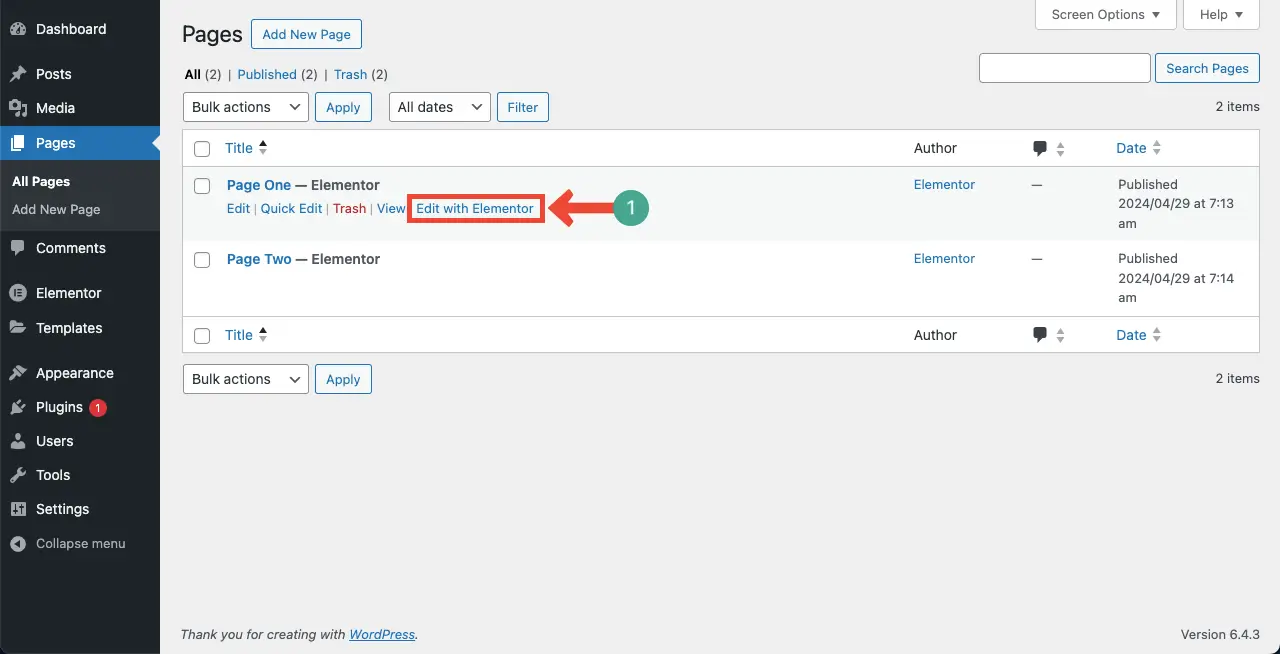
步骤02:使用 Elementor Canvas 打开页面
转到页面 > 添加新页面。 然后,使用 Elementor 打开页面。
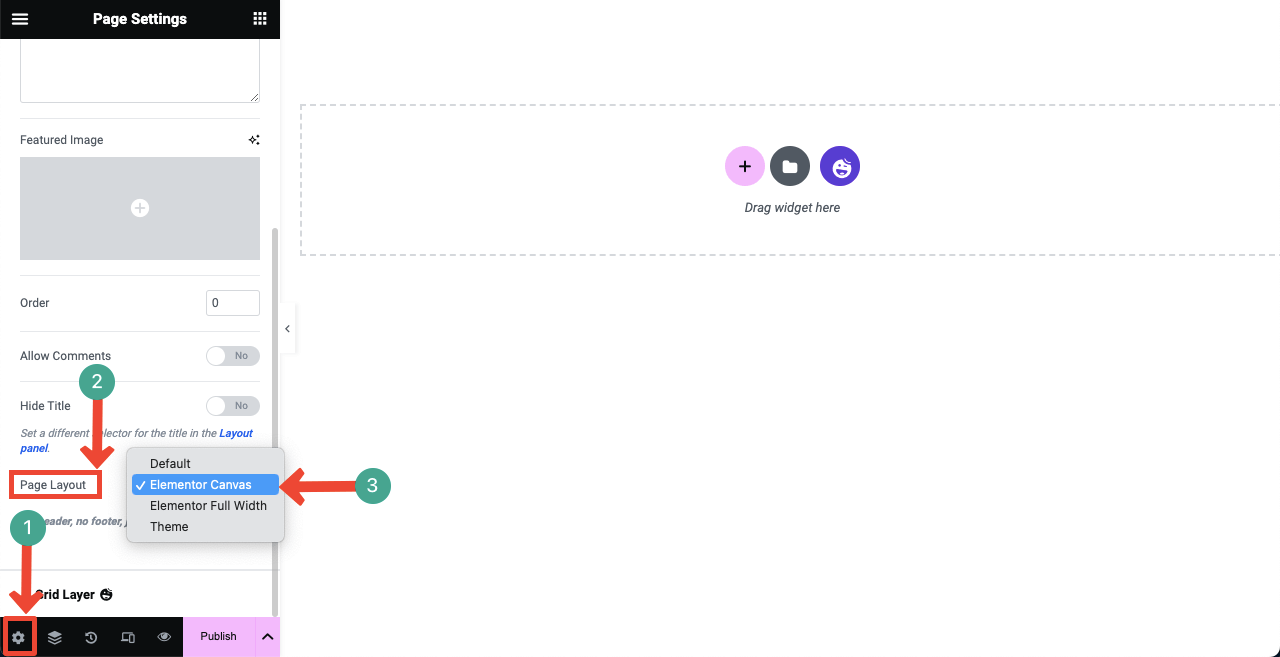
使用 Elementor 打开页面后,转到“设置”>“页面布局” 。 从下拉列表中选择Elementor Canvas 。
Elementor Canvas 将从页面中删除页眉和页脚。 实际上,即将推出的页面不需要显示页眉和页脚。 因此,我们通过选择 Elementor Canvas 选项删除了它们。
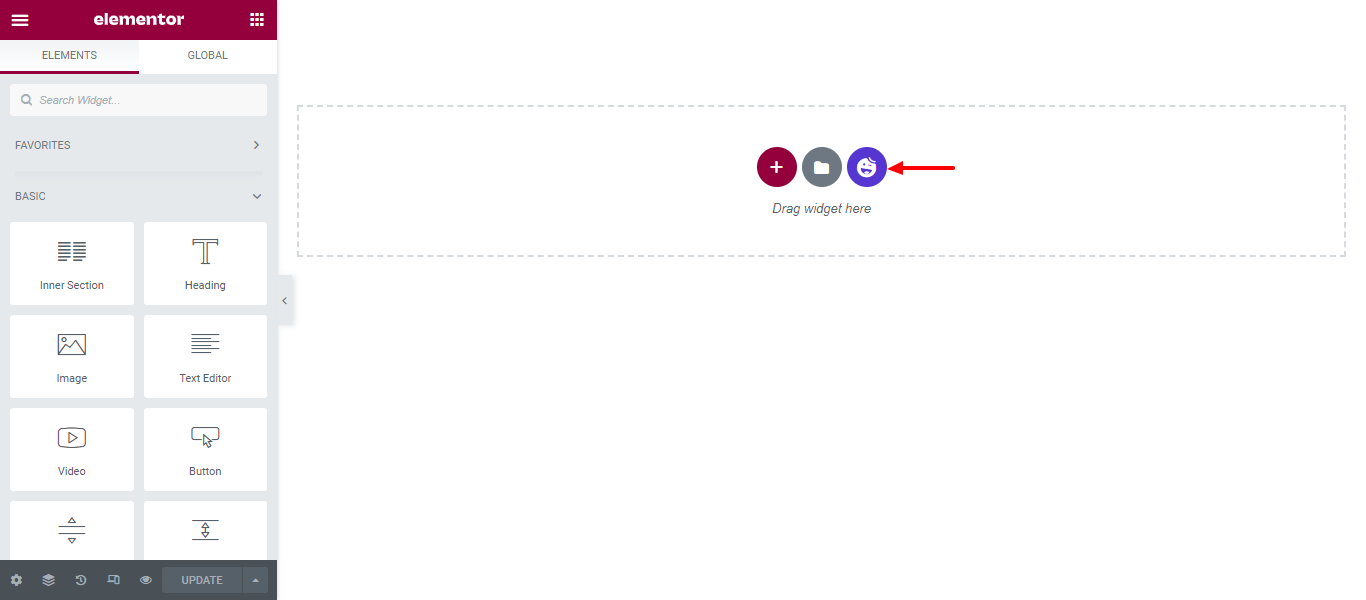
步骤 03:导入即将推出的模板
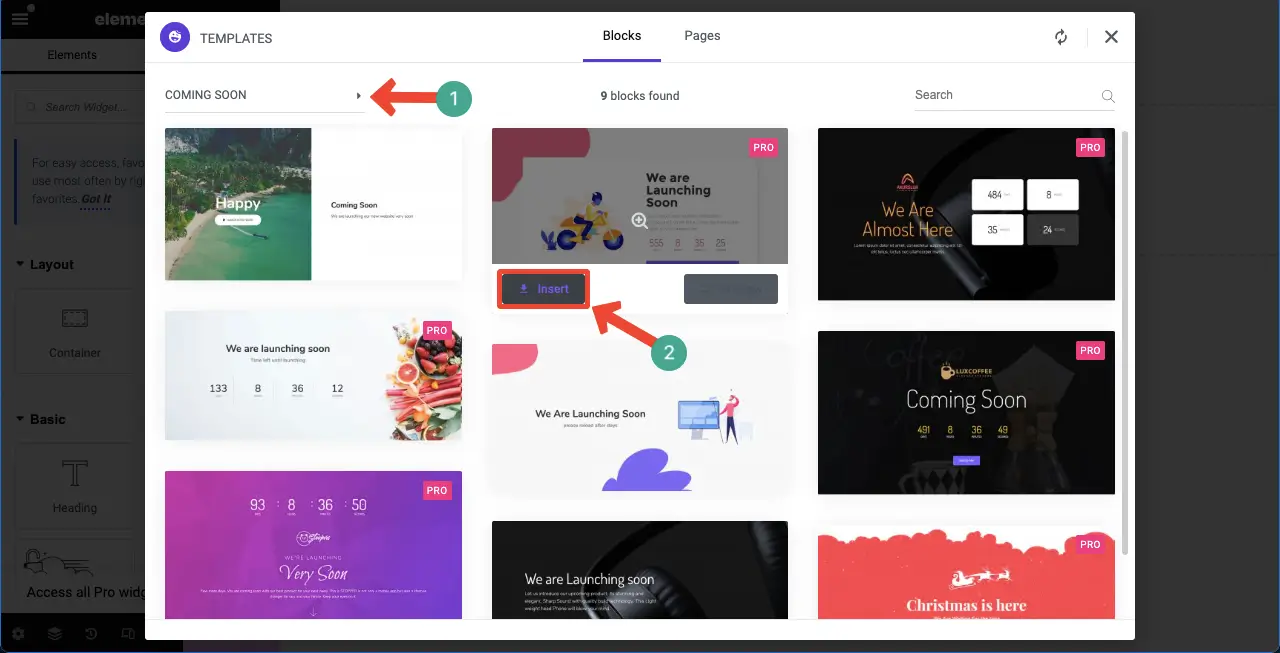
单击 HappyAddons模板库图标可打开并访问模板库。
可以轻松过滤和查找即将推出的页面模板。 单击左上角的箭头符号。
选择即将推出选项。 所有即将推出的块和相关页面都会出现在屏幕上。
点击插入按钮将您喜欢的模板添加到画布中。
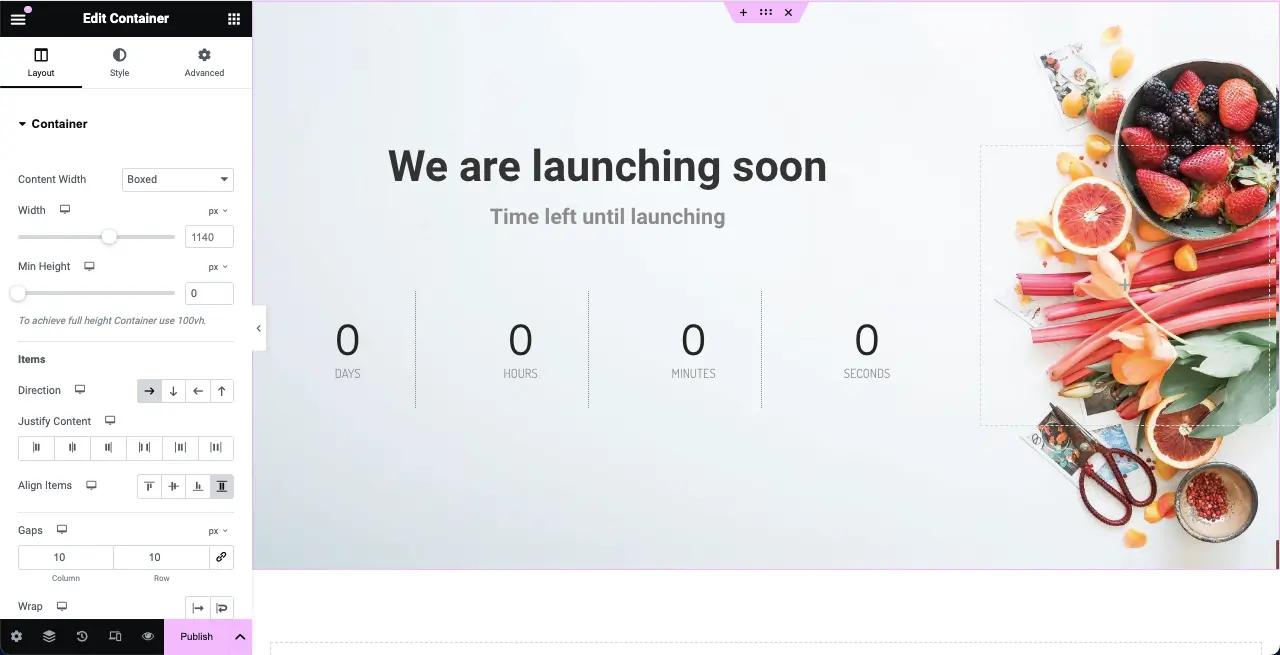
即将推出的页面模板将在几秒钟内导入到画布中。 您现在可以通过添加新的小部件和元素来修改它。
方法二:从头开始创建即将推出的页面
您将在 Elementor 面板中获得许多有用的小部件,这将允许您从头开始轻松创建即将推出的页面。 我们将向您展示如何使用此方法进行操作。 让我们首先看一下创建即将推出的页面所需的小部件。
现在,跳入教程。
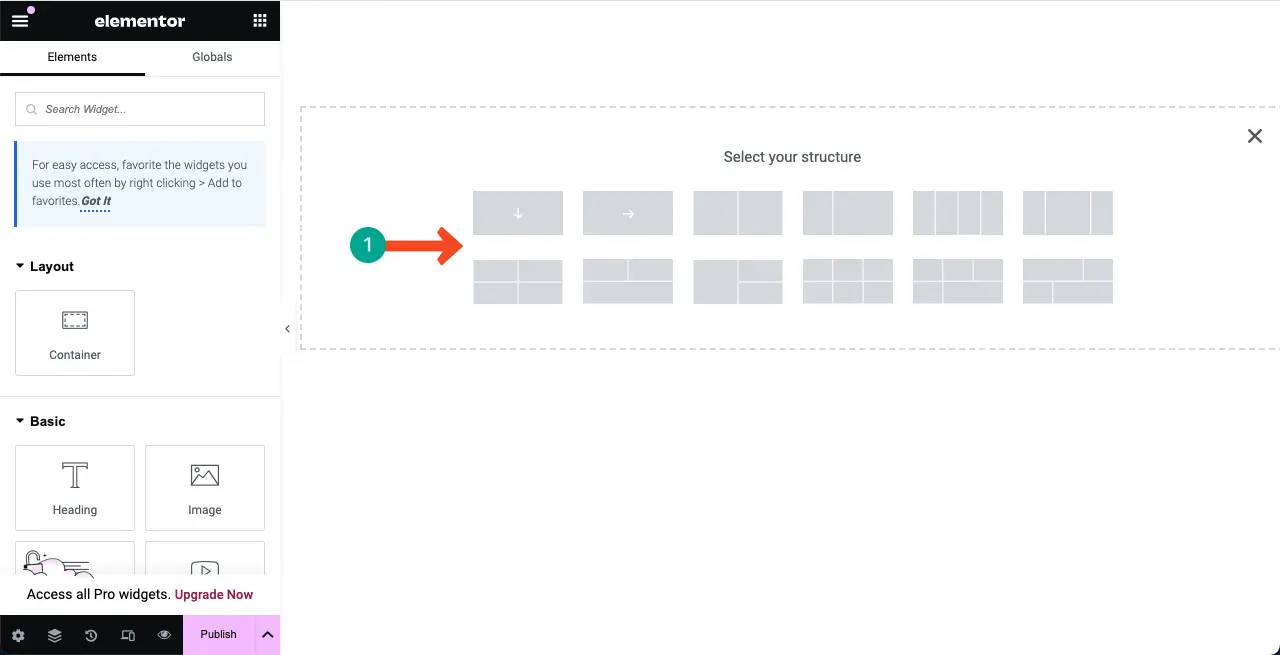
步骤 01:选择一个结构以在 Elementor 画布上添加内容
Elementor 发布了 Flexbox 容器及其更新 3.6。 它使使用 Elementor 添加内容和页面设计变得非常容易。 在画布上选择 Flexbox 列结构,以便您可以添加小部件并设计即将推出的页面。
我们将为本教程选择第一个列结构。
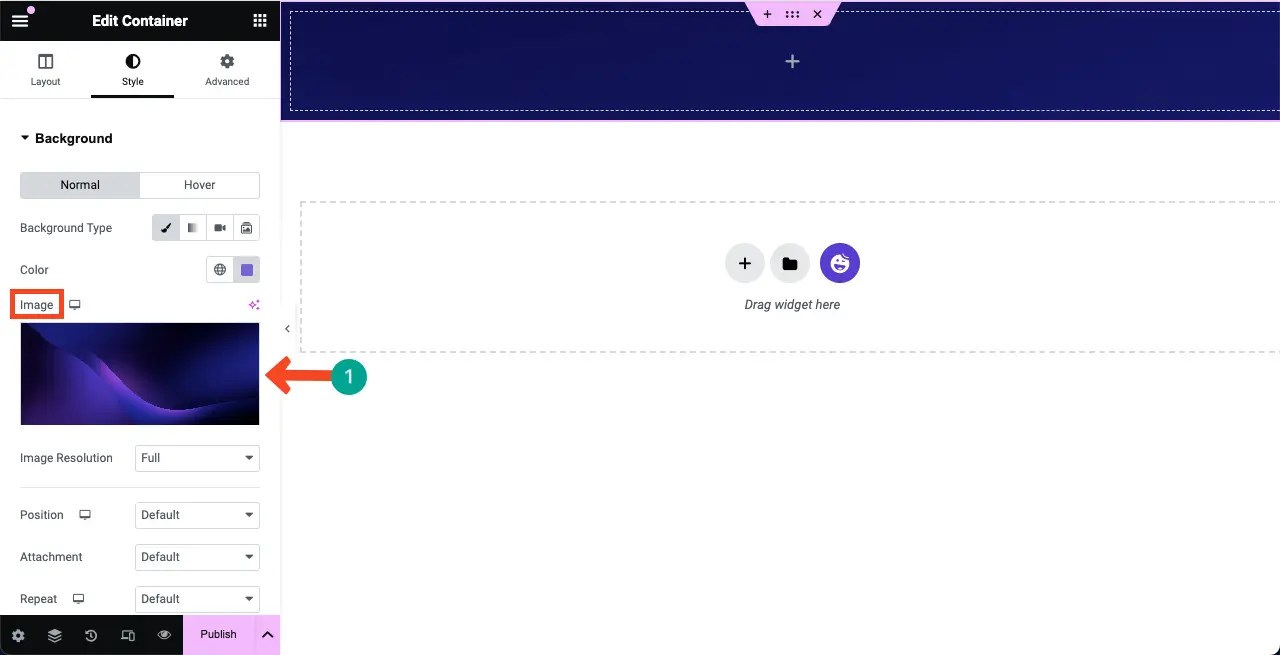
步骤02:为结构列的背景添加颜色或图像
通过向列的背景添加合适的颜色,您可以创建一个充满活力的环境来呈现即将推出的页面的信息和设计元素。
要向列的背景添加颜色,请单击列上的六点图标。 转到样式选项卡。 点击选项卡下的颜色选项。
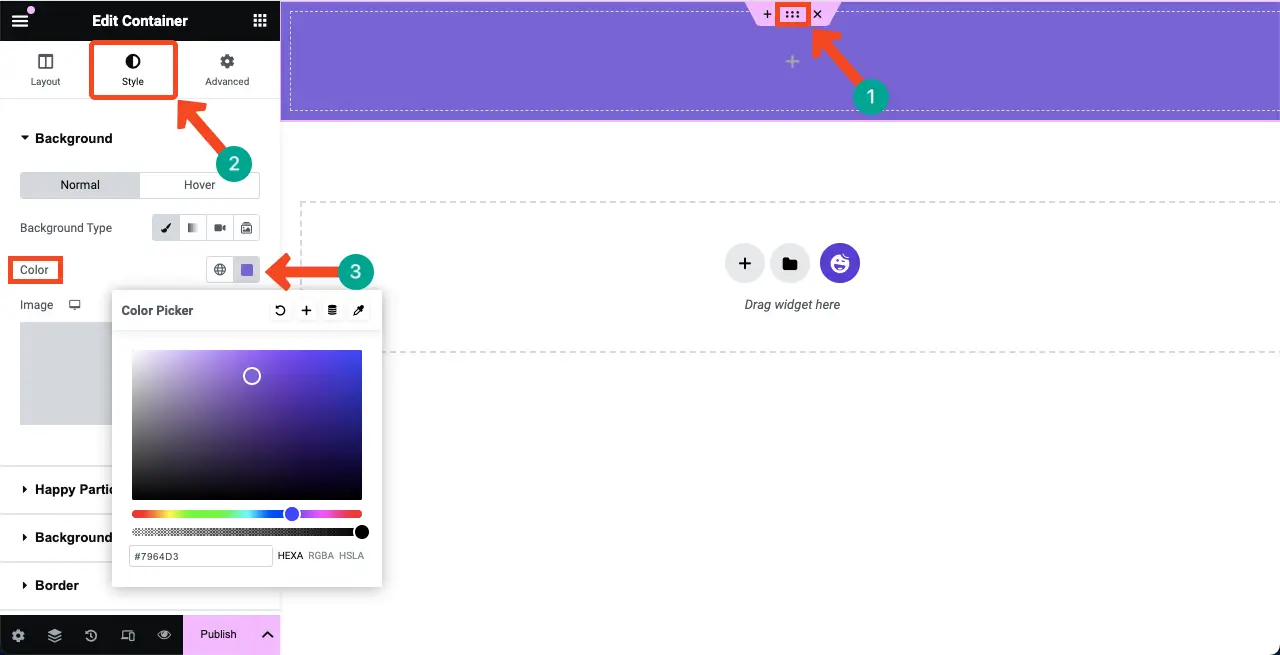
或者,您可以通过点击“样式”选项卡下的“图像”选项将图像添加到背景。
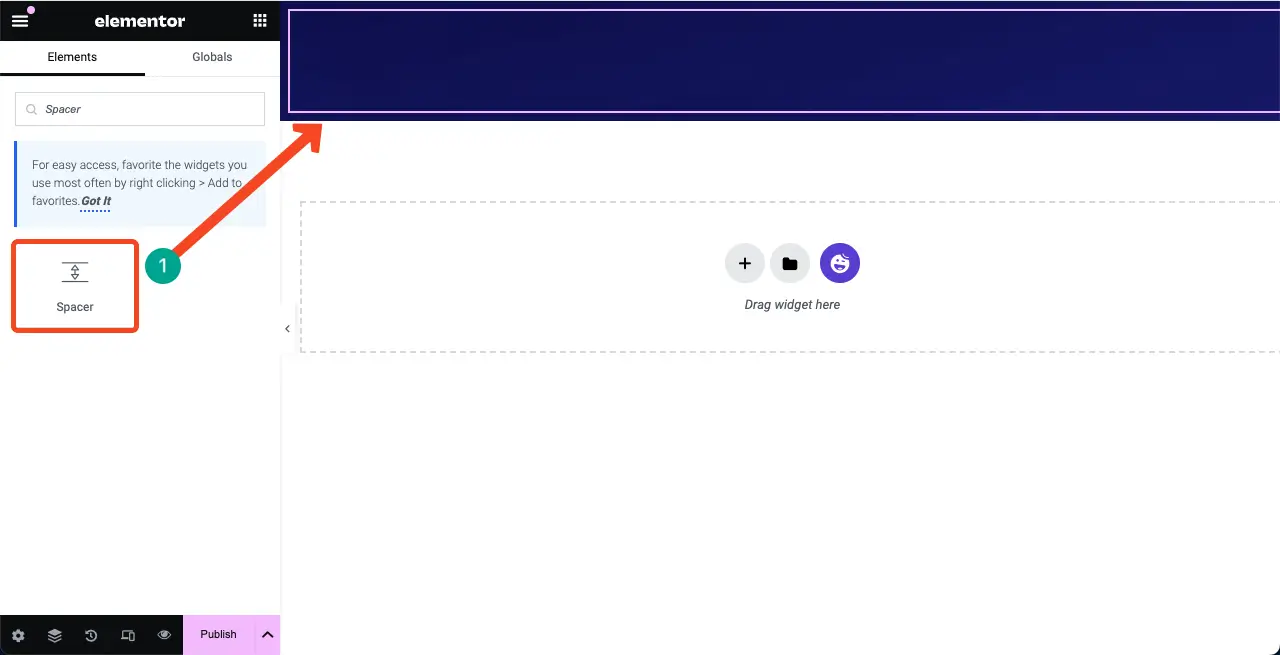
步骤 03:在结构顶部添加间隔小部件
找到Spacer 小部件并将其添加到画布上的选定区域。 它将在选定区域的顶部和其他部分之间创建一个空间。 否则,您的内容可能会与顶部边缘对齐显示,这看起来不太好。
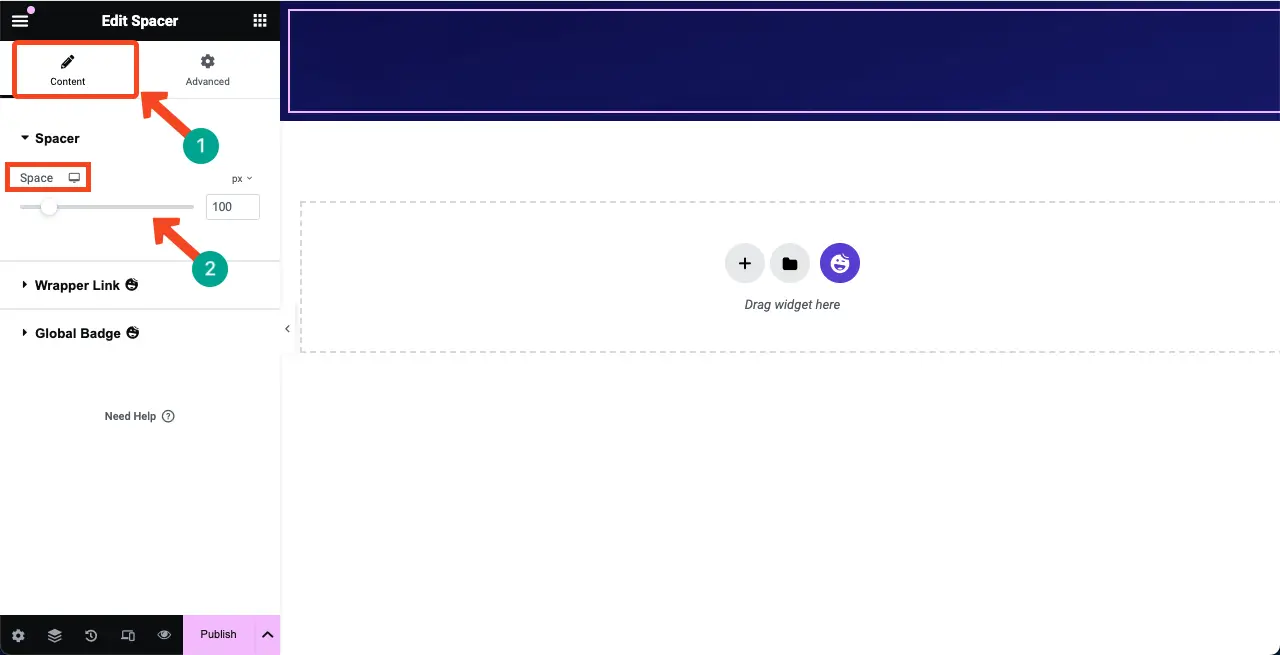
您可以从“内容”选项卡自定义小部件的高度。
步骤04:将文本编辑器小部件添加到选定区域
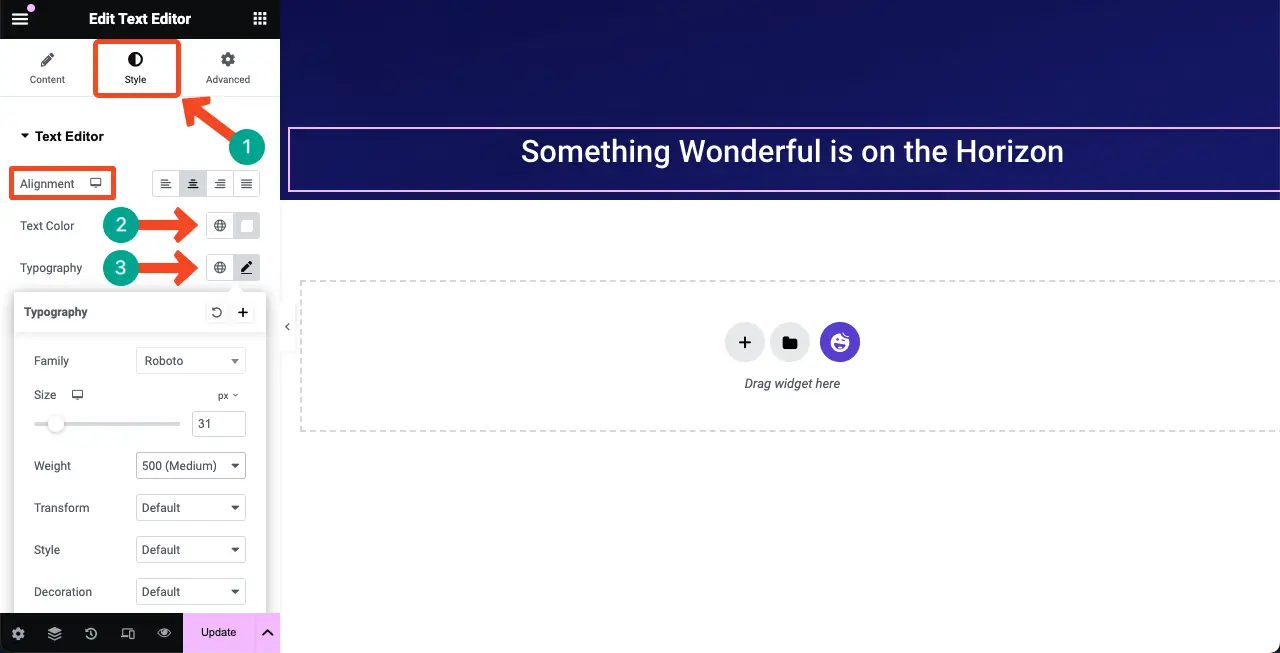
将文本编辑器小部件拖放到画布上所选区域。 它将允许您为即将到来的页面撰写副本。
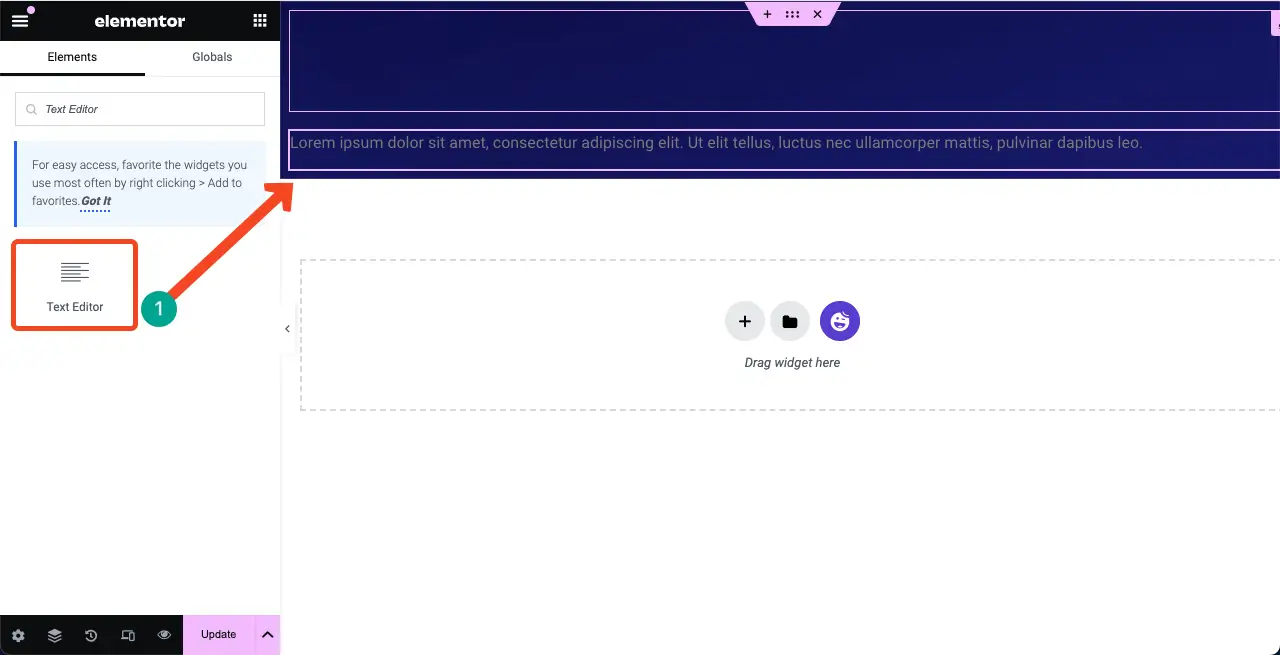
您可以看到我们在小部件上写了一段文字。 之后,我们从“样式”选项卡自定义了其颜色、对齐方式、版式和字体粗细。
步骤 05:将倒计时小部件添加到 Elementor 画布
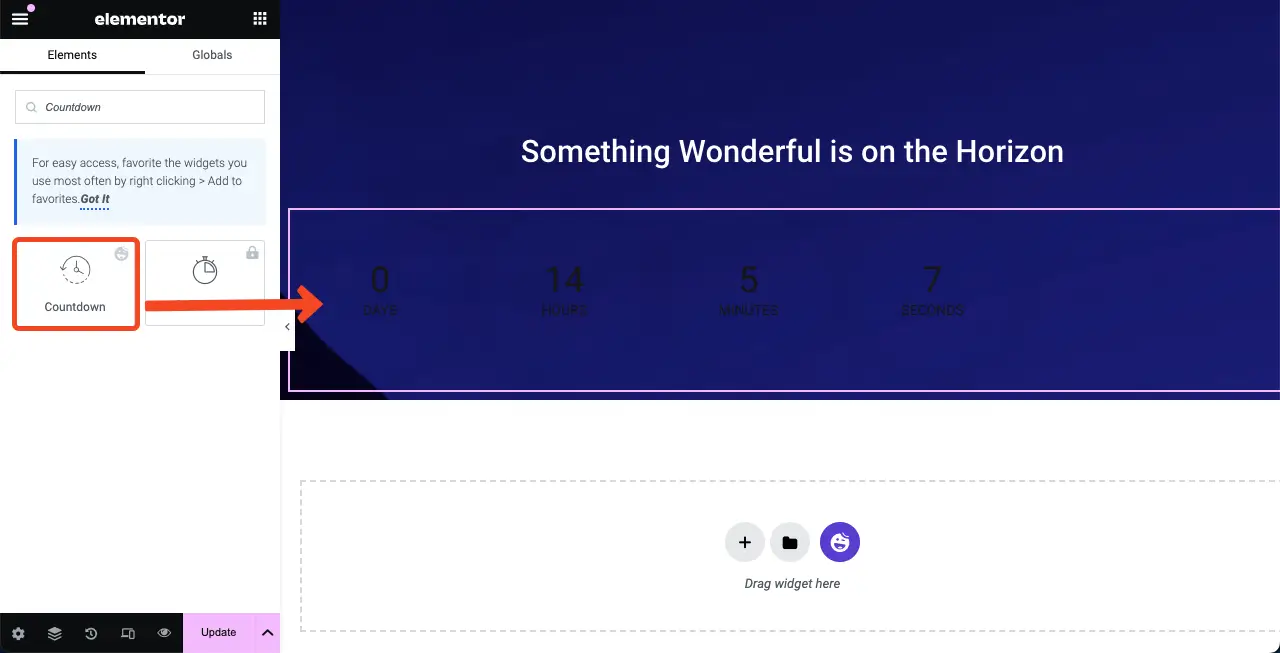
HappyAddons 有一个倒计时小部件。 找到并将其添加到 Elementor 画布中。
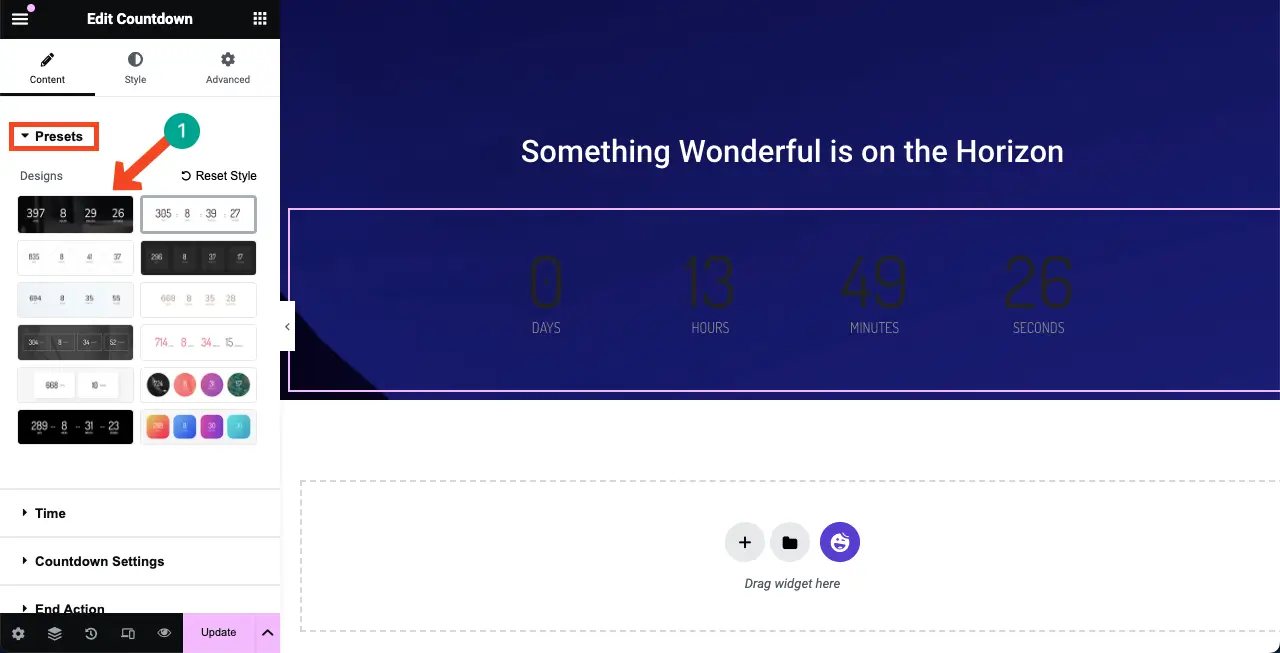
倒计时小部件在预设部分下包含多个模板。 您可以选择一个模板或从头开始自定义它。 但是,我们将为教程选择一个模板。

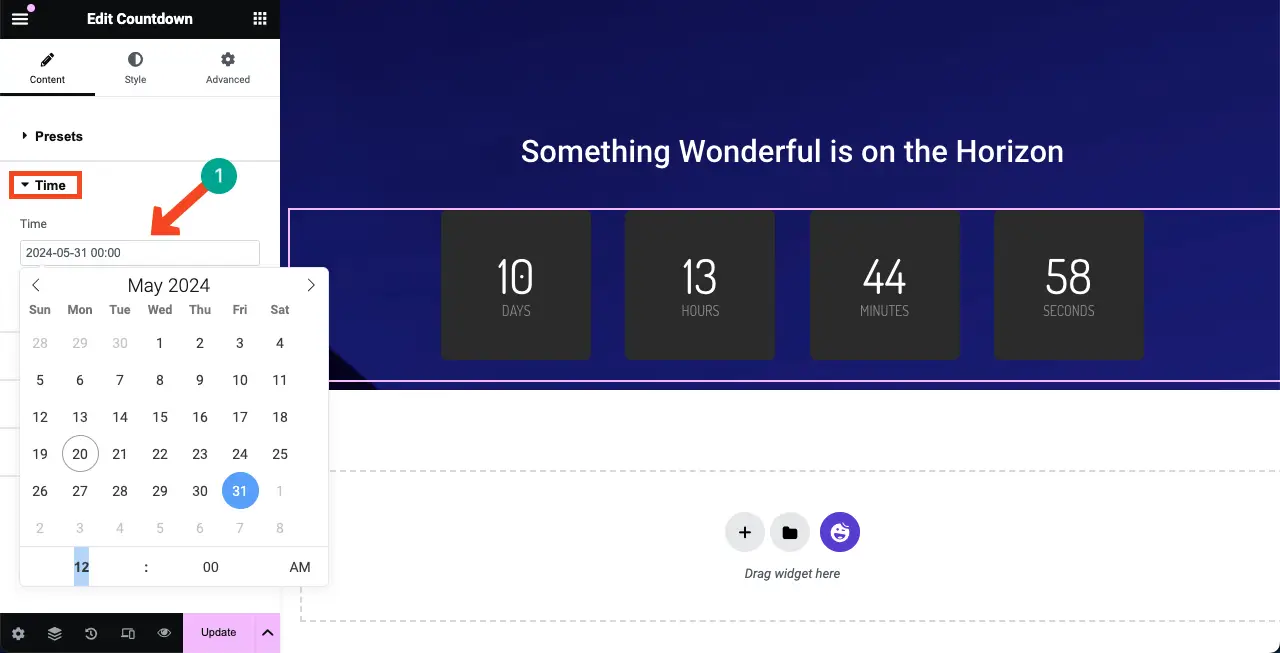
在“时间”部分,您可以设置倒计时持续的时间。
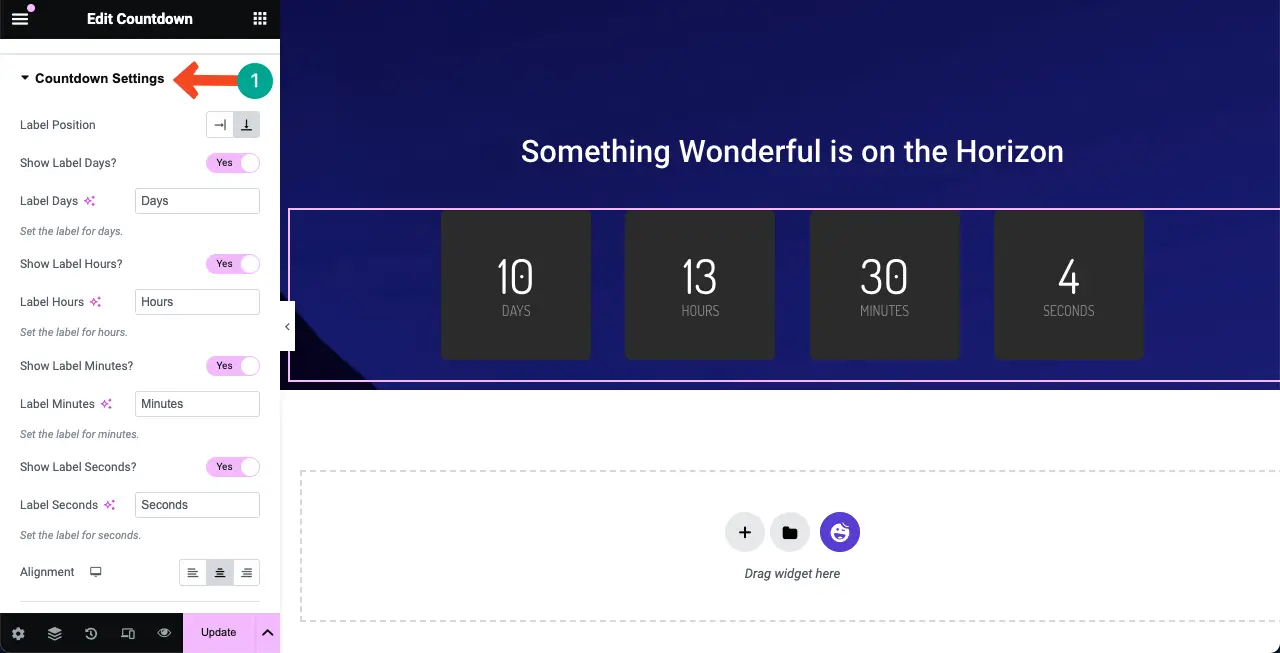
从倒计时设置中,您可以重写倒计时选项的标签及其对齐方式。
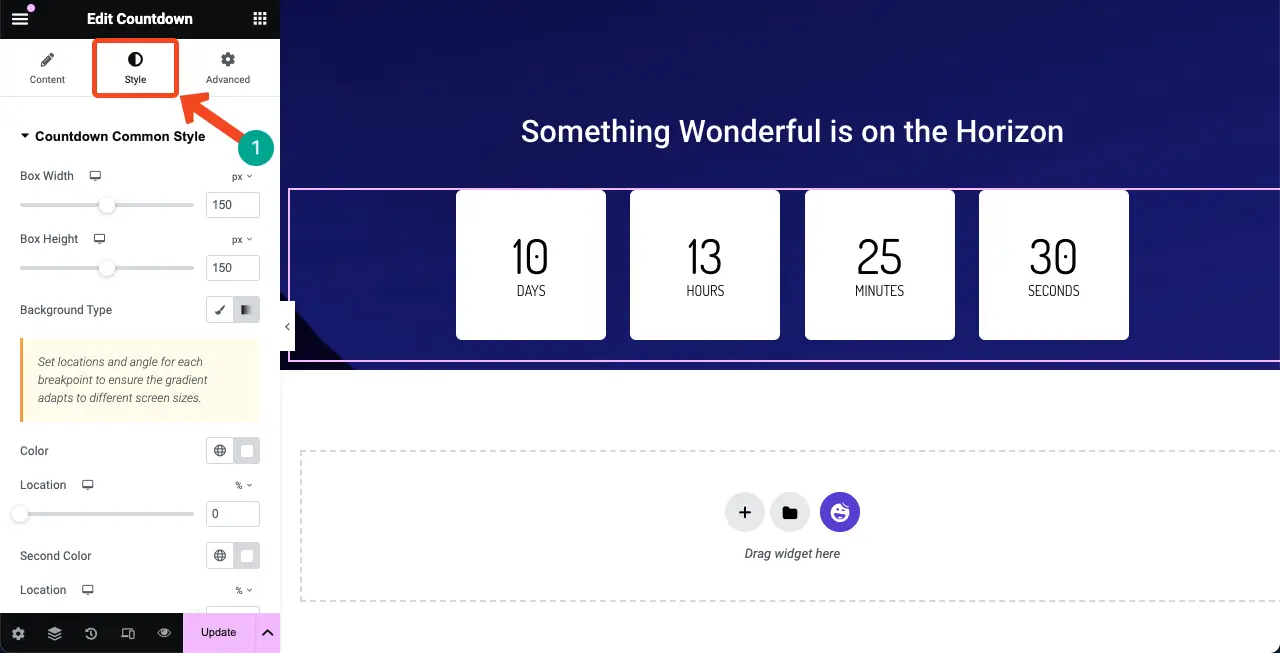
来到样式选项卡。 您将获得使用相应设置对小部件进行风格化的选项。 您可以修改小部件颜色、字体大小、填充、边距等。
步骤06:添加联系表格
在即将推出的页面中添加联系表单至关重要。 它允许您收集想要向您了解最新动态的感兴趣受众的电子邮件 ID。 HappyAddons 与众多表单生成器插件集成,例如 Contact Form 7、WP Forms、Ninja Forms、Caldera Forms、weForms 等。
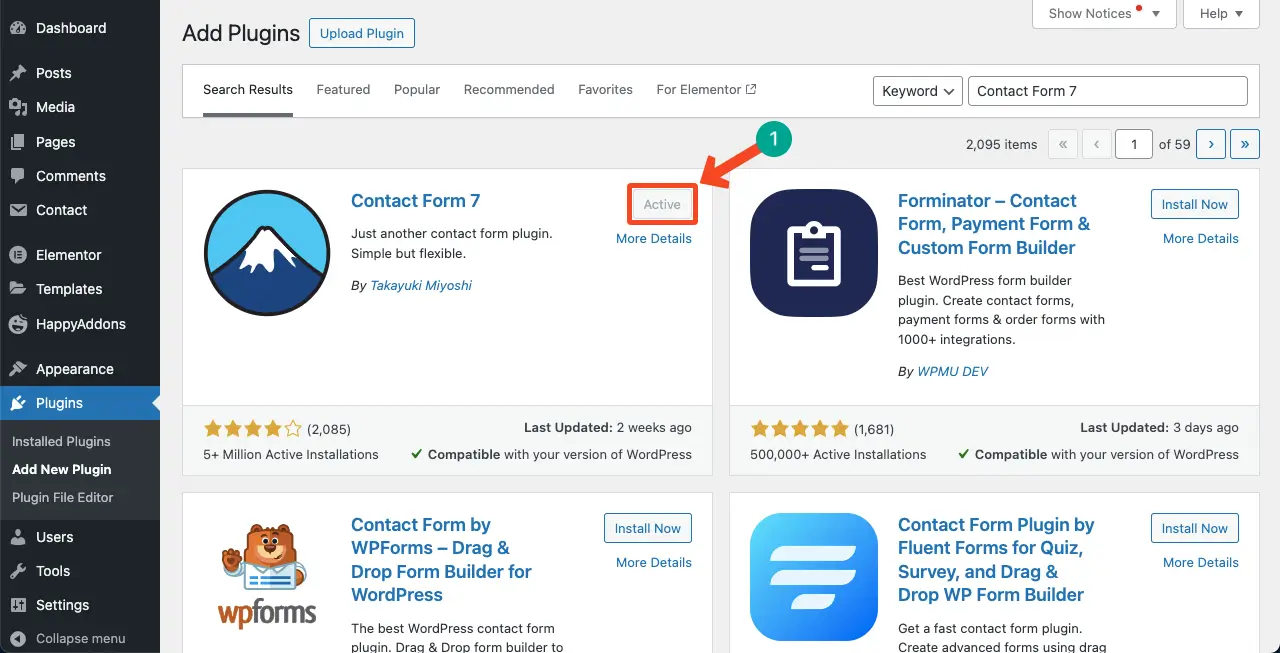
要添加联系表单,请确保您在后端安装了表单插件。 在本教程中,我们安装了 Contact Form 7 插件。 看看其他一些最好的 WordPress 插件联系方式。
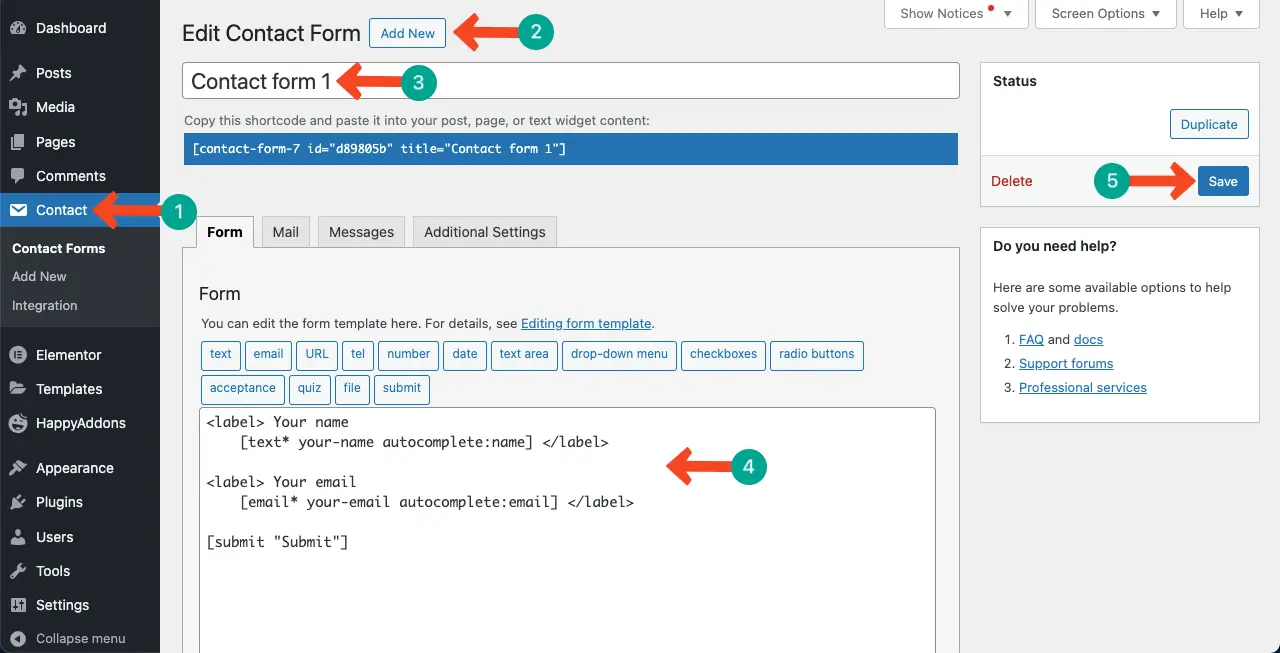
使用该插件创建联系表单。 我们可以看到我们已经创建了它并将其命名为Contact form 1 。
查找Contact Form 7小部件并将其添加到 Elementor Canvas
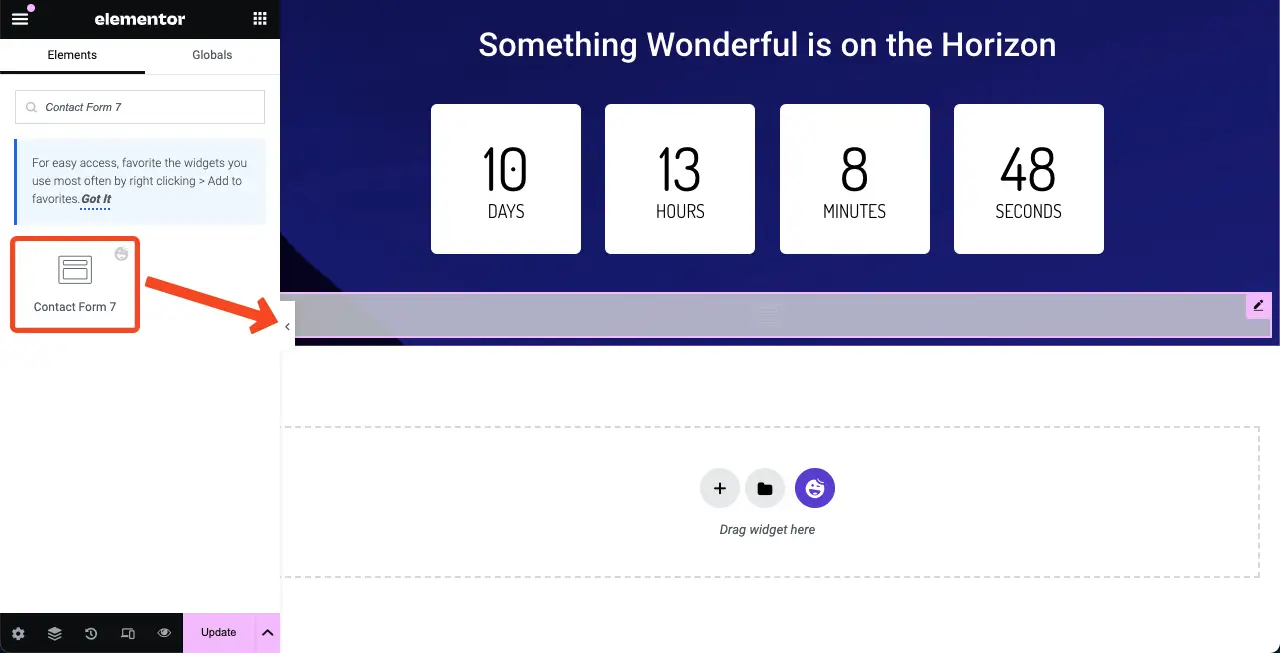
现在,您必须选择要在画布上显示的联系表单。 转到内容 > 联系表 7 。 选择您在后端创建的表单的名称。 请观看下面的视频来探索这个过程。
转至“内容”选项卡下的“预设”选项,选择联系表单的模板。
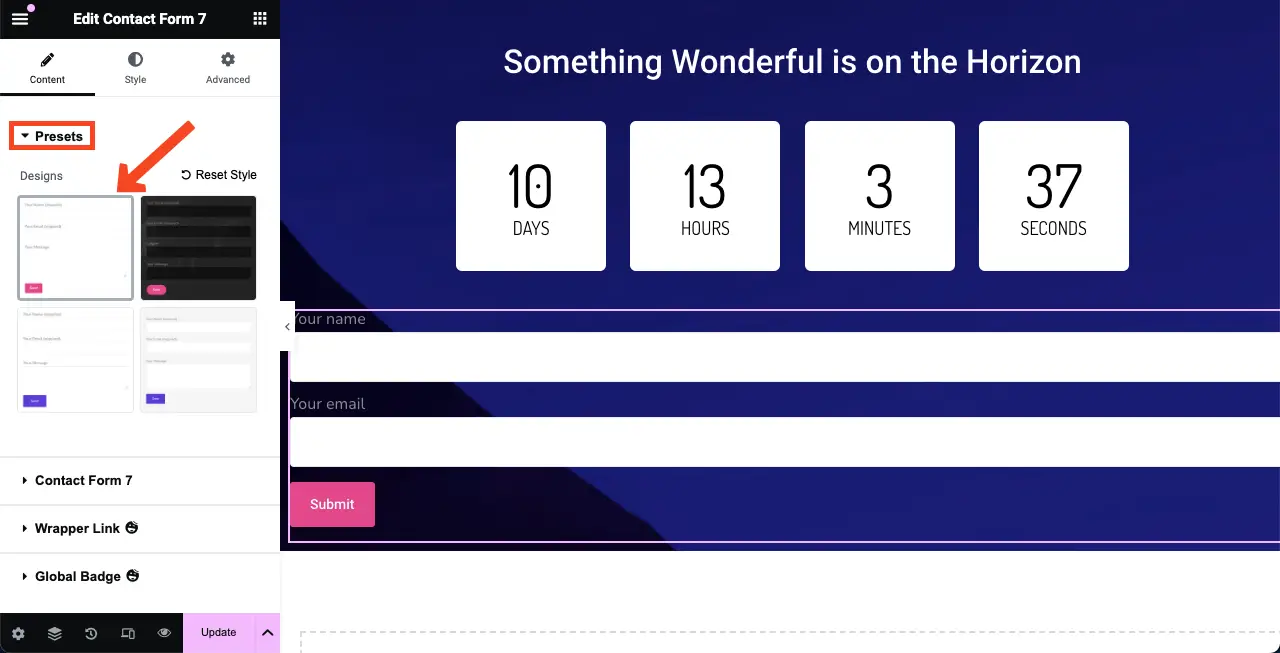
# 风格化联系表
正如您所看到的,接触形式过宽,这与设计不符。 您可以通过按住表单的右侧边缘并向左拖动来减小表单的宽度。
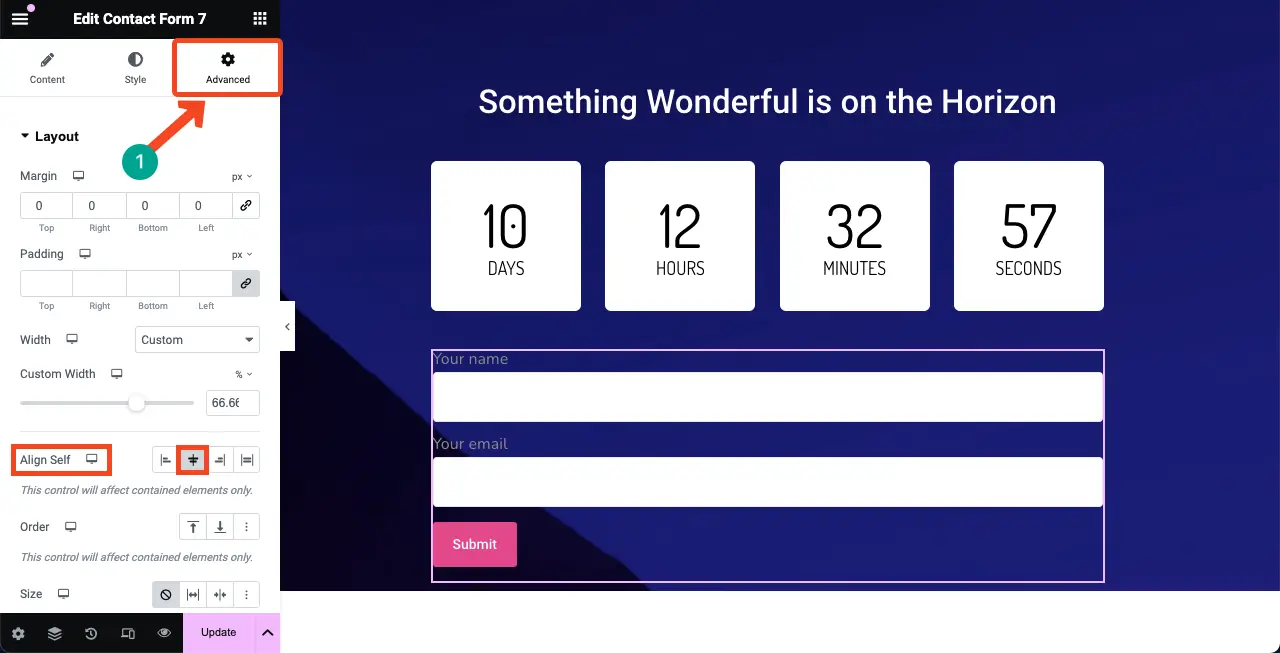
转到“高级”选项卡。 您将在其下方看到“自我对齐”选项。 从这里,您可以选择居中对齐选项以在画布的中间部分展示表单。
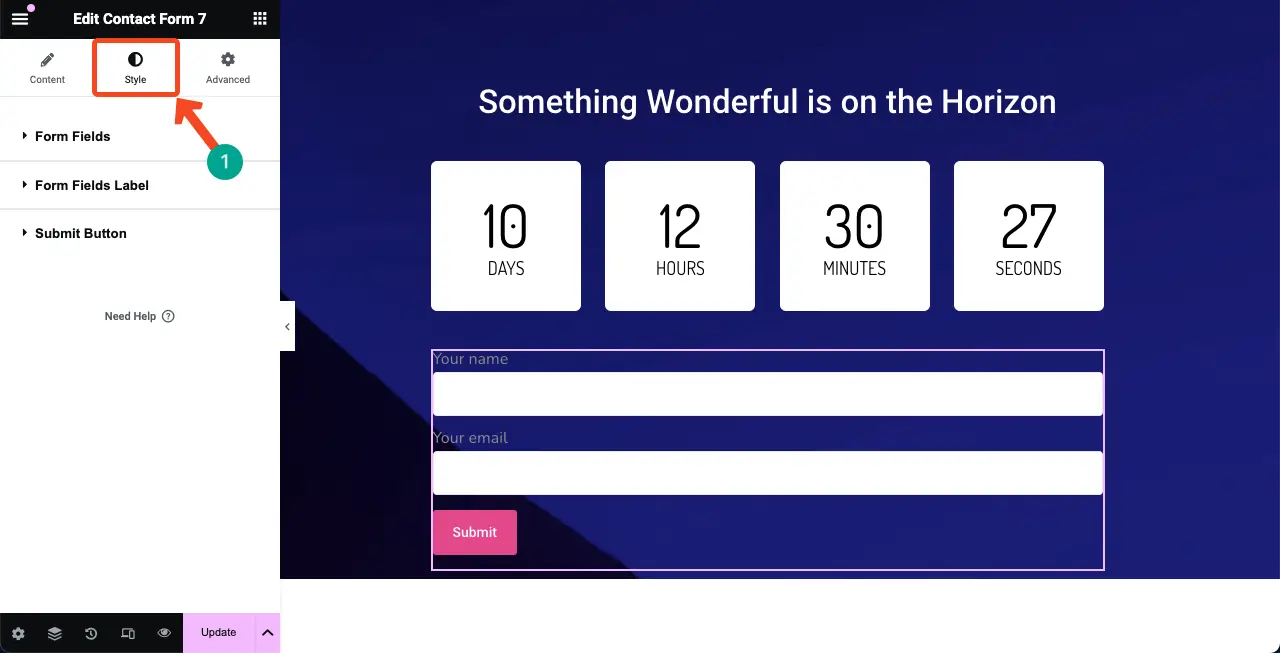
来到样式选项卡。 您将在此选项卡中获得选项来自定义标签颜色-大小-粗细、占位符颜色、字体大小和 CTA 按钮。
我们在这里不解释细节。 希望你能自己做。
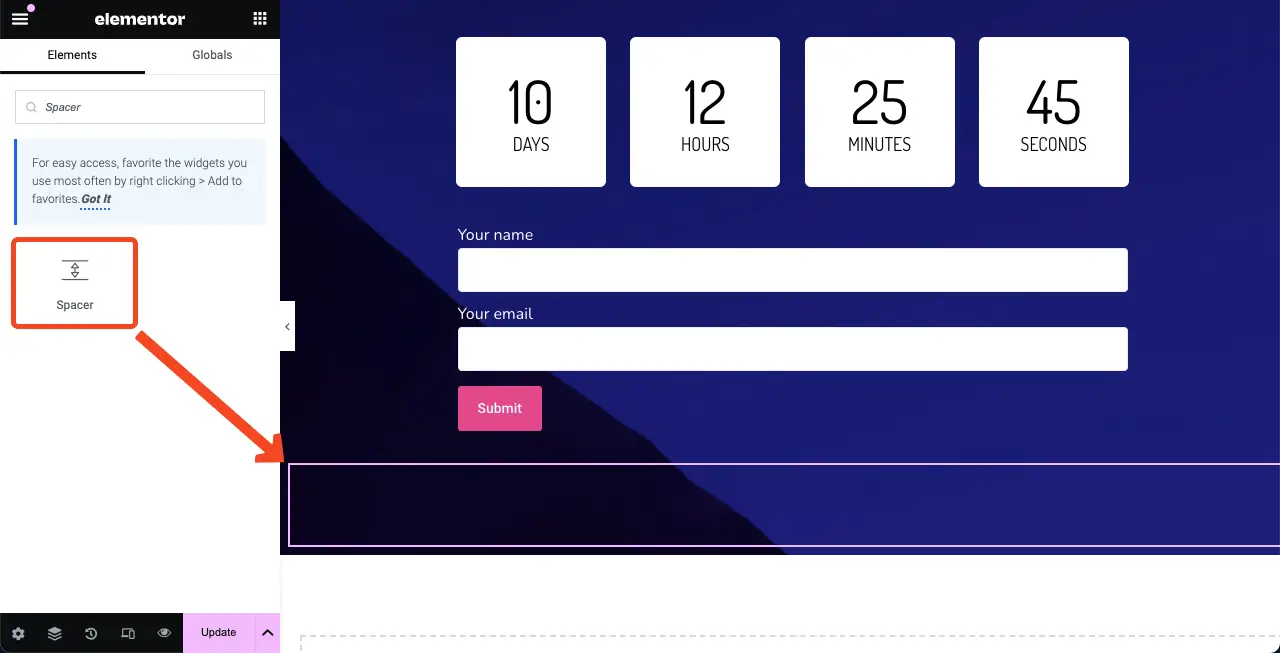
步骤07:在末尾添加间隔小部件
再次添加 Spacer 小部件以在画布底线和主要内容之间创建一个空间。 这将使即将推出的页面设计看起来不错。
步骤08:添加“即将推出”文本
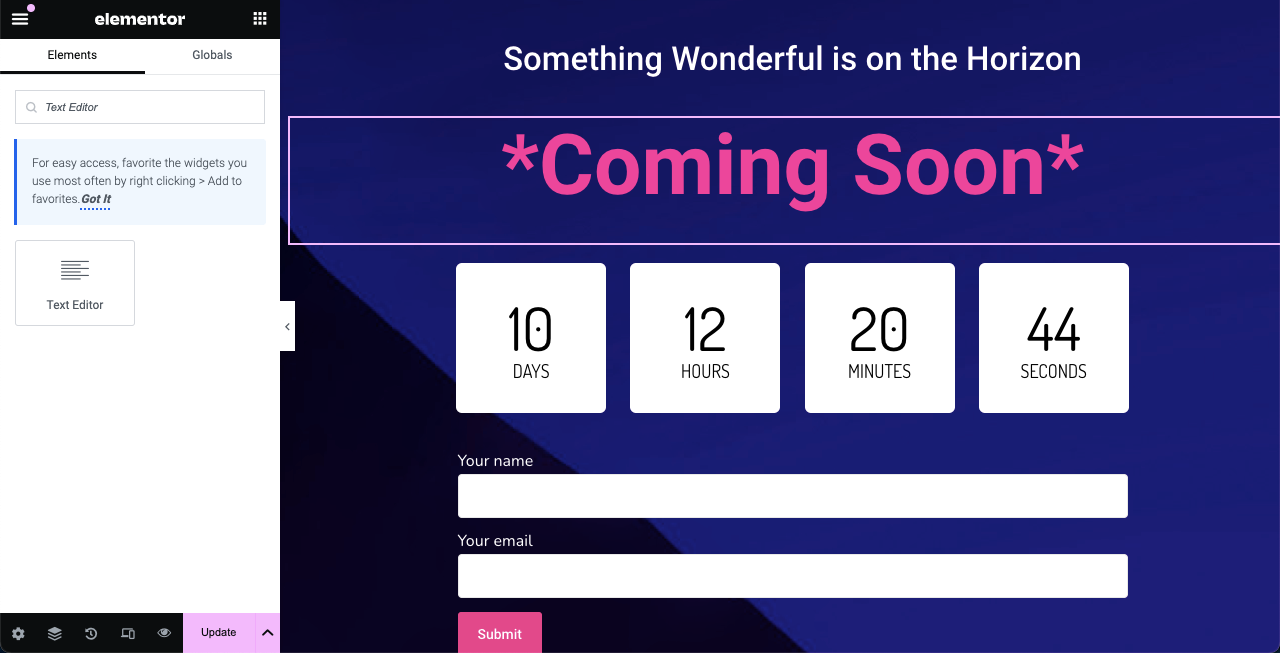
嘿,由于这是一个即将推出的页面,因此您必须将“即将推出”添加到画布中,以使您的设计更有意义。 我们忘记在一开始就添加它。 但一旦发现,采取正确的行动永远不会太晚。
使用文本编辑器小部件,您可以轻松地将“即将推出”文本添加到画布中。 见下图; 我们已经做到了。
步骤 09:使即将推出的页面具有移动响应能力
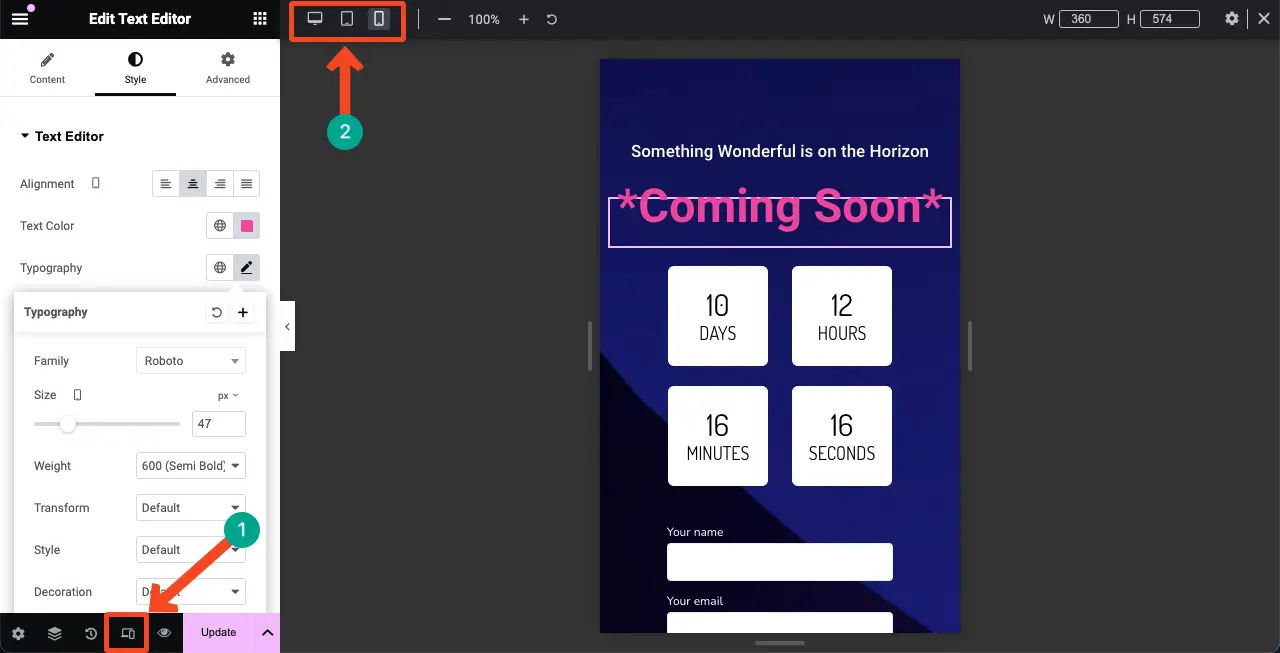
由于移动设备和平板电脑设备的屏幕宽度相对较窄,因此您必须减小页面元素的尺寸,使其完美适合屏幕。
单击 Elementor 面板页脚的“响应模式”选项。 它将打开根据设备在不同断点之间切换的选项。
无论您切换到什么设备,都可以自定义内容以使其完美适合屏幕尺寸。 将针对该设备的屏幕尺寸保存自定义详细信息。
注意:不要删除任何屏幕上的任何元素; 它将同样适用于所有设备模式。
检查如何使 Elementor 网站具有移动响应能力。
第10步:保存设计
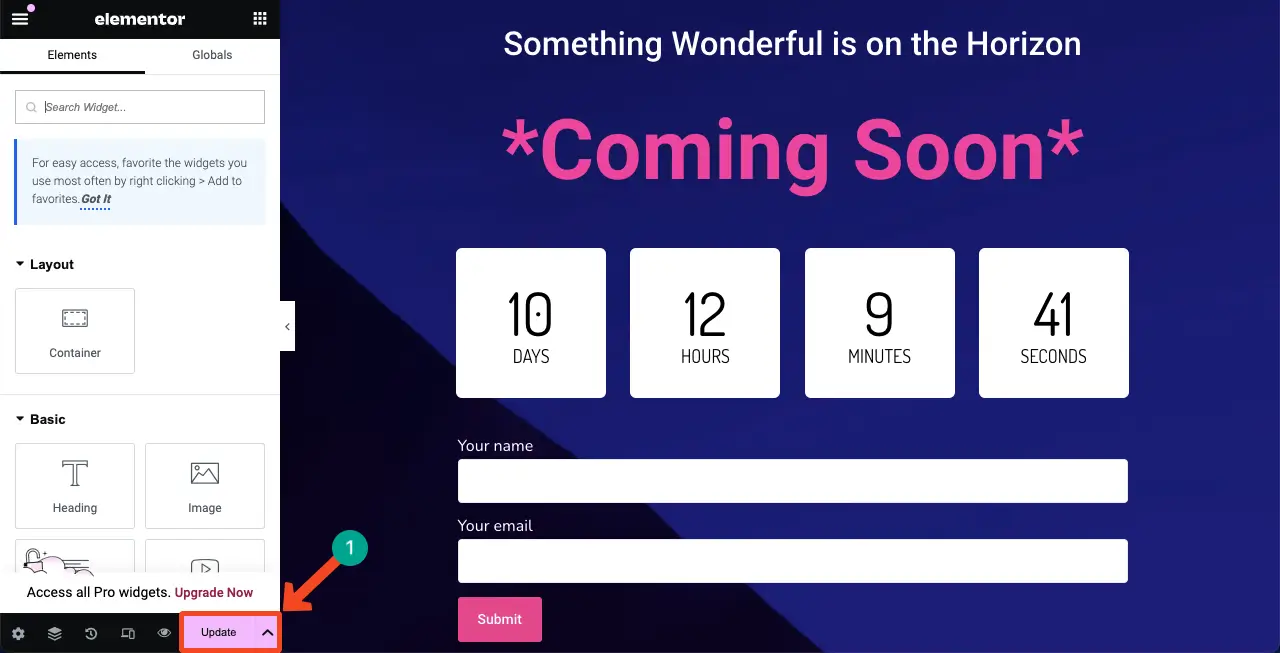
设计完成后,单击 Elementor 面板上的“发布”或“更新”按钮保存设计和所有更改。
注意:使用合适的名称(例如“即将推出”)保存页面,以便您以后需要时可以找到它。
因此,您可以使用 Elementor 创建即将推出的页面。 您现在可以将其用作即将推出的登陆页面或模板。 该模板可以导入并在使用 Elementor 构建的其他网站上使用。
如何在 WordPress 中启用 Elementor 即将推出
到目前为止,您刚刚使用 Elementor 设计了“即将推出”页面。 您现在必须完成更多配置才能将其显示在前端。 转到您的WordPress 仪表板。 导航到Elementor > 工具 > 维护模式。
从选择模式选项中选择维护。
从“谁可以访问”中,您可以定义谁将看到即将推出的页面。
接下来,从“选择模板”选项中选择您刚刚创建的页面。
单击最后的“保存更改”按钮。
您将看到维护模式已被激活,并且您的页面将显示在前端。
包起来!
总而言之,在 WordPress 中使用 Elementor 设置即将推出的页面是在完成网站时保持受众参与度的绝佳方法。 使用 Elementor,您可以轻松创建页面,同时保持页面引人注目且功能齐全。
尽管添加联系表单不是强制性的,但我们建议您通过添加由强大插件支持的联系表单来完成页面,这样您就不会错过潜在的潜在客户。 如果您遇到任何问题,只需在评论框中输入或通过我们的聊天框将其发送给我们的支持人员。
