
ส่วนที่ 6 – การเขียนโปรแกรม WordPress และ Object Oriented: ตัวอย่าง WordPress – การนำไปใช้: การลงทะเบียน Sections
เผยแพร่แล้ว: 2022-02-04ยินดีต้อนรับกลับสู่ซีรีส์ของเราเกี่ยวกับการเขียนโปรแกรมเชิงวัตถุ
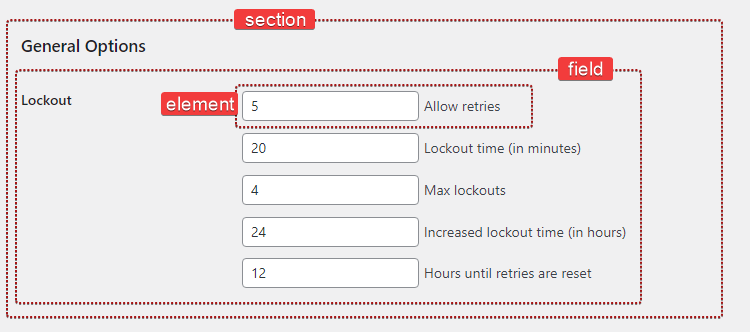
ตามที่เราอธิบายไว้ในส่วนการออกแบบของซีรีส์ หน้าผู้ดูแลระบบประกอบด้วย ส่วนต่างๆ แต่ละส่วนประกอบด้วยฟิลด์ตั้งแต่หนึ่ง ฟิลด์ ขึ้นไป และแต่ละฟิลด์เหล่านั้นมี องค์ประกอบ ตั้งแต่หนึ่งรายการขึ้นไป
มันจะมีลักษณะอย่างไรในโค้ด?
public function register_sections() { $my_section = $this->register_section( /* ... */ ); $my_field = $my_section->add_field( /* ... */ ); $my_element = $my_field->add_element( /* ... */ ); } เอาล่ะ ดูเหมือนจะใช้งานง่าย และเราบอกได้เลยว่าเราอาจจะต้องสร้างสามคลาสใหม่: Section , Field และ Element
class Section {} class Field {} class Element {}ลองใช้เวลาสักครู่แล้วถามตัวเองว่าเรารู้อะไรบ้างเกี่ยวกับชั้นเรียนเหล่านี้
-
$my_section->add_field()→ คลาสSectionควรจะสามารถเพิ่ม (และจัดเก็บ) วัตถุFieldใหม่ได้ -
$my_field->add_element()→ คลาสFieldควรสามารถเพิ่ม (และจัดเก็บ) วัตถุElementใหม่ได้
เราเริ่มต้นด้วยการจัดเก็บวัตถุ Field ของเราในอาร์เรย์ ตามปกติเราจะทำ:
class Section { /** * @var Field[] Section field objects. */ protected $fields = array(); ตัวแปร $fields นี้เป็นสมาชิกคลาสและเป็นสิ่งที่เราเรียกว่า คุณสมบัติ คุณสมบัติคือตัวแปร PHP ที่อาศัยอยู่ในคลาส และสามารถเป็นข้อมูลประเภทใดก็ได้ ( string , integer , object ฯลฯ )
เราจะเขียน add_field() เพื่อสร้างและเพิ่มฟิลด์ใหม่
public function add_field() { $field = new Field( /* ... */ ); $this->fields[] = $field; return $field; } เมธอดนี้จะสร้างออบเจ็กต์ Field ใหม่ เพิ่มลงในคุณสมบัติฟิลด์ และส่งคืนออบเจ็กต์ที่สร้างขึ้นใหม่ ค่อนข้างตรงไปตรงมา
มาทำซ้ำขั้นตอนเดียวกันสำหรับคลาส Field เช่นกัน
class Field { /** * @var Element[] Field elements. */ private $elements = array(); /** * Create a new element object. * * @return Element */ private function create_element() { return new Element( /* ... */ ); } /** * Add a new element object to this field. */ public function add_element() { $element = $this->create_element(); $this->elements[] = $element; } }นั่นคือการเริ่มต้น! อะไรต่อไป?
หมวดวิชา
เราจำเป็นต้องเรียก add_settings_section() เมื่อมีการสร้างส่วนใหม่ เป็นอีกครั้งที่เมธอด Constructor เป็นวิธีที่ยอดเยี่ยมในการเริ่มต้นของเรา มาเพิ่มในชั้นเรียนกันเถอะ:
class Section { // ... public function __construct() { add_settings_section( $this->id, $this->title, array( $this, 'print_description' ), $this->page ); } }ดูเหมือนว่า Section ต้องการชื่อกระสุนเพื่อระบุส่วนนั้น (ใช้ในแอตทริบิวต์ id ของแท็ก) นอกจากนี้ยังสามารถมีชื่อ คำอธิบาย และอยู่ในหน้าเฉพาะ
class Section { /** * @var Field[] Section field objects. */ protected $fields = array(); /** * @var string Section title. */ public $title; /** * @var string Section id. */ public $id; /** * @var string Slug-name of the settings page this section belongs to. */ public $page; /** * @var string Section description. */ public $description;เราสามารถตั้งชื่อหัวข้อได้โดยทำดังนี้:
$section = new Section(); $section->title = __( 'Hello world', 'prsdm-limit-login-attempts' );นั่นไม่ถูกต้องนัก แม้ว่าโค้ดด้านบนจะถูกต้องอย่างสมบูรณ์ แต่ก็ไม่ได้ทำในสิ่งที่เราคาดหวังไว้
เมธอดตัวสร้างจะดำเนินการเมื่อมีการสร้างอ็อบเจ็กต์ Section ใหม่ ดังนั้น add_settings_section() จะถูกเรียกก่อนที่เราจะมีโอกาสตั้งชื่อ ส่งผลให้ส่วนนี้ไม่มีชื่อเรื่อง

โฮสต์เว็บไซต์ของคุณด้วย Pressidium
รับประกันคืนเงิน 60 วัน
ชื่อเรื่องจะต้องพร้อมใช้งานในระหว่างการเริ่มต้นวัตถุของเรา ดังนั้นเราจึงต้องทำสิ่งนี้ในตัวสร้าง
class Section { /** * @var string Section title. */ private $title; public function __construct( $title ) { $this->title = $title; // ... } // .. ระวังว่า $this->title หมายถึงคุณสมบัติของคลาสหัวเรื่อง โดยที่ $title หมายถึงอาร์กิวเมนต์ของคอนสตรัคเตอร์
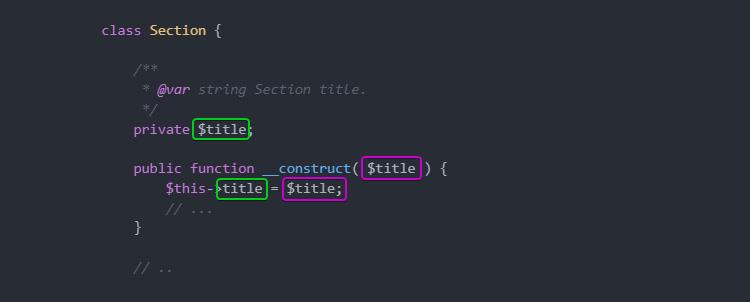
ที่นี่ เรายังใช้ประโยชน์จากการ มองเห็น เนื่องจากคุณสมบัติ $title ของเราจะเข้าถึงได้โดยคลาสที่กำหนดเท่านั้น เราจึงสามารถประกาศให้เป็น private ได้ ดังนั้นเราจึงป้องกันไม่ให้มีการเข้าถึงภายนอกชั้นเรียน
โอ้ และเรายังต้องเพิ่ม print_description() ซึ่งจะพิมพ์คำอธิบายของส่วนนั้นด้วย
/** * Print the section description. */ public function print_description() { echo esc_html( $this->description ); }เมื่อนำทั้งหมดมารวมกันแล้ว คลาส Section ของเราจะมีหน้าตาแบบนี้
class Section { /** * @var Field[] Section field objects. */ protected $fields = array(); /** * @var string Section title. */ private $title; /** * @var string Section id. */ private $id; /** * @var string Slug-name of the settings page this section belongs to. */ private $page; /** * @var string Section description. */ private $description; /** * Section constructor. * * @param string $id Section id. * @param string $title Section title. * @param string $page Slug-name of the settings page. * @param string $description Section description. */ public function __construct( $id, $title, $page, $description ) { $this->id = $id; $this->title = $title; $this->page = $page; $this->description = $description; add_settings_section( $this->id, $this->title, array( $this, 'print_description' ), $this->page ); } /** * Print the section description. */ public function print_description() { echo esc_html( $this->description ); } /** * Create and add a new field object to this section. */ public function add_field() { $field = new Field( /* ... */ ); $this->fields[] = $field; return $field; } }The Field Class
ในทำนองเดียวกันกับ Section ตอนนี้เราสามารถดำเนินการและสร้างคลาส Field ซึ่งจะใช้ add_settings_field() ของ WordPress
class Field { /** * @var Element[] Field elements. */ private $elements = array(); /** * @var string ID of the section this field belongs to. */ private $section_id; /** * @var string Field description. */ private $description; /** * Field constructor. * * @param string $id Field ID. * @param string $label Field label. * @param string $page Slug-name of the settings page. * @param string $section_id ID of the section this field belongs to. * @param string $description Field description. */ public function __construct( $id, $label, $page, $section_id, $description ) { $this->section_id = $section_id; $this->description = $description; add_settings_field( $id, $label, array( $this, 'render' ), $page, $this->section_id ); } }ที่นี่ เราต้องการระบุค่าเริ่มต้นสำหรับรหัส ป้ายกำกับ และคำอธิบายของฟิลด์ เราสามารถทำได้โดยส่งอาร์เรย์ตัวเลือกไปยังตัวสร้างและใช้ฟังก์ชัน wp_parse_args() WordPress เพื่อแยกวิเคราะห์ตัวเลือกเหล่านั้น
class Field { /** * @var int Number of fields instantiated. */ private static $number_of_fields = 0; // ... /** * Field constructor. * * @param string $section_id ID of the section this field belongs to. * @param string $page Slug-name of the settings page. * @param array $options Options. */ public function __construct( $section_id, $page, $options = array() ) { self::$number_of_fields++; $options = wp_parse_args( $options, array( 'label' => sprintf( __( 'Field #%s', 'prsdm-limit-login-attempts' ), self::$number_of_fields 'id' => 'field_' . self::$number_of_fields, 'description' => '' ) ); $this->section_id = $section_id; $this->description = $options['description']; add_settings_field( $options['id'], $options['label'], array( $this, 'render' ), $page, $this->section_id ); } } ฟังก์ชัน wp_parse_args() จะช่วยให้เราสามารถรวมค่าที่ผู้ใช้กำหนด (อาร์เรย์ $options ) เข้ากับค่าเริ่มต้นได้
array( 'label' => sprintf( __( 'Field #%s', 'prsdm-limit-login-attempts' ), self::$number_of_fields 'id' => 'field_' . self::$number_of_fields, 'description' => '' ) นอกจากนี้เรายังต้องตั้งค่าป้ายกำกับ เฉพาะ สำหรับแต่ละฟิลด์ เราสามารถจัดการสิ่งนี้ได้โดยการตั้งค่าป้ายกำกับเป็นคำนำหน้า ( 'field_' ) ตามด้วยตัวเลข ซึ่งจะเพิ่มขึ้นทุกครั้งที่สร้างวัตถุ Field ใหม่ เราจะเก็บหมายเลขนี้ไว้ในคุณสมบัติ คง ที่ $number_of_fields
/** * @var int Number of fields instantiated. */ private static $number_of_fields = 0;คุณสมบัติสแตติกสามารถเข้าถึงได้โดยตรงโดยไม่ต้องสร้างอินสแตนซ์ของคลาสก่อน
'id' => 'field_' . self::$number_of_fields คีย์เวิร์ด self ใช้เพื่ออ้างถึงคลาสปัจจุบัน และด้วยความช่วยเหลือของตัวดำเนินการแก้ไขขอบเขต :: (ปกติเรียกว่า “โคลอนคู่”) เราสามารถเข้าถึงคุณสมบัติสแตติกของเราได้
ด้วยวิธีนี้ ในคอนสตรัคเตอร์ เราเข้าถึงคุณสมบัติ $number_of_fields เดียวกัน ได้เสมอ โดยจะเพิ่มมูลค่าทุกครั้งที่สร้างอ็อบเจ็กต์ ซึ่งส่งผลให้มีป้ายกำกับที่ไม่ซ้ำกันติดอยู่กับแต่ละฟิลด์
ต่อจากนี้ไป เมธอด render() หลังจากพิมพ์คำอธิบาย (ถ้ามีอยู่) จะวนซ้ำผ่านองค์ประกอบทั้งหมดและแสดงผลแต่ละรายการ
public function render() { if ( ! empty( $this->description ) ) { printf( '<p class="description">%s</p>', esc_html( $this->description ) ); } foreach ( $this->elements as $key => $element ) { $element->render(); } }วางมันทั้งหมดเข้าด้วยกัน…
class Field { /** * @var int Number of fields instantiated. */ private static $number_of_fields = 0; /** * @var Element[] Field elements. */ private $elements = array(); /** * @var string ID of the section this field belongs to. */ private $section_id; /** * @var string Field description. */ private $description; /** * Field constructor. * * @param string $section_id ID of the section this field belongs to. * @param string $page Slug-name of the settings page. * @param array $options Options. */ public function __construct( $section_id, $page, $options = array() ) { self::$number_of_fields++; $options = wp_parse_args( $options, array( 'label' => sprintf( /* translators: %s is the unique s/n of the field. */ __( 'Field #%s', 'prsdm-limit-login-attempts' ), self::$number_of_fields 'id' => 'field_' . self::$number_of_fields, 'description' => '' ) ); $this->section_id = $section_id; $this->description = $options['description']; add_settings_field( $options['id'], $options['label'], array( $this, 'render' ), $page, $this->section_id ); } /** * Create a new element object. * * @return Element */ private function create_element() { return new Element( /* ... */ ); } /** * Add a new element object to this field. */ public function add_element() { $element = $this->create_element(); $this->elements[] = $element; } /** * Render the field. */ public function render() { if ( ! empty( $this->description ) ) { printf( '<p class="description">%s</p>', esc_html( $this->description ) ); } foreach ( $this->elements as $key => $element ) { $element->render(); } } }The Element Class
ต่อจากนี้ไป เราจะสร้างคลาส Element ในลักษณะเดียวกัน!

เราจะเริ่มเขียนชั้นเรียนดังนี้:
class Element { /** * @var int Number of elements instantiated. */ private static $number_of_elements = 0; /** * @var string Element label. */ private $label; /** * @var string Element name. */ private $name; /** * @var mixed Element value. */ private $value; /** * Element constructor. * * @param string $section_id Section ID. * @param array $options Options. */ public function __construct( $section_id, $options = array() ) { self::$number_of_elements++; $options = wp_parse_args( $options, array( 'label' => sprintf( /* translators: %s is the unique s/n of the element. */ __( 'Element #%s', 'prsdm-limit-login-attempts' ), self::$number_of_elements ), 'name' => 'element_' . self::$number_of_elements ) ); $this->label = $options['label']; $this->name = $options['name']; $this->value = ''; } /** * Render the element. */ public function render() { ?> <fieldset> <label> <input type="number" name="<?php echo esc_attr( $this->name ); ?>" value="<?php echo esc_attr( $this->value ); ?>" /> <?php echo esc_html(); ?> </label> </fieldset> <?php } }ตรวจสอบให้แน่ใจว่าคุณกำลังหลบหนีจากผลลัพธ์ของคุณ เช่นเดียวกับที่เราทำที่นี่ โดยใช้ฟังก์ชัน WordPress esc_attr() และ esc_html() เพื่อป้องกันการโจมตีแบบแฝงสคริปต์ แม้ว่าเราจะแสดงองค์ประกอบของเราเฉพาะในหน้าผู้ดูแลระบบเท่านั้น แต่ก็ยังเป็นความคิดที่ดีที่ จะ หลีกเลี่ยงข้อมูลเอาต์พุตเสมอ
หมายเหตุ: Cross-site scripting (หรือ XSS) เป็นช่องโหว่ด้านความปลอดภัยประเภทหนึ่งที่มักพบในเว็บแอปพลิเคชัน XSS ช่วยให้ผู้โจมตีสามารถแทรกโค้ดฝั่งไคลเอ็นต์ลงในหน้าเว็บที่ผู้ใช้รายอื่นดูได้ ผู้โจมตีอาจใช้ช่องโหว่ในการเขียนสคริปต์ข้ามไซต์เพื่อหลีกเลี่ยงการควบคุมการเข้าถึง เช่น นโยบายต้นทางเดียวกัน
เมื่อเรารวบรวมข้อกำหนดของปลั๊กอิน เราสังเกตว่ามีองค์ประกอบหลายประเภท เช่น ช่องทำเครื่องหมาย ปุ่มตัวเลือก ช่องตัวเลข ฯลฯ เมื่อเราออกแบบได้ เราตัดสินใจสร้างคลาส Element ที่ต้องการขยาย ดังนั้น เรารู้ว่าเราจะลงเอยด้วยคลาสลูกสำหรับองค์ประกอบแต่ละประเภท
ผลลัพธ์ควรแตกต่างกันไปตามประเภทขององค์ประกอบ ดังนั้นเราจะเปลี่ยนการเรนเดอร์ render() เป็นวิธีนามธรรม นั่นหมายความว่าคลาสนั้นควรเป็นนามธรรมด้วย
abstract class Element { /** * @var int Number of elements instantiated. */ private static $number_of_elements = 0; /** * @var string Element label. */ protected $label; /** * @var string Element name. */ protected $name; /** * @var mixed Element value. */ protected $value; /** * Element constructor. * * @param string $section_id Section ID. * @param array $options Options. */ public function __construct( $section_id, $options = array() ) { self::$number_of_elements++; $options = wp_parse_args( $options, array( 'label' => sprintf( /* translators: %s is the unique s/n of the element. */ __( 'Element #%s', 'prsdm-limit-login-attempts' ), self::$number_of_elements ), 'name' => 'element_' . self::$number_of_elements ) ); $this->label = $options['label']; $this->name = $options['name']; $this->value = ''; } /** * Render the element. */ abstract public function render(); } ตัวอย่างเช่น คลาส Number_Element จะมีลักษณะดังนี้:
class Number_Element extends Element { /** * Render the element. */ public function render() { ?> <fieldset> <label> <input type="number" name="<?php echo esc_attr( $this->name ); ?>" value="<?php echo esc_attr( $this->value ); ?>" /> <?php echo esc_html(); ?> </label> </fieldset> <?php } } ในทำนองเดียวกัน เราสามารถสร้าง Checkbox_Element , Radio_Element และแม้แต่คลาส Custom_Element สำหรับองค์ประกอบที่เหลือของเรา
สังเกตว่าเรากำลังสร้างชั้นเรียนของเราเพื่อให้ สามารถใช้งานได้ในลักษณะเดียวกัน การเรียกเมธอด render() บนลูกของ Element ใด ๆ จะเป็นเอาต์พุต HTML บางส่วน
นั่นคือตัวอย่างของ polymorphism ซึ่งเป็นหนึ่งในแนวคิดหลักของการเขียนโปรแกรมเชิงวัตถุ
ความหลากหลาย
Polymorphism หมายถึง "หลายรูปแบบ" (จากคำภาษากรีก "poly" หมายถึง "จำนวนมาก" และ "morphe" หมายถึง "รูปแบบ") คลาสลูกของ Element สามารถมีได้ หลายรูปแบบ เนื่องจากสามารถใช้รูปแบบใดก็ได้ของคลาสในลำดับชั้นพาเรนต์
เราสามารถใช้ Number_Element , Checkbox_Element หรือ ประเภทย่อย อื่น ๆ ในสถานที่ใดก็ได้ที่คาดว่าวัตถุ Element เนื่องจากวัตถุย่อยทั้งหมดสามารถ ใช้ได้ ในลักษณะเดียวกัน (เช่นเรียกเมธอด render() ) ในขณะที่ยังคงสามารถ ทำงาน ต่างกัน (ผลลัพธ์จะแตกต่างกันไปสำหรับองค์ประกอบแต่ละประเภท)
อย่างที่คุณอาจบอกได้ ความหลากหลายและการสืบทอดเป็นแนวคิดที่เกี่ยวข้องกันอย่างใกล้ชิด
ทดแทนได้
หลักการทดแทน Liskov (หรือ LSP) "L" ใน SOLID กล่าวว่า:
“ในโปรแกรมคอมพิวเตอร์ ถ้า S เป็นประเภทย่อยของ T วัตถุประเภท T อาจถูกแทนที่ด้วยวัตถุประเภท S (เช่น วัตถุประเภท T อาจแทนที่ด้วยวัตถุประเภทย่อย S) โดยไม่เปลี่ยนแปลงใดๆ คุณสมบัติที่ต้องการของโปรแกรม”
ในแง่ฆราวาส คุณควรจะสามารถใช้คลาสลูกใดๆ แทนคลาสพาเรนต์ได้โดยไม่มีพฤติกรรมที่ไม่คาดคิด
โรงงาน
กลับไปที่คลาส Field ซึ่งขณะนี้เรามี create_element() ที่สร้าง Element ใหม่
/** * Create a new element object. * * @return Element */ private function create_element() { return new Element( /* ... */ ); } /** * Add a new element object to this field. */ public function add_element() { $element = $this->create_element(); $this->elements[] = $element; }วิธีการที่ส่งคืนวัตถุใหม่มักเรียกว่า โรงงานแบบง่าย (เพื่อไม่ให้สับสนกับ "วิธีจากโรงงาน" ซึ่งเป็นรูปแบบการออกแบบ)
เมื่อรู้ว่าชนิดย่อยใดๆ ก็ตามที่ใช้แทนคลาสหลัก Element เราจะดำเนินการแก้ไขโรงงานนี้ต่อไป เพื่อให้สามารถสร้างวัตถุของคลาสย่อยได้
/** * Create a new element object. * * @throws Exception If there are no classes for the given element type. * @throws Exception If the given element type is not an `Element`. * * @param string $element_type * @param array $options * * @return Element */ private function create_element( $element_type, $options ) { $element_type = __NAMESPACE__ . '\\Elements\\' . $element_type; if ( ! class_exists( $element_type ) ) { throw new Exception( 'No class exists for the specified type' ); } $element = new $element_type( $this->section_id, $options ); if ( ! ( $element instanceof Element ) ) { throw new Exception( 'The specified type is invalid' ); } return $element; } /** * Add a new element object to this field. * * @param string $element_type * @param array $options */ public function add_element( $element_type, $options ) { try { $element = $this->create_element( $element_type, $options ); $this->elements[] = $element; } catch ( Exception $e ) { // Handle the exception } }เราเริ่มต้นด้วยคำนำหน้าประเภทองค์ประกอบด้วยชื่อปัจจุบัน:
$element_type = __NAMESPACE__ . '\\Elements\\' . $element_type; ค่าคงที่เวทย์มนตร์ __NAMESPACE__ มีชื่อเนมสเปซปัจจุบัน
จากนั้น เราตรวจสอบให้แน่ใจว่ามีคลาสสำหรับประเภทองค์ประกอบที่ระบุ:
if ( ! class_exists( $element_type ) ) { throw new Exception( 'No class exists for the specified type' ); }ต่อไป เราสร้างวัตถุใหม่:
$element = new $element_type( $this->section_id, $options );และสุดท้าย เราตรวจสอบให้แน่ใจว่าวัตถุที่สร้างขึ้นใหม่นั้นเป็นตัวอย่างของ Element:
if ( ! ( $element instanceof Element ) ) { return; }ยืดออก
เป็นเรื่องที่ควรค่าแก่การชี้ให้เห็นว่าเราได้สร้างปลั๊กอินให้สามารถขยายได้ การเพิ่มหน้า ส่วนต่างๆ องค์ประกอบทำได้ง่ายเหมือนกับการสร้างคลาสใหม่ที่ขยาย Admin_Page , Section , Element เป็นต้น คลาสพื้นฐานเหล่านี้ไม่มีโค้ดที่จำเป็นต้องเปลี่ยนเพื่อเพิ่มหน้า ส่วน หรือองค์ประกอบใหม่
หลักการเปิด/ปิด (หรือ OCP) ตัว “O” ใน SOLID ระบุว่า:
“ซอฟต์แวร์เอนทิตี (คลาส โมดูล ฟังก์ชัน ฯลฯ) ควรเปิดเพื่อขยาย แต่ปิดเพื่อแก้ไข”
ซึ่งหมายความว่าเราควรจะสามารถ ขยาย คลาสเช่น Admin_Page และนำกลับมาใช้ใหม่ได้ แต่เราไม่ควรต้อง แก้ไข เพื่อทำเช่นนั้น
บทสรุป
ในบทความนี้ เราได้ลงทะเบียนส่วน ฟิลด์ และองค์ประกอบของเรา ในขณะที่ใช้สิ่งเหล่านี้ เราได้พิจารณาอย่างละเอียดถี่ถ้วนว่าความแตกต่างคืออะไรและเหตุใดจึงมีประโยชน์ นอกจากนี้เรายังได้พิจารณาหลักการ SOLID สองสามข้อ ได้แก่ “หลักการทดแทน Liskov” และ “หลักการเปิด/ปิด”
อยู่กับเราในตอนต่อไปของการเดินทางนี้ โดยเราจะเจาะลึกลงไปถึงวิธีที่เราจะสามารถปรับปรุงวิธีจัดการ WordPress hooks ของเราได้
คลิกที่นี่เพื่ออ่านตอนที่ 7 ใน Objected Oriented Programming Series
ดูสิ่งนี้ด้วย
- WordPress และการเขียนโปรแกรมเชิงวัตถุ – ภาพรวม
- ส่วนที่ 2 – การเขียนโปรแกรม WordPress และ Object Oriented: ตัวอย่างในโลกแห่งความจริง
- ส่วนที่ 3 – WordPress และการเขียนโปรแกรมเชิงวัตถุ: Α ตัวอย่าง WordPress – การกำหนดขอบเขต
- ส่วนที่ 4 – การเขียนโปรแกรม WordPress และ Object Oriented: ตัวอย่าง WordPress – การออกแบบ
- ส่วนที่ 5 – WordPress และการเขียนโปรแกรมเชิงวัตถุ: ตัวอย่าง WordPress – การนำไปใช้: เมนูการดูแลระบบ