
วิธีสร้างกล่อง Meta แบบกำหนดเองด้วย CMB2
เผยแพร่แล้ว: 2023-02-25สองสามปีที่แล้ว ฉันมองหาวิธีค้นหาโพสต์และแสดงตำแหน่งที่โพสต์เขียนบน Google Map จากการวิจัยของฉัน ฉันบังเอิญเจอบล็อกโพสต์เกี่ยวกับวิธีสร้างตัวระบุตำแหน่งร้านโดยใช้ CMB2 และ Google Maps ตั้งแต่นั้นมา CMB2 ก็กลายเป็นหนึ่งในปลั๊กอินที่ฉันโปรดปรานและใช้ในโครงการส่วนใหญ่ของฉัน
ประการแรก CMB2 คืออะไร?
CMB เป็นตัวย่อสำหรับ Custom Meta Boxes และตามคำอธิบายในหน้าปลั๊กอิน “CMB2 เป็นเมตาบ็อกซ์ ฟิลด์ที่กำหนดเอง และไลบรารีฟอร์มสำหรับ WordPress ที่จะทำให้คุณทึ่ง” ได้รับการพัฒนาโดย Justin Sternberg จาก WebDevStudios และอยู่ในที่เก็บปลั๊กอินมานานกว่าสองปี อย่างไรก็ตาม เมื่อเดือนกุมภาพันธ์ที่ผ่านมา คนดีในที่เก็บปลั๊กอิน WordPress ยอมรับว่าพวกเขาทำผิดพลาดและอนุมัติ CMB2 เป็นปลั๊กอินทั้งที่ไม่ควรจะมี
ดูสิ โดยทั่วไปแล้วปลั๊กอินสามารถทำบางสิ่งได้ทันทีนอกกรอบ พวกเขามีฟังก์ชั่นโดยธรรมชาติบางอย่าง CMB2 เป็นเฟรมเวิร์กจริงๆ ดังที่สเติร์นเบิร์กเคยอธิบายไว้ว่า “เป็นเฟรมเวิร์กของนักพัฒนาสำหรับสร้างฟอร์มและฟิลด์ให้กับธีมและปลั๊กอินของคุณได้อย่างง่ายดาย” ในความเป็นจริง เมื่อคุณติดตั้ง CMB2 จะไม่มีอะไรเกิดขึ้น คุณจะไม่ได้รับหน้าผู้ดูแลระบบและไม่มีส่วนติดต่อผู้ใช้ของผู้ดูแลระบบ หากต้องการใช้ CMB2 คุณต้องสามารถเขียนโค้ดและเพิ่มลงในไฟล์ functions.php ได้ ด้วยเหตุนี้ฉันจึงเรียกมันว่าปลั๊กอิน 'ไม่ใช่ปลั๊กอิน'
ข่าวดีก็คือทีมอนุมัติปลั๊กอินตกลงที่จะปล่อยให้มันอยู่ในที่เก็บ ดังนั้นคุณจึงสามารถดาวน์โหลดและอัปเดตได้จากที่นั่น คุณสามารถอ่านประวัติทั้งหมดได้ที่นี่ที่ไซต์ของ Justin
วิธีการตั้งค่า CMB2
ในการเริ่มต้น คุณจะต้องค้นหาไฟล์ example-functions.php จากไดเร็กทอรีปลั๊กอินและคัดลอกลงในธีมของคุณ สามารถคัดลอกไปยังโฟลเดอร์รูทของธีมได้โดยตรง แต่เพื่อให้โปรเจ็กต์ของคุณเป็นระเบียบ ฉันขอแนะนำให้คัดลอกลงในโฟลเดอร์ เช่น /lib/ หรือ /includes/ หากคุณทราบแล้วว่าคุณต้องการใช้ CMB2 อย่างไร คุณอาจต้องการดำเนินการต่อและเปลี่ยนชื่อไฟล์เป็นสิ่งที่เหมาะสมกว่า ตัวอย่างเช่น หากคุณต้องการใช้เพื่อสร้างฟิลด์ที่กำหนดเองสำหรับหน้าข้อความรับรอง คุณอาจตั้งชื่อว่า testimonial-functions.php
ต่อไป คุณจะต้องตรวจสอบให้แน่ใจว่า WordPress พบไฟล์ใหม่โดยเพิ่มคำสั่ง require_once ลงในไฟล์ functions.php ของคุณ ซึ่งจะมีลักษณะดังนี้:
require_once( dirname(__FILE__) . '/lib/testimonial-functions.php'); ตอนนี้ได้เวลาขุดค้นจริงๆ เปิดไฟล์ testimonial-functions.php (หรือชื่ออะไรก็ได้) คุณจะสังเกตได้ว่า Justin ไม่เพียงสร้างตัวอย่างฟิลด์ทุกประเภทที่เป็นไปได้เท่านั้น แต่เขายังสร้างฟังก์ชันสำหรับแสดงฟิลด์ตามหน้าแรก หมวดหมู่ รหัสโพสต์ ฯลฯ
หมายเหตุ: บทความนี้มีวัตถุประสงค์เพื่อแนะนำให้คุณรู้จักกับ CMB2; มันจะไม่ใช่บทช่วยสอนเต็มรูปแบบเกี่ยวกับวิธีใช้งานทุกแง่มุม และเนื่องจากเป็นเฟรมเวิร์กและได้รับการพัฒนาเพื่อช่วยเหลือโปรแกรมเมอร์ คุณจึงควรมีความเข้าใจพื้นฐานของ PHP และการทำงานภายในของ WordPress หากคุณกำลังมองหาปลั๊กอิน Custom Meta Box ที่มีส่วนติดต่อผู้ใช้ของผู้ดูแลระบบ คุณอาจต้องการตรวจสอบปลั๊กอิน Advanced Custom Fields
ดังนั้น กลับมาที่การสร้างเมตาบ็อกซ์แบบกำหนดเองสำหรับสิ่งง่ายๆ เช่น ข้อความรับรอง ขั้นแรก กำหนดจำนวนและประเภทของฟิลด์ที่คุณต้องการ เพื่อให้ง่าย สมมติว่าเราต้องการสามฟิลด์ หนึ่งรายการสำหรับคำรับรองที่แท้จริง หนึ่งรายการสำหรับชื่อของผู้ให้คำรับรอง และอีกรายการสำหรับรูปภาพของบุคคลนั้น
การทำงานในไฟล์ testimonial-functions.php คุณจะต้องค้นหาส่วนสำหรับลงทะเบียนและเพิ่มฟังก์ชันใหม่ของคุณ รหัสนั้นมีลักษณะดังนี้
add_action( 'cmb2_admin_init', 'yourprefix_register_demo_metabox' );ต่อไป ฉันขอแนะนำให้คุณเปลี่ยนชื่อฟังก์ชันของคุณเป็นสิ่งที่เกี่ยวข้องกับธีมและโครงการของคุณ
add_action( 'cmb2_admin_init', 'register_testimonial_metabox' ); /** * Hook in and add a testimonial metabox. Can only happen on the 'cmb2_admin_init' or 'cmb2_init' hook. */ function register_testimonial_metabox() {ฉันขอแนะนำให้คุณเปลี่ยนชื่อคำนำหน้าด้วย
// Start with an underscore to hide fields from custom fields list $prefix = '_yourprefix_'; //note, you can use anything you'd like here, but you need to remember what you use, because you will be using it again later.มีฟิลด์หลายประเภทให้เลือก ฉันจะใช้:
'type' => 'textarea_small' // for the author field 'type' => 'wysiwyg' // for the testimonial in case we want to include html 'type' => 'file' // for the image of the project or author $cmb_demo->add_field( array( 'name' => __( 'Testimonial Author', 'cmb2' ), 'desc' => __( 'Who is the testimonial from', 'cmb2' ), 'id' => $prefix . 'author', //Note, I renamed this to be more appropriate 'type' => 'textarea_small', ) ); $cmb_demo->add_field( array( 'name' => __( 'Testimonial', 'cmb2' ), 'desc' => __( 'add the testimonial here', 'cmb2' ), 'id' => $prefix . 'testimonial', //Note, I renamed this to be more appropriate 'type' => 'wysiwyg', 'options' => array( 'textarea_rows' => 5, ), ) ); $cmb_demo->add_field( array( 'name' => __( 'Author Image', 'cmb2' ), 'desc' => __( 'Upload an image or enter a URL.', 'cmb2' ), 'id' => $prefix . 'image', //Note, I renamed this to be more appropriate 'type' => 'file', ) );ต้องเพิ่มฟิลด์ใหม่สามฟิลด์นี้ในฟังก์ชันใหม่ ซึ่งจะมีลักษณะดังนี้:
add_action( 'cmb2_admin_init', 'register_testimonial_metabox' ); /** * Hook in and add a testimonial metabox. Can only happen on the 'cmb2_admin_init' or 'cmb2_init' hook. */ function register_testimonial_metabox() { // Start with an underscore to hide fields from custom fields list $prefix = '_yourprefix_'; //note, you can use anything you'd like here /** * Start field groups here */ $cmb_demo->add_field( array( 'name' => __( 'Testimonial Author', 'cmb2' ), 'desc' => __( 'Who is the testimonial from', 'cmb2' ), 'id' => $prefix . 'author', //Note, I renamed this to be more appropriate 'type' => 'textarea_small', ) ); $cmb_demo->add_field( array( 'name' => __( 'Testimonial', 'cmb2' ), 'desc' => __( 'add the testimonial here', 'cmb2' ), 'id' => $prefix . 'testimonial', //Note, I renamed this to be more appropriate 'type' => 'wysiwyg', 'options' => array( 'textarea_rows' => 5, ), ) ); $cmb_demo->add_field( array( 'name' => __( 'Author Image', 'cmb2' ), 'desc' => __( 'Upload an image or enter a URL.', 'cmb2' ), 'id' => $prefix . 'image', //Note, I renamed this to be more appropriate 'type' => 'file', ) ); }และนั่นแหล่ะ! รหัสสุดท้ายของคุณควรมีลักษณะดังนี้:

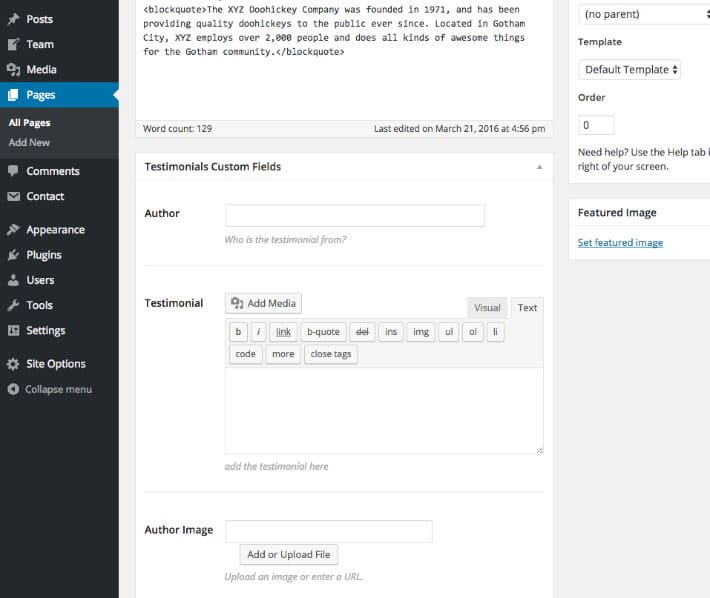
<?php /** * Include and set up custom metaboxes and fields. (Make sure you copy this file outside the CMB2 directory) * * Be sure to replace all instances of 'yourprefix_' with your project's prefix. * http://nacin.com/2010/05/11/in-wordpress-prefix-everything/ * * @category YourThemeOrPlugin * @package Demo_CMB2 * @license http://www.opensource.org/licenses/gpl-license.php GPL v2.0 (or later) * @link https://github.com/WebDevStudios/CMB2 */ /** * Get the bootstrap! If using the plugin from wordpress.org, REMOVE THIS! */ if ( file_exists( dirname( __FILE__ ) . '/CMB2/init.php' ) ) { require_once dirname( __FILE__ ) . '/CMB2/init.php'; } elseif ( file_exists( dirname( __FILE__ ) . '/CMB2/init.php' ) ) { require_once dirname( __FILE__ ) . '/CMB2/init.php'; } add_action( 'cmb2_admin_init', 'register_testimonial_metabox' ); /** * Hook in and add a testimonial metabox. Can only happen on the 'cmb2_admin_init' or 'cmb2_init' hook. */ function register_testimonial_metabox() { // Start with an underscore to hide fields from custom fields list $prefix = '_yourprefix_'; //note, you can use anything you'd like here /** * Start field groups here */ // This first field group tells WordPress where to put the fields. In the example below, it is set to show up only on Post_ID=10 $cmb_demo = new_cmb2_box( array( 'id' => $prefix . 'metabox', 'title' => __( 'Homepage Custom Fields', 'cmb2' ), 'object_types' => array( 'page', ), // Post type 'show_on' => array( 'id' => array( 10, ) ), // Specific post IDs to display this metabox ) ); $cmb_demo->add_field( array( 'name' => __( 'Testimonial Author', 'cmb2' ), 'desc' => __( 'Who is the testimonial from', 'cmb2' ), 'id' => $prefix . 'author', //Note, I renamed this to be more appropriate 'type' => 'textarea_small', ) ); $cmb_demo->add_field( array( 'name' => __( 'Testimonial', 'cmb2' ), 'desc' => __( 'add the testimonial here', 'cmb2' ), 'id' => $prefix . 'testimonial', //Note, I renamed this to be more appropriate 'type' => 'wysiwyg', 'options' => array( 'textarea_rows' => 5, ), ) ); $cmb_demo->add_field( array( 'name' => __( 'Author Image', 'cmb2' ), 'desc' => __( 'Upload an image or enter a URL.', 'cmb2' ), 'id' => $prefix . 'image', //Note, I renamed this to be more appropriate 'type' => 'file', ) ); }เมื่อเสร็จแล้ว คุณควรมีหน้าเว็บที่มีลักษณะดังต่อไปนี้:
การใช้ CMB2 เป็นวิธีที่ยอดเยี่ยมในการมอบสิ่งที่คุณต้องการให้กับเว็บไซต์ของคุณ เนื่องจากมีตัวเลือกมากมายไม่รู้จบ ตัวอย่างเช่น สามารถใช้ CMB2 เพื่อสร้างหน้าตัวเลือกธีมที่มีเมตาบ็อกซ์สำหรับโลโก้ URL ไปยังไซต์โซเชียลมีเดีย หรือวิดีโอ ในกรณีของการสร้างเว็บไซต์สำหรับลูกค้า CMB2 เหมาะสำหรับการปรับแต่งผู้ดูแลระบบ เพื่อให้ลูกค้าไม่ต้องจัดรูปแบบเนื้อหาให้ตรงกับสไตล์ธีมของคุณ และเมื่อป้อนข้อมูลแล้ว คุณสามารถแสดงเนื้อหาด้วยสไตล์ทั้งหมดที่มีอยู่แล้วใน HTML และ CSS ของคุณ
เมื่อคุณเชี่ยวชาญการเพิ่มฟิลด์พื้นฐานด้วย CMB2 แล้ว ให้ลองเพิ่มกลุ่มฟิลด์ที่ทำซ้ำได้ ด้วยสิ่งเหล่านี้ คุณจะสามารถเพิ่มประเภทเนื้อหาได้มากเท่าที่คุณต้องการ จากนั้นใช้ for- each loop คุณสามารถเริ่มสร้างสไลด์โชว์หรือภาพหมุนได้
CMB2 ทำให้ฉันพัฒนาเว็บไซต์ WordPress ไปอีกขั้น และฉันหวังว่ามันจะทำเช่นเดียวกันกับคุณ