
Część 6 – WordPress i programowanie obiektowe: przykład WordPressa – Implementacja: rejestracja sekcji
Opublikowany: 2022-02-04Witamy ponownie w naszej serii poświęconej programowaniu obiektowemu.
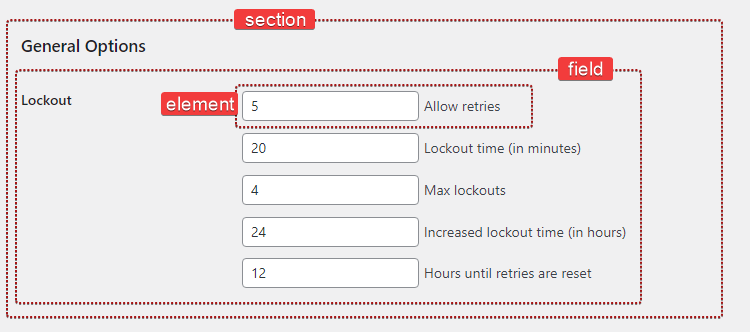
Jak wyjaśniliśmy w części dotyczącej projektowania, strona administracyjna składa się z sekcji . Każda sekcja zawiera jedno lub więcej pól , a każde z tych pól zawiera jeden lub więcej elementów .
Jak by to wyglądało w kodzie?
public function register_sections() { $my_section = $this->register_section( /* ... */ ); $my_field = $my_section->add_field( /* ... */ ); $my_element = $my_field->add_element( /* ... */ ); } W porządku, wydaje się to łatwe w użyciu i już możemy powiedzieć, że prawdopodobnie będziemy musieli utworzyć trzy nowe klasy: Section , Field i Element .
class Section {} class Field {} class Element {}Poświęćmy chwilę i zadajmy sobie pytanie, co dotychczas wiemy o tych zajęciach.
-
$my_section->add_field()→ KlasaSectionpowinna mieć możliwość dodawania (i przechowywania) nowego obiektuField -
$my_field->add_element()→ KlasaFieldpowinna być w stanie dodać (i przechowywać) nowy obiektElement.
Zaczynamy od przechowywania naszych obiektów Field w tablicy, tak jak zwykle:
class Section { /** * @var Field[] Section field objects. */ protected $fields = array(); Ta zmienna $fields jest elementem klasy i nazywamy ją właściwością . Właściwości są zmiennymi PHP, żyjącymi w klasie i mogą mieć dowolny typ danych ( string , integer , object , itp.).
Napiszemy również metodę add_field() , aby utworzyć i dodać nowe pole.
public function add_field() { $field = new Field( /* ... */ ); $this->fields[] = $field; return $field; } Ta metoda tworzy nowy obiekt Field , dodaje go do właściwości fields i zwraca nowo utworzony obiekt. Całkiem proste.
Powtórzmy ten sam proces również dla klasy Field .
class Field { /** * @var Element[] Field elements. */ private $elements = array(); /** * Create a new element object. * * @return Element */ private function create_element() { return new Element( /* ... */ ); } /** * Add a new element object to this field. */ public function add_element() { $element = $this->create_element(); $this->elements[] = $element; } }To początek! Co dalej?
Klasa sekcji
Musimy wywołać add_settings_section(), gdy tworzona jest nowa sekcja. Po raz kolejny metoda konstruktora jest świetnym sposobem na wykonanie naszej inicjalizacji. Dodajmy to w klasie:
class Section { // ... public function __construct() { add_settings_section( $this->id, $this->title, array( $this, 'print_description' ), $this->page ); } }Wygląda na to, że sekcja potrzebuje nazwy ślimaka, aby ją zidentyfikować (używanej w atrybucie id tagów). Może również mieć tytuł, opis i należeć do określonej strony.
class Section { /** * @var Field[] Section field objects. */ protected $fields = array(); /** * @var string Section title. */ public $title; /** * @var string Section id. */ public $id; /** * @var string Slug-name of the settings page this section belongs to. */ public $page; /** * @var string Section description. */ public $description;Możemy ustawić tytuł sekcji, wykonując coś takiego:
$section = new Section(); $section->title = __( 'Hello world', 'prsdm-limit-login-attempts' );Cóż, to nie do końca w porządku. Mimo że powyższy kod jest całkowicie poprawny, w rzeczywistości nie robi tego, czego oczekujemy.
Metoda konstruktora jest wykonywana podczas tworzenia nowego obiektu Section. Zatem add_settings_section() zostanie wywołana, zanim jeszcze będziemy mieli szansę ustawić tytuł. W rezultacie sekcja nie będzie miała tytułu.

Hostuj swoją stronę internetową z Pressidium
60- DNIOWA GWARANCJA ZWROTU PIENIĘDZY
Tytuł musi być dostępny podczas inicjalizacji naszego obiektu, więc musimy to zrobić w konstruktorze.
class Section { /** * @var string Section title. */ private $title; public function __construct( $title ) { $this->title = $title; // ... } // .. Pamiętaj, że $this->title odnosi się do własności klasy title, gdzie $title odnosi się do argumentu konstruktora.
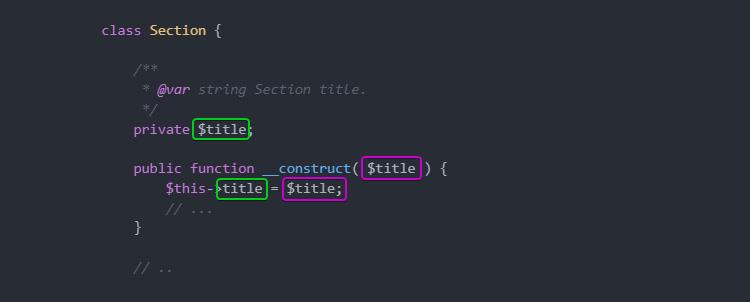
Tutaj również korzystamy z widoczności . Ponieważ nasza właściwość $title będzie dostępna tylko dla klasy, która ją zdefiniowała, możemy zadeklarować ją jako private . Dlatego uniemożliwiamy dostęp do niego poza klasą.
Aha, musimy też dodać print_description() , która będzie, no cóż, wydrukowała opis sekcji.
/** * Print the section description. */ public function print_description() { echo esc_html( $this->description ); }Podsumowując, nasza klasa Section wygląda tak.
class Section { /** * @var Field[] Section field objects. */ protected $fields = array(); /** * @var string Section title. */ private $title; /** * @var string Section id. */ private $id; /** * @var string Slug-name of the settings page this section belongs to. */ private $page; /** * @var string Section description. */ private $description; /** * Section constructor. * * @param string $id Section id. * @param string $title Section title. * @param string $page Slug-name of the settings page. * @param string $description Section description. */ public function __construct( $id, $title, $page, $description ) { $this->id = $id; $this->title = $title; $this->page = $page; $this->description = $description; add_settings_section( $this->id, $this->title, array( $this, 'print_description' ), $this->page ); } /** * Print the section description. */ public function print_description() { echo esc_html( $this->description ); } /** * Create and add a new field object to this section. */ public function add_field() { $field = new Field( /* ... */ ); $this->fields[] = $field; return $field; } }Klasa pola
W podobny sposób jak Section , możemy teraz kontynuować i zbudować klasę Field , która będzie wykorzystywała funkcję WordPress add_settings_field() .
class Field { /** * @var Element[] Field elements. */ private $elements = array(); /** * @var string ID of the section this field belongs to. */ private $section_id; /** * @var string Field description. */ private $description; /** * Field constructor. * * @param string $id Field ID. * @param string $label Field label. * @param string $page Slug-name of the settings page. * @param string $section_id ID of the section this field belongs to. * @param string $description Field description. */ public function __construct( $id, $label, $page, $section_id, $description ) { $this->section_id = $section_id; $this->description = $description; add_settings_field( $id, $label, array( $this, 'render' ), $page, $this->section_id ); } }W tym miejscu chcielibyśmy również podać domyślne wartości identyfikatora, etykiety i opisu pola. Możemy to zrobić, przekazując tablicę options do konstruktora i używając funkcji WordPress wp_parse_args() do przeanalizowania tych opcji.
class Field { /** * @var int Number of fields instantiated. */ private static $number_of_fields = 0; // ... /** * Field constructor. * * @param string $section_id ID of the section this field belongs to. * @param string $page Slug-name of the settings page. * @param array $options Options. */ public function __construct( $section_id, $page, $options = array() ) { self::$number_of_fields++; $options = wp_parse_args( $options, array( 'label' => sprintf( __( 'Field #%s', 'prsdm-limit-login-attempts' ), self::$number_of_fields 'id' => 'field_' . self::$number_of_fields, 'description' => '' ) ); $this->section_id = $section_id; $this->description = $options['description']; add_settings_field( $options['id'], $options['label'], array( $this, 'render' ), $page, $this->section_id ); } } Funkcja wp_parse_args() pozwoli nam połączyć wartości zdefiniowane przez użytkownika (tablica $options ) z wartościami domyślnymi.
array( 'label' => sprintf( __( 'Field #%s', 'prsdm-limit-login-attempts' ), self::$number_of_fields 'id' => 'field_' . self::$number_of_fields, 'description' => '' ) Musimy również ustawić unikalne etykiety dla każdego pola. Możemy sobie z tym poradzić, ustawiając etykietę na przedrostek ( 'field_' ), po którym następuje liczba, która będzie zwiększana za każdym razem, gdy tworzony jest nowy obiekt Field. Przechowamy tę liczbę we właściwości statycznej $number_of_fields .
/** * @var int Number of fields instantiated. */ private static $number_of_fields = 0;Dostęp do właściwości statycznej można uzyskać bezpośrednio, bez konieczności wcześniejszego tworzenia instancji klasy.
'id' => 'field_' . self::$number_of_fields Słowo kluczowe self jest używane do odwoływania się do bieżącej klasy i, za pomocą operatora rozwiązywania zakresu :: (powszechnie nazywanego „podwójnym dwukropkiem”), możemy uzyskać dostęp do naszej właściwości statycznej.
W ten sposób w konstruktorze zawsze mamy dostęp do tej samej właściwości $number_of_fields , zwiększając jej wartość za każdym razem, gdy tworzony jest obiekt, co skutkuje unikalną etykietą dołączoną do każdego pola.
Idąc dalej, metoda render() , po wydrukowaniu opisu (jeśli taki istnieje), iteruje przez wszystkie elementy i renderuje każdy z nich.
public function render() { if ( ! empty( $this->description ) ) { printf( '<p class="description">%s</p>', esc_html( $this->description ) ); } foreach ( $this->elements as $key => $element ) { $element->render(); } }Kładąc wszystko razem…
class Field { /** * @var int Number of fields instantiated. */ private static $number_of_fields = 0; /** * @var Element[] Field elements. */ private $elements = array(); /** * @var string ID of the section this field belongs to. */ private $section_id; /** * @var string Field description. */ private $description; /** * Field constructor. * * @param string $section_id ID of the section this field belongs to. * @param string $page Slug-name of the settings page. * @param array $options Options. */ public function __construct( $section_id, $page, $options = array() ) { self::$number_of_fields++; $options = wp_parse_args( $options, array( 'label' => sprintf( /* translators: %s is the unique s/n of the field. */ __( 'Field #%s', 'prsdm-limit-login-attempts' ), self::$number_of_fields 'id' => 'field_' . self::$number_of_fields, 'description' => '' ) ); $this->section_id = $section_id; $this->description = $options['description']; add_settings_field( $options['id'], $options['label'], array( $this, 'render' ), $page, $this->section_id ); } /** * Create a new element object. * * @return Element */ private function create_element() { return new Element( /* ... */ ); } /** * Add a new element object to this field. */ public function add_element() { $element = $this->create_element(); $this->elements[] = $element; } /** * Render the field. */ public function render() { if ( ! empty( $this->description ) ) { printf( '<p class="description">%s</p>', esc_html( $this->description ) ); } foreach ( $this->elements as $key => $element ) { $element->render(); } } }Klasa Element
Idąc dalej, zbudujemy klasę Element w podobny sposób!

Zaczniemy pisać klasę w ten sposób:
class Element { /** * @var int Number of elements instantiated. */ private static $number_of_elements = 0; /** * @var string Element label. */ private $label; /** * @var string Element name. */ private $name; /** * @var mixed Element value. */ private $value; /** * Element constructor. * * @param string $section_id Section ID. * @param array $options Options. */ public function __construct( $section_id, $options = array() ) { self::$number_of_elements++; $options = wp_parse_args( $options, array( 'label' => sprintf( /* translators: %s is the unique s/n of the element. */ __( 'Element #%s', 'prsdm-limit-login-attempts' ), self::$number_of_elements ), 'name' => 'element_' . self::$number_of_elements ) ); $this->label = $options['label']; $this->name = $options['name']; $this->value = ''; } /** * Render the element. */ public function render() { ?> <fieldset> <label> <input type="number" name="<?php echo esc_attr( $this->name ); ?>" value="<?php echo esc_attr( $this->value ); ?>" /> <?php echo esc_html(); ?> </label> </fieldset> <?php } }Upewnij się, że unikasz danych wyjściowych — tak jak robimy to tutaj, używając funkcji WordPressa esc_attr() i esc_html() — aby zapobiec atakom cross-site scripting. Mimo że renderujemy nasze elementy tylko na stronach administracyjnych, nadal dobrym pomysłem jest unikanie wszelkich danych wyjściowych.
UWAGA: Cross-site scripting (lub XSS) to rodzaj luki w zabezpieczeniach, która zwykle występuje w aplikacjach internetowych. XSS umożliwia atakującym wstrzyknięcie kodu po stronie klienta do stron internetowych przeglądanych przez innych użytkowników. Osoby atakujące mogą wykorzystać lukę w zabezpieczeniach skryptów między lokacjami do ominięcia kontroli dostępu, takich jak zasady tego samego pochodzenia.
Kiedy zbieraliśmy wymagania dotyczące wtyczki, zauważyliśmy, że istnieje wiele typów elementów — pola wyboru, przyciski opcji, pola liczbowe itp. Kiedy wymyśliliśmy nasz projekt, podjęliśmy decyzję o zbudowaniu klasy Element , która ma zostać rozszerzona. Tak więc wiemy, że otrzymamy klasę potomną dla każdego typu elementu.
Dane wyjściowe powinny się różnić w zależności od typu elementu, więc zamienimy render() w metodę abstrakcyjną. Oznacza to oczywiście, że sama klasa również powinna być abstrakcyjna.
abstract class Element { /** * @var int Number of elements instantiated. */ private static $number_of_elements = 0; /** * @var string Element label. */ protected $label; /** * @var string Element name. */ protected $name; /** * @var mixed Element value. */ protected $value; /** * Element constructor. * * @param string $section_id Section ID. * @param array $options Options. */ public function __construct( $section_id, $options = array() ) { self::$number_of_elements++; $options = wp_parse_args( $options, array( 'label' => sprintf( /* translators: %s is the unique s/n of the element. */ __( 'Element #%s', 'prsdm-limit-login-attempts' ), self::$number_of_elements ), 'name' => 'element_' . self::$number_of_elements ) ); $this->label = $options['label']; $this->name = $options['name']; $this->value = ''; } /** * Render the element. */ abstract public function render(); } Na przykład klasa Number_Element wyglądałaby tak:
class Number_Element extends Element { /** * Render the element. */ public function render() { ?> <fieldset> <label> <input type="number" name="<?php echo esc_attr( $this->name ); ?>" value="<?php echo esc_attr( $this->value ); ?>" /> <?php echo esc_html(); ?> </label> </fieldset> <?php } } Podobnie możemy zbudować klasy Checkbox_Element , Radio_Element , a nawet Custom_Element dla pozostałych naszych elementów.
Zwróć uwagę, że budujemy nasze klasy, aby można było ich używać w ten sam sposób . Wywołanie metody render() na dowolnym dziecku elementu Element spowoduje wyświetlenie kodu HTML.
To przykład polimorfizmu , jednej z podstawowych koncepcji programowania obiektowego.
Wielopostaciowość
„Polimorfizm” oznacza dosłownie „wiele form” (od greckich słów „poly” oznaczających „wiele” i „morphe” oznaczających „formę”). Klasa potomna Element może mieć wiele form , ponieważ może przybierać dowolną formę klasy w swojej hierarchii nadrzędnej.
Możemy użyć Number_Element , Checkbox_Element , lub dowolnego innego podtypu w dowolnym miejscu, w którym oczekuje się obiektu Element , ponieważ wszystkie obiekty podrzędne mogą być używane dokładnie w ten sam sposób (tj. wywołując ich metodę render() ), przy jednoczesnym zachowaniu możliwości zachowania inaczej (wyjście będzie inne dla każdego typu elementu).
Jak można się domyślić, polimorfizm i dziedziczenie są ściśle powiązanymi pojęciami.
Zastępowalność
Zasada substytucji Liskov (lub LSP) , „L” w SOLID, stanowi:
„W programie komputerowym, jeśli S jest podtypem T, to obiekty typu T można zastąpić obiektami typu S (tj. obiekt typu T można zastąpić dowolnym obiektem podtypu S) bez zmiany żadnego z pożądane właściwości programu.”
Mówiąc językiem laika, powinieneś być w stanie użyć dowolnej klasy potomnej zamiast jej klasy nadrzędnej bez żadnych nieoczekiwanych zachowań.
Fabryki
Wróćmy do naszej klasy Field , gdzie obecnie mamy metodę create_element() tworzącą nowy Element .
/** * Create a new element object. * * @return Element */ private function create_element() { return new Element( /* ... */ ); } /** * Add a new element object to this field. */ public function add_element() { $element = $this->create_element(); $this->elements[] = $element; }Metoda zwracająca nowy obiekt jest często nazywana prostą fabryką (nie mylić z „metodą fabryczną”, która jest wzorcem projektowym).
Wiedząc, że każdy podtyp może być używany zamiast klasy nadrzędnej Element , zmodyfikujemy tę fabrykę, aby mogła tworzyć obiekty dowolnej klasy potomnej.
/** * Create a new element object. * * @throws Exception If there are no classes for the given element type. * @throws Exception If the given element type is not an `Element`. * * @param string $element_type * @param array $options * * @return Element */ private function create_element( $element_type, $options ) { $element_type = __NAMESPACE__ . '\\Elements\\' . $element_type; if ( ! class_exists( $element_type ) ) { throw new Exception( 'No class exists for the specified type' ); } $element = new $element_type( $this->section_id, $options ); if ( ! ( $element instanceof Element ) ) { throw new Exception( 'The specified type is invalid' ); } return $element; } /** * Add a new element object to this field. * * @param string $element_type * @param array $options */ public function add_element( $element_type, $options ) { try { $element = $this->create_element( $element_type, $options ); $this->elements[] = $element; } catch ( Exception $e ) { // Handle the exception } }Zaczynamy od poprzedzenia typu elementu aktualną nazwą:
$element_type = __NAMESPACE__ . '\\Elements\\' . $element_type; Magiczna stała __NAMESPACE__ zawiera nazwę bieżącej przestrzeni nazw.
Następnie upewniamy się, że istnieje klasa dla określonego typu elementu:
if ( ! class_exists( $element_type ) ) { throw new Exception( 'No class exists for the specified type' ); }Następnie tworzymy nowy obiekt:
$element = new $element_type( $this->section_id, $options );I na koniec upewniamy się, że nowo utworzony obiekt jest rzeczywiście instancją Elementu:
if ( ! ( $element instanceof Element ) ) { return; }Rozsuwalny
Warto zaznaczyć, że zbudowaliśmy naszą wtyczkę, aby była rozszerzalna. Dodawanie różnych rodzajów stron, sekcji, elementów jest tak proste, jak tworzenie nowej klasy rozszerzającej Admin_Page , Section , Element itp. Te klasy bazowe nie zawierają żadnego kodu, który trzeba zmienić, aby dodać nową stronę, sekcję lub element.
Zasada Open/Closed (lub OCP), „O” w SOLID, stanowi:
„Jednostki oprogramowania (klasy, moduły, funkcje itp.) powinny być otwarte na rozbudowę, ale zamknięte na modyfikację.”
Oznacza to, że powinniśmy być w stanie rozszerzyć klasę taką jak Admin_Page i ponownie ją wykorzystać, ale nie powinniśmy jej modyfikować , aby to zrobić.
Wniosek
W tym artykule zarejestrowaliśmy nasze sekcje, pola i elementy. Podczas ich wdrażania przyjrzeliśmy się bliżej, czym jest polimorfizm i dlaczego jest użyteczny. Przyjrzeliśmy się również kilku zasadom SOLID: „Zasadzie substytucji Liskov” i „Zasadzie otwartej/zamkniętej”.
Zostań z nami w kolejnej części tej podróży, podczas której przyjrzymy się bliżej, jak możemy ulepszyć sposób, w jaki zarządzamy naszymi hakami WordPress.
Kliknij tutaj, aby przeczytać część 7 naszej serii programowania zorientowanego na obiekt
Zobacz też
- WordPress i programowanie obiektowe – przegląd
- Część 2 – WordPress i programowanie obiektowe: przykład ze świata rzeczywistego
- Część 3 – WordPress i programowanie obiektowe: Α Przykład WordPress – definiowanie zakresu
- Część 4 – WordPress i programowanie obiektowe: przykład WordPressa – projektowanie
- Część 5 – WordPress i programowanie obiektowe: przykład WordPressa – Implementacja: menu administracyjne