
6부 – WordPress 및 객체 지향 프로그래밍: WordPress 예제 – 구현: 섹션 등록
게시 됨: 2022-02-04객체 지향 프로그래밍 시리즈에 오신 것을 환영합니다.
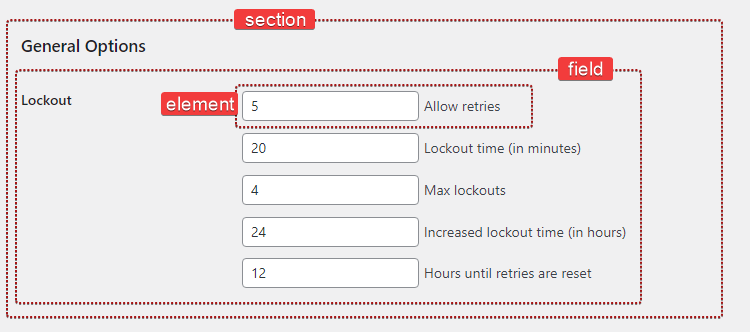
시리즈의 디자인 부분에서 설명했듯이 관리 페이지는 섹션 으로 구성됩니다. 각 섹션에는 하나 이상의 필드 가 포함되며 각 필드에는 하나 이상의 요소 가 포함됩니다.
코드에서 어떻게 보일까요?
public function register_sections() { $my_section = $this->register_section( /* ... */ ); $my_field = $my_section->add_field( /* ... */ ); $my_element = $my_field->add_element( /* ... */ ); } 좋습니다. 사용하기 쉬우며 Section , Field 및 Element 세 가지 새 클래스를 만들어야 할 수도 있다는 것을 이미 알 수 있습니다.
class Section {} class Field {} class Element {}잠시 시간을 내어 이 클래스에 대해 지금까지 알고 있는 것을 스스로에게 물어봅시다.
-
$my_section->add_field()→Section클래스는 새로운Field객체를 추가(및 저장)할 수 있어야 합니다. -
$my_field->add_element()→Field클래스는 새로운Element객체를 추가(및 저장)할 수 있어야 합니다.
일반적으로 하는 것처럼 Field 개체를 배열에 저장하는 것으로 시작합니다.
class Section { /** * @var Field[] Section field objects. */ protected $fields = array(); 이 $fields 변수는 클래스 멤버이며 우리가 속성 이라고 부르는 것입니다. 속성은 클래스에 있는 PHP 변수이며 모든 데이터 유형( string , integer , object 등)이 될 수 있습니다.
또한 add_field() 메서드를 작성하여 새 필드를 만들고 추가합니다.
public function add_field() { $field = new Field( /* ... */ ); $this->fields[] = $field; return $field; } 이 메소드는 새로운 Field 객체를 생성하고 이를 fields 속성에 추가하고 새로 생성된 객체를 반환합니다. 꽤 직설적 인.
Field 클래스에 대해서도 동일한 과정을 반복해 봅시다.
class Field { /** * @var Element[] Field elements. */ private $elements = array(); /** * Create a new element object. * * @return Element */ private function create_element() { return new Element( /* ... */ ); } /** * Add a new element object to this field. */ public function add_element() { $element = $this->create_element(); $this->elements[] = $element; } }시작입니다! 무엇 향후 계획?
섹션 클래스
새 섹션이 생성되면 add_settings_section()을 호출해야 합니다. 다시 한 번, 생성자 메서드는 초기화를 수행하는 좋은 방법입니다. 클래스에 추가해 보겠습니다.
class Section { // ... public function __construct() { add_settings_section( $this->id, $this->title, array( $this, 'print_description' ), $this->page ); } }섹션을 식별하기 위해 슬러그 이름이 필요한 것 같습니다(태그의 id 속성에 사용됨). 또한 제목, 설명을 가질 수 있으며 특정 페이지에 속합니다.
class Section { /** * @var Field[] Section field objects. */ protected $fields = array(); /** * @var string Section title. */ public $title; /** * @var string Section id. */ public $id; /** * @var string Slug-name of the settings page this section belongs to. */ public $page; /** * @var string Section description. */ public $description;다음과 같이 하여 섹션의 제목을 설정할 수 있습니다.
$section = new Section(); $section->title = __( 'Hello world', 'prsdm-limit-login-attempts' );글쎄요, 그것은 옳지 않습니다. 위의 코드는 완벽하게 유효하지만 실제로는 우리가 기대하는 바를 수행하지 않습니다.
생성자 메소드는 새로운 Section 객체가 생성될 때 실행됩니다. 따라서 add_settings_section() 은 제목을 설정할 기회가 생기기도 전에 호출됩니다. 결과적으로 섹션에는 제목이 없습니다.

Pressidium으로 웹사이트 호스팅
60일 환불 보장
제목은 객체를 초기화하는 동안 사용할 수 있어야 하므로 생성자에서 이 작업을 수행해야 합니다.
class Section { /** * @var string Section title. */ private $title; public function __construct( $title ) { $this->title = $title; // ... } // .. $this->title 은 제목 클래스 속성을 참조한다는 점에 주의하십시오. 여기서 $title 은 생성자의 인수를 참조합니다.
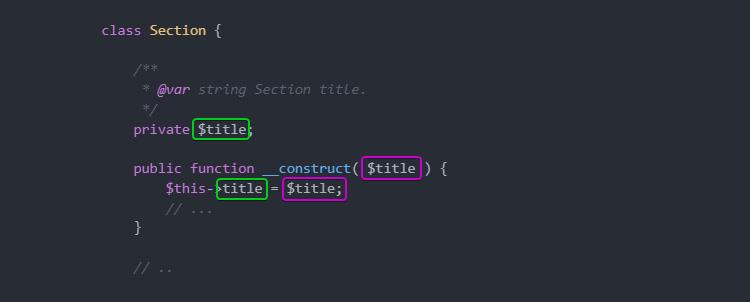
여기서 우리는 또한 가시성 을 이용합니다. $title 속성은 정의한 클래스에서만 액세스할 수 있으므로 private 으로 선언할 수 있습니다. 따라서 클래스 외부에서 액세스하는 것을 방지합니다.
아, 그리고 섹션의 설명을 인쇄할 print_description() 메서드도 추가해야 합니다.
/** * Print the section description. */ public function print_description() { echo esc_html( $this->description ); }모든 것을 종합하면 Section 클래스는 다음과 같습니다.
class Section { /** * @var Field[] Section field objects. */ protected $fields = array(); /** * @var string Section title. */ private $title; /** * @var string Section id. */ private $id; /** * @var string Slug-name of the settings page this section belongs to. */ private $page; /** * @var string Section description. */ private $description; /** * Section constructor. * * @param string $id Section id. * @param string $title Section title. * @param string $page Slug-name of the settings page. * @param string $description Section description. */ public function __construct( $id, $title, $page, $description ) { $this->id = $id; $this->title = $title; $this->page = $page; $this->description = $description; add_settings_section( $this->id, $this->title, array( $this, 'print_description' ), $this->page ); } /** * Print the section description. */ public function print_description() { echo esc_html( $this->description ); } /** * Create and add a new field object to this section. */ public function add_field() { $field = new Field( /* ... */ ); $this->fields[] = $field; return $field; } }필드 클래스
Section 과 비슷한 방식으로 이제 add_settings_field() WordPress 함수를 사용할 Field 클래스를 빌드하고 진행할 수 있습니다.
class Field { /** * @var Element[] Field elements. */ private $elements = array(); /** * @var string ID of the section this field belongs to. */ private $section_id; /** * @var string Field description. */ private $description; /** * Field constructor. * * @param string $id Field ID. * @param string $label Field label. * @param string $page Slug-name of the settings page. * @param string $section_id ID of the section this field belongs to. * @param string $description Field description. */ public function __construct( $id, $label, $page, $section_id, $description ) { $this->section_id = $section_id; $this->description = $description; add_settings_field( $id, $label, array( $this, 'render' ), $page, $this->section_id ); } }여기에서 필드의 ID, 레이블 및 설명에 대한 기본값도 제공하고자 합니다. 옵션 배열을 생성자에 전달하고 wp_parse_args() WordPress 함수를 사용하여 해당 옵션을 구문 분석하여 이를 수행할 수 있습니다.
class Field { /** * @var int Number of fields instantiated. */ private static $number_of_fields = 0; // ... /** * Field constructor. * * @param string $section_id ID of the section this field belongs to. * @param string $page Slug-name of the settings page. * @param array $options Options. */ public function __construct( $section_id, $page, $options = array() ) { self::$number_of_fields++; $options = wp_parse_args( $options, array( 'label' => sprintf( __( 'Field #%s', 'prsdm-limit-login-attempts' ), self::$number_of_fields 'id' => 'field_' . self::$number_of_fields, 'description' => '' ) ); $this->section_id = $section_id; $this->description = $options['description']; add_settings_field( $options['id'], $options['label'], array( $this, 'render' ), $page, $this->section_id ); } } wp_parse_args() 함수를 사용하면 사용자 정의 값( $options 배열)을 기본값과 병합할 수 있습니다.
array( 'label' => sprintf( __( 'Field #%s', 'prsdm-limit-login-attempts' ), self::$number_of_fields 'id' => 'field_' . self::$number_of_fields, 'description' => '' ) 또한 각 필드에 고유한 레이블을 설정해야 합니다. 레이블을 접두사( 'field_' )와 그 뒤에 오는 숫자로 설정하여 이를 처리할 수 있습니다. 이 숫자는 새 Field 객체가 생성될 때마다 증가합니다. 이 숫자를 $number_of_fields 정적 속성에 저장합니다.
/** * @var int Number of fields instantiated. */ private static $number_of_fields = 0;먼저 클래스의 인스턴스를 만들 필요 없이 정적 속성에 직접 액세스할 수 있습니다.
'id' => 'field_' . self::$number_of_fields self 키워드는 현재 클래스를 참조하는 데 사용되며 범위 확인 연산자 :: 일반적으로 "이중 콜론"이라고 함)의 도움으로 정적 속성에 액세스할 수 있습니다.
그렇게 하면 생성자에서 항상 동일한 $number_of_fields 속성에 액세스하여 개체가 생성될 때마다 값이 증가하므로 각 필드에 고유한 레이블이 부착됩니다.
앞으로 render() 메서드는 설명(있는 경우)을 인쇄한 후 모든 요소를 반복하고 각 요소를 렌더링합니다.
public function render() { if ( ! empty( $this->description ) ) { printf( '<p class="description">%s</p>', esc_html( $this->description ) ); } foreach ( $this->elements as $key => $element ) { $element->render(); } }함께 모아서…
class Field { /** * @var int Number of fields instantiated. */ private static $number_of_fields = 0; /** * @var Element[] Field elements. */ private $elements = array(); /** * @var string ID of the section this field belongs to. */ private $section_id; /** * @var string Field description. */ private $description; /** * Field constructor. * * @param string $section_id ID of the section this field belongs to. * @param string $page Slug-name of the settings page. * @param array $options Options. */ public function __construct( $section_id, $page, $options = array() ) { self::$number_of_fields++; $options = wp_parse_args( $options, array( 'label' => sprintf( /* translators: %s is the unique s/n of the field. */ __( 'Field #%s', 'prsdm-limit-login-attempts' ), self::$number_of_fields 'id' => 'field_' . self::$number_of_fields, 'description' => '' ) ); $this->section_id = $section_id; $this->description = $options['description']; add_settings_field( $options['id'], $options['label'], array( $this, 'render' ), $page, $this->section_id ); } /** * Create a new element object. * * @return Element */ private function create_element() { return new Element( /* ... */ ); } /** * Add a new element object to this field. */ public function add_element() { $element = $this->create_element(); $this->elements[] = $element; } /** * Render the field. */ public function render() { if ( ! empty( $this->description ) ) { printf( '<p class="description">%s</p>', esc_html( $this->description ) ); } foreach ( $this->elements as $key => $element ) { $element->render(); } } }요소 클래스
앞으로 비슷한 방식으로 Element 클래스를 빌드하겠습니다!

다음과 같이 클래스 작성을 시작할 것입니다.
class Element { /** * @var int Number of elements instantiated. */ private static $number_of_elements = 0; /** * @var string Element label. */ private $label; /** * @var string Element name. */ private $name; /** * @var mixed Element value. */ private $value; /** * Element constructor. * * @param string $section_id Section ID. * @param array $options Options. */ public function __construct( $section_id, $options = array() ) { self::$number_of_elements++; $options = wp_parse_args( $options, array( 'label' => sprintf( /* translators: %s is the unique s/n of the element. */ __( 'Element #%s', 'prsdm-limit-login-attempts' ), self::$number_of_elements ), 'name' => 'element_' . self::$number_of_elements ) ); $this->label = $options['label']; $this->name = $options['name']; $this->value = ''; } /** * Render the element. */ public function render() { ?> <fieldset> <label> <input type="number" name="<?php echo esc_attr( $this->name ); ?>" value="<?php echo esc_attr( $this->value ); ?>" /> <?php echo esc_html(); ?> </label> </fieldset> <?php } }여기에서 하는 것처럼 esc_attr() 및 esc_html() WordPress 함수를 사용하여 출력을 탈출하고 있는지 확인하여 교차 사이트 스크립팅 공격을 방지하십시오. 관리 페이지에서만 요소를 렌더링하지만 항상 출력 데이터를 이스케이프하는 것이 좋습니다.
참고: 교차 사이트 스크립팅(또는 XSS)은 일반적으로 웹 응용 프로그램에서 발견되는 일종의 보안 취약점입니다. XSS를 사용하면 공격자가 다른 사용자가 보는 웹 페이지에 클라이언트 측 코드를 삽입할 수 있습니다. 사이트 간 스크립팅 취약점은 공격자가 동일 출처 정책과 같은 액세스 제어를 우회하는 데 사용할 수 있습니다.
플러그인의 요구 사항을 수집할 때 체크박스, 라디오 버튼, 숫자 필드 등 여러 요소 유형이 있음을 확인했습니다. 디자인을 생각해 냈을 때 확장할 Element 클래스를 빌드하기로 결정했습니다. 따라서 각 요소 유형에 대한 자식 클래스가 생성된다는 것을 알고 있습니다.
출력은 요소 유형에 따라 달라야 하므로 render() 를 추상 메서드로 변환합니다. 이것은 물론 클래스 자체도 추상적이어야 함을 의미합니다.
abstract class Element { /** * @var int Number of elements instantiated. */ private static $number_of_elements = 0; /** * @var string Element label. */ protected $label; /** * @var string Element name. */ protected $name; /** * @var mixed Element value. */ protected $value; /** * Element constructor. * * @param string $section_id Section ID. * @param array $options Options. */ public function __construct( $section_id, $options = array() ) { self::$number_of_elements++; $options = wp_parse_args( $options, array( 'label' => sprintf( /* translators: %s is the unique s/n of the element. */ __( 'Element #%s', 'prsdm-limit-login-attempts' ), self::$number_of_elements ), 'name' => 'element_' . self::$number_of_elements ) ); $this->label = $options['label']; $this->name = $options['name']; $this->value = ''; } /** * Render the element. */ abstract public function render(); } 예를 들어 Number_Element 클래스는 다음과 같습니다.
class Number_Element extends Element { /** * Render the element. */ public function render() { ?> <fieldset> <label> <input type="number" name="<?php echo esc_attr( $this->name ); ?>" value="<?php echo esc_attr( $this->value ); ?>" /> <?php echo esc_html(); ?> </label> </fieldset> <?php } } 마찬가지로 Checkbox_Element , Radio_Element 및 나머지 요소에 대한 Custom_Element 클래스도 만들 수 있습니다.
클래스 가 모두 같은 방식으로 사용될 수 있도록 빌드하고 있음을 주목하세요. Element의 자식에 대해 render() 메서드를 호출하면 일부 HTML이 출력됩니다.
이것이 객체 지향 프로그래밍의 핵심 개념 중 하나인 다형성 의 예입니다.
다형성
"다형성"은 문자 그대로 "많은 형태"를 의미합니다("많은"을 의미하는 그리스어 "poly"와 "형태"를 의미하는 "morphe"에서). Element 자식 클래스는 부모 계층 구조에서 모든 형식의 클래스를 사용할 수 있으므로 여러 형식 을 가질 수 있습니다.
Number_Element , Checkbox_Element 또는 Element 객체가 예상되는 모든 위치에서 다른 하위 유형 을 사용할 수 있습니다. 모든 자식 객체가 동일한 방식 으로 사용될 수 있기 때문입니다(즉, render() 메서드 호출). 다르게(출력은 각 요소 유형에 따라 다름).
알 수 있듯이 다형성과 상속은 밀접하게 관련된 개념입니다.
대체 가능성
SOLID의 "L"인 Liskov 대체 원리(또는 LSP) 는 다음과 같이 설명합니다.
"컴퓨터 프로그램에서 S가 T의 하위 유형이면 T 유형의 개체는 다음 중 하나를 변경하지 않고 유형 S의 개체로 대체될 수 있습니다(즉, 유형 T의 개체는 하위 유형 S의 임의의 개체로 대체될 수 있음). 프로그램의 바람직한 속성."
평신도의 관점에서 보면 예상치 못한 동작 없이 부모 클래스 대신 모든 자식 클래스를 사용할 수 있어야 합니다.
공장
현재 새로운 Element 를 생성하는 create_element() 메서드가 있는 Field 클래스로 돌아가 보겠습니다.
/** * Create a new element object. * * @return Element */ private function create_element() { return new Element( /* ... */ ); } /** * Add a new element object to this field. */ public function add_element() { $element = $this->create_element(); $this->elements[] = $element; }새 객체를 반환하는 메서드를 종종 단순 팩토리 라고 합니다(디자인 패턴인 "팩토리 메서드"와 혼동하지 마십시오).
Element 상위 클래스 대신 모든 하위 유형을 사용할 수 있다는 것을 알고 있으므로 이 팩토리를 수정하여 모든 하위 클래스의 개체를 생성할 수 있도록 하겠습니다.
/** * Create a new element object. * * @throws Exception If there are no classes for the given element type. * @throws Exception If the given element type is not an `Element`. * * @param string $element_type * @param array $options * * @return Element */ private function create_element( $element_type, $options ) { $element_type = __NAMESPACE__ . '\\Elements\\' . $element_type; if ( ! class_exists( $element_type ) ) { throw new Exception( 'No class exists for the specified type' ); } $element = new $element_type( $this->section_id, $options ); if ( ! ( $element instanceof Element ) ) { throw new Exception( 'The specified type is invalid' ); } return $element; } /** * Add a new element object to this field. * * @param string $element_type * @param array $options */ public function add_element( $element_type, $options ) { try { $element = $this->create_element( $element_type, $options ); $this->elements[] = $element; } catch ( Exception $e ) { // Handle the exception } }요소 유형에 현재 이름을 접두사로 사용하여 시작합니다.
$element_type = __NAMESPACE__ . '\\Elements\\' . $element_type; __NAMESPACE__ 매직 상수는 현재 네임스페이스 이름을 포함합니다.
그런 다음 지정된 요소 유형에 대한 클래스가 있는지 확인합니다.
if ( ! class_exists( $element_type ) ) { throw new Exception( 'No class exists for the specified type' ); }다음으로 새 객체를 만듭니다.
$element = new $element_type( $this->section_id, $options );마지막으로 새로 생성된 객체가 실제로 Element의 인스턴스인지 확인합니다.
if ( ! ( $element instanceof Element ) ) { return; }확장
확장 가능하도록 플러그인을 구축했다는 점을 지적할 가치가 있습니다. 다른 종류의 페이지, 섹션, 요소를 추가하는 것은 Admin_Page , Section , Element 등을 확장하는 새 클래스를 만드는 것만큼 쉽습니다. 이러한 기본 클래스에는 새 페이지, 섹션 또는 요소를 추가하기 위해 변경해야 하는 코드가 포함되어 있지 않습니다.
SOLID의 "O"인 개방형/폐쇄형 원칙(또는 OCP)은 다음과 같이 명시합니다.
"소프트웨어 엔터티(클래스, 모듈, 기능 등)는 확장을 위해 열려야 하지만 수정을 위해 닫혀 있어야 합니다."
즉, Admin_Page 와 같은 클래스를 확장 하고 재사용할 수 있어야 하지만 그렇게 하기 위해 수정할 필요는 없습니다.
결론
이 기사에서는 섹션, 필드 및 요소를 등록했습니다. 이것을 구현하는 동안 우리는 다형성이 무엇이며 왜 유용한지 자세히 살펴보았습니다. 우리는 또한 몇 가지 SOLID 원칙, "리스코프 대체 원칙" 및 "개방/폐쇄 원칙"을 살펴보았습니다.
이 여정의 다음 부분에서 우리와 함께 하세요. 여기에서 WordPress 후크를 관리하는 방법을 개선할 수 있는 방법을 자세히 살펴보겠습니다.
객체 지향 프로그래밍 시리즈의 7부를 읽으려면 여기를 클릭하십시오.
또한보십시오
- WordPress 및 객체 지향 프로그래밍 – 개요
- 2부 – WordPress와 객체 지향 프로그래밍: 실제 사례
- 3부 – WordPress 및 객체 지향 프로그래밍: Α WordPress 예제 – 범위 정의
- 4부 – WordPress 및 객체 지향 프로그래밍: WordPress 예제 – 디자인
- 5부 – WordPress 및 객체 지향 프로그래밍: WordPress 예제 – 구현: 관리 메뉴