
CMB2로 커스텀 메타 박스를 만드는 방법
게시 됨: 2023-02-25몇 년 전에 저는 게시물을 쿼리하고 Google 지도에서 게시물이 작성된 위치를 표시하는 방법을 찾고 있었습니다. 연구 중에 CMB2와 Google 지도를 사용하여 매장 찾기 기능을 구축하는 방법에 대한 블로그 게시물을 우연히 발견했습니다. 그 이후로 CMB2는 제가 가장 좋아하는 플러그인 중 하나가 되었으며 대부분의 프로젝트에서 사용됩니다.
먼저 CMB2란?
CMB는 Custom Meta Boxes의 약어이며 플러그인 페이지의 설명에 따르면 "CMB2는 WordPress용 메타 상자, 사용자 정의 필드 및 양식 라이브러리로 마음을 사로잡을 것입니다." WebDevStudios의 Justin Sternberg가 개발했으며 2년이 조금 넘게 플러그인 저장소에 있었습니다. 그러나 지난 2월, WordPress 플러그인 저장소의 좋은 사람들은 CMB2를 플러그인으로 사용하지 않아야 할 때 바보짓을 하고 플러그인으로 승인했음을 인식했습니다.
보세요, 플러그인은 일반적으로 상자에서 바로 무언가를 할 수 있습니다. 몇 가지 고유한 기능이 있습니다. CMB2는 실제로 프레임워크입니다. Sternberg가 설명했듯이 "테마와 플러그인에 대한 양식과 필드를 쉽게 구축하기 위한 개발자 프레임워크입니다." 사실 CMB2를 설치하면 아무 일도 일어나지 않습니다. 관리자 페이지가 표시되지 않으며 관리자 사용자 인터페이스가 없습니다. CMB2를 사용하려면 코드를 작성하고 functions.php 파일에 추가할 수 있어야 합니다. 그런 이유로 '비플러그인' 플러그인이라고 부릅니다.
좋은 소식은 플러그인 승인 팀이 그것을 저장소에 남겨두기로 동의했기 때문에 거기에서 계속 다운로드하고 업데이트할 수 있다는 것입니다. Justin의 사이트에서 역사에 대한 모든 내용을 읽을 수 있습니다.
CMB2 설정 방법
시작하려면 플러그인 디렉토리에서 example-functions.php 파일을 찾아 테마에 복사해야 합니다. 테마의 루트 폴더에 직접 복사할 수 있지만 프로젝트를 잘 정리된 상태로 유지하려면 /lib/ 또는 /includes/ 같은 폴더에 복사하는 것이 좋습니다. CMB2를 사용하는 방법을 이미 알고 있는 경우 파일 이름을 보다 적절한 이름으로 바꿀 수 있습니다. 예를 들어, 추천 페이지에 대한 사용자 정의 필드를 만드는 데 사용하려면 testimonial-functions.php 로 이름을 지정할 수 있습니다.
다음으로, functions.php 파일에 require_once 문을 추가하여 워드프레스가 새 파일을 찾도록 해야 합니다. 다음과 같이 표시됩니다.
require_once( dirname(__FILE__) . '/lib/testimonial-functions.php'); 이제 본격적으로 파헤쳐볼 시간입니다. testimonial-functions.php 파일(또는 이름이 무엇이든)을 엽니다. Justin이 가능한 거의 모든 유형의 필드에 대한 예제를 만들었을 뿐만 아니라 홈페이지, 카테고리, 게시물 ID 등으로 필드를 표시하는 기능도 만들었습니다.
참고: 이 기사는 CMB2를 소개하기 위한 것입니다. 그것은 그것의 모든 측면을 사용하는 방법에 대한 완전한 자습서가 될 수 없으며 프레임워크이고 프로그래머를 돕기 위해 개발되었기 때문에 PHP와 WordPress의 내부 작동에 대한 기본적인 이해가 있어야 합니다. 관리 사용자 인터페이스가 있는 Custom Meta Box 플러그인을 찾고 있다면 Advanced Custom Fields 플러그인을 확인하는 것이 좋습니다.
자, 평가와 같은 단순한 것에 대한 사용자 지정 메타 상자를 만드는 것으로 돌아가 봅시다. 먼저 필요한 필드의 수와 유형을 결정합니다. 단순하게 유지하기 위해 세 개의 필드가 필요하다고 가정해 보겠습니다. 하나는 실제 추천용, 하나는 추천하는 사람의 이름용, 다른 하나는 그 사람의 이미지용입니다.
testimonial-functions.php 파일에서 작업하면서 새 기능을 등록하고 추가하기 위한 섹션을 찾아야 합니다. 그 코드는 다음과 같습니다.
add_action( 'cmb2_admin_init', 'yourprefix_register_demo_metabox' );다음으로 기능의 이름을 테마 및 프로젝트와 관련된 이름으로 바꾸는 것이 좋습니다.
add_action( 'cmb2_admin_init', 'register_testimonial_metabox' ); /** * Hook in and add a testimonial metabox. Can only happen on the 'cmb2_admin_init' or 'cmb2_init' hook. */ function register_testimonial_metabox() {또한 접두사 이름을 바꾸는 것이 좋습니다.
// Start with an underscore to hide fields from custom fields list $prefix = '_yourprefix_'; //note, you can use anything you'd like here, but you need to remember what you use, because you will be using it again later.선택할 수 있는 여러 필드 유형이 있습니다. 나는 다음을 사용할 것입니다 :
'type' => 'textarea_small' // for the author field 'type' => 'wysiwyg' // for the testimonial in case we want to include html 'type' => 'file' // for the image of the project or author $cmb_demo->add_field( array( 'name' => __( 'Testimonial Author', 'cmb2' ), 'desc' => __( 'Who is the testimonial from', 'cmb2' ), 'id' => $prefix . 'author', //Note, I renamed this to be more appropriate 'type' => 'textarea_small', ) ); $cmb_demo->add_field( array( 'name' => __( 'Testimonial', 'cmb2' ), 'desc' => __( 'add the testimonial here', 'cmb2' ), 'id' => $prefix . 'testimonial', //Note, I renamed this to be more appropriate 'type' => 'wysiwyg', 'options' => array( 'textarea_rows' => 5, ), ) ); $cmb_demo->add_field( array( 'name' => __( 'Author Image', 'cmb2' ), 'desc' => __( 'Upload an image or enter a URL.', 'cmb2' ), 'id' => $prefix . 'image', //Note, I renamed this to be more appropriate 'type' => 'file', ) );이 세 개의 새 필드를 새 함수에 추가해야 다음과 같이 표시됩니다.
add_action( 'cmb2_admin_init', 'register_testimonial_metabox' ); /** * Hook in and add a testimonial metabox. Can only happen on the 'cmb2_admin_init' or 'cmb2_init' hook. */ function register_testimonial_metabox() { // Start with an underscore to hide fields from custom fields list $prefix = '_yourprefix_'; //note, you can use anything you'd like here /** * Start field groups here */ $cmb_demo->add_field( array( 'name' => __( 'Testimonial Author', 'cmb2' ), 'desc' => __( 'Who is the testimonial from', 'cmb2' ), 'id' => $prefix . 'author', //Note, I renamed this to be more appropriate 'type' => 'textarea_small', ) ); $cmb_demo->add_field( array( 'name' => __( 'Testimonial', 'cmb2' ), 'desc' => __( 'add the testimonial here', 'cmb2' ), 'id' => $prefix . 'testimonial', //Note, I renamed this to be more appropriate 'type' => 'wysiwyg', 'options' => array( 'textarea_rows' => 5, ), ) ); $cmb_demo->add_field( array( 'name' => __( 'Author Image', 'cmb2' ), 'desc' => __( 'Upload an image or enter a URL.', 'cmb2' ), 'id' => $prefix . 'image', //Note, I renamed this to be more appropriate 'type' => 'file', ) ); }그리고 그게 다야! 최종 코드는 다음과 같아야 합니다.

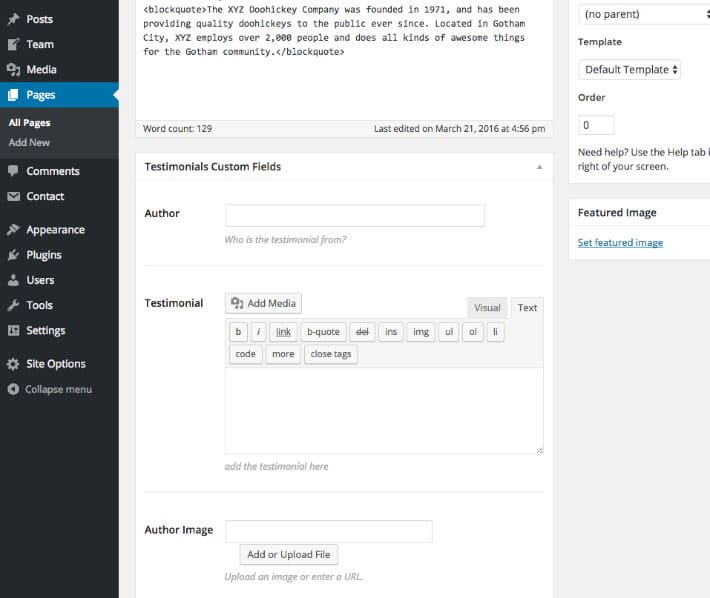
<?php /** * Include and set up custom metaboxes and fields. (Make sure you copy this file outside the CMB2 directory) * * Be sure to replace all instances of 'yourprefix_' with your project's prefix. * http://nacin.com/2010/05/11/in-wordpress-prefix-everything/ * * @category YourThemeOrPlugin * @package Demo_CMB2 * @license http://www.opensource.org/licenses/gpl-license.php GPL v2.0 (or later) * @link https://github.com/WebDevStudios/CMB2 */ /** * Get the bootstrap! If using the plugin from wordpress.org, REMOVE THIS! */ if ( file_exists( dirname( __FILE__ ) . '/CMB2/init.php' ) ) { require_once dirname( __FILE__ ) . '/CMB2/init.php'; } elseif ( file_exists( dirname( __FILE__ ) . '/CMB2/init.php' ) ) { require_once dirname( __FILE__ ) . '/CMB2/init.php'; } add_action( 'cmb2_admin_init', 'register_testimonial_metabox' ); /** * Hook in and add a testimonial metabox. Can only happen on the 'cmb2_admin_init' or 'cmb2_init' hook. */ function register_testimonial_metabox() { // Start with an underscore to hide fields from custom fields list $prefix = '_yourprefix_'; //note, you can use anything you'd like here /** * Start field groups here */ // This first field group tells WordPress where to put the fields. In the example below, it is set to show up only on Post_ID=10 $cmb_demo = new_cmb2_box( array( 'id' => $prefix . 'metabox', 'title' => __( 'Homepage Custom Fields', 'cmb2' ), 'object_types' => array( 'page', ), // Post type 'show_on' => array( 'id' => array( 10, ) ), // Specific post IDs to display this metabox ) ); $cmb_demo->add_field( array( 'name' => __( 'Testimonial Author', 'cmb2' ), 'desc' => __( 'Who is the testimonial from', 'cmb2' ), 'id' => $prefix . 'author', //Note, I renamed this to be more appropriate 'type' => 'textarea_small', ) ); $cmb_demo->add_field( array( 'name' => __( 'Testimonial', 'cmb2' ), 'desc' => __( 'add the testimonial here', 'cmb2' ), 'id' => $prefix . 'testimonial', //Note, I renamed this to be more appropriate 'type' => 'wysiwyg', 'options' => array( 'textarea_rows' => 5, ), ) ); $cmb_demo->add_field( array( 'name' => __( 'Author Image', 'cmb2' ), 'desc' => __( 'Upload an image or enter a URL.', 'cmb2' ), 'id' => $prefix . 'image', //Note, I renamed this to be more appropriate 'type' => 'file', ) ); }완료되면 다음과 같은 페이지가 표시됩니다.
옵션이 정말 무한하기 때문에 CMB2를 사용하는 것은 귀하의 웹사이트에 정확히 필요한 것을 제공할 수 있는 좋은 방법입니다. 예를 들어, CMB2는 로고, 소셜 미디어 사이트 URL 또는 비디오에 대한 메타 상자가 있는 테마 옵션 페이지를 만드는 데 사용할 수 있습니다. 클라이언트를 위한 웹 사이트를 구축하는 경우 CMB2는 클라이언트가 테마 스타일과 일치하도록 콘텐츠 형식을 지정할 필요가 없도록 관리자를 사용자 지정하는 데 적합합니다. 데이터가 입력되면 HTML 및 CSS에 이미 적용된 모든 스타일로 콘텐츠를 표시할 수 있습니다.
CMB2로 기본 필드 추가를 마스터했으면 반복 가능한 필드 그룹을 추가해 보십시오. 이를 통해 원하는 만큼 많은 콘텐츠 유형을 추가할 수 있으며 for-each 루프를 사용하여 슬라이드쇼 또는 캐러셀 만들기를 시작할 수 있습니다.
CMB2를 통해 WordPress 사이트를 다음 단계로 끌어올릴 수 있었고 귀하에게도 동일한 작업을 수행할 수 있기를 바랍니다.