
WooCommerce 결제 배경색을 변경하는 방법
게시 됨: 2021-04-19 결제 페이지에서 양식의 배경색을 변경하는 방법을 찾고 계십니까? 결제 페이지 최적화는 WooCommerce 상점 소유자가 자주 간과하는 영역입니다.
WooCommerce는 유연하기 때문에 계속 인기가 있습니다. 사용자 정의 코드를 추가하여 사이트의 다른 섹션을 수정할 수 있습니다.
결제 페이지에서 배경색을 변경하고 싶을 수 있습니다. 기본적으로 WooCommerce에는 이를 위한 내장 솔루션이 없습니다.
플러그인을 사용할 수 있지만 사용자 지정 코드를 사용하는 것이 좋습니다. 이는 사이트를 부풀릴 수 있기 때문입니다.
WooCommerce 결제 배경색 변경
이 게시물이 끝나면 결제 페이지 양식의 배경색을 변경할 수 있습니다.
그러나 귀하의 사이트에는 균일한 디자인이 포함되어야 합니다. 이것은 장바구니와 결제 페이지에서 양식의 배경색을 변경해야 함을 의미합니다.
또한 양식 필드, 자리 표시자 텍스트 및 모든 WooCommerce 버튼의 스타일을 지정합니다.
체크아웃 페이지에 지불 상자, 쿠폰 필드 및 드롭다운을 사용자 지정하는 코드를 포함했다는 점도 언급할 가치가 있습니다.
WooCommerce Checkout 배경색을 변경하는 단계
이 섹션에서는 CSS 코드를 사용하여 사이트의 나머지 부분과 일치하도록 WooCommerce 장바구니, 결제 및 계정 페이지를 사용자 지정합니다.
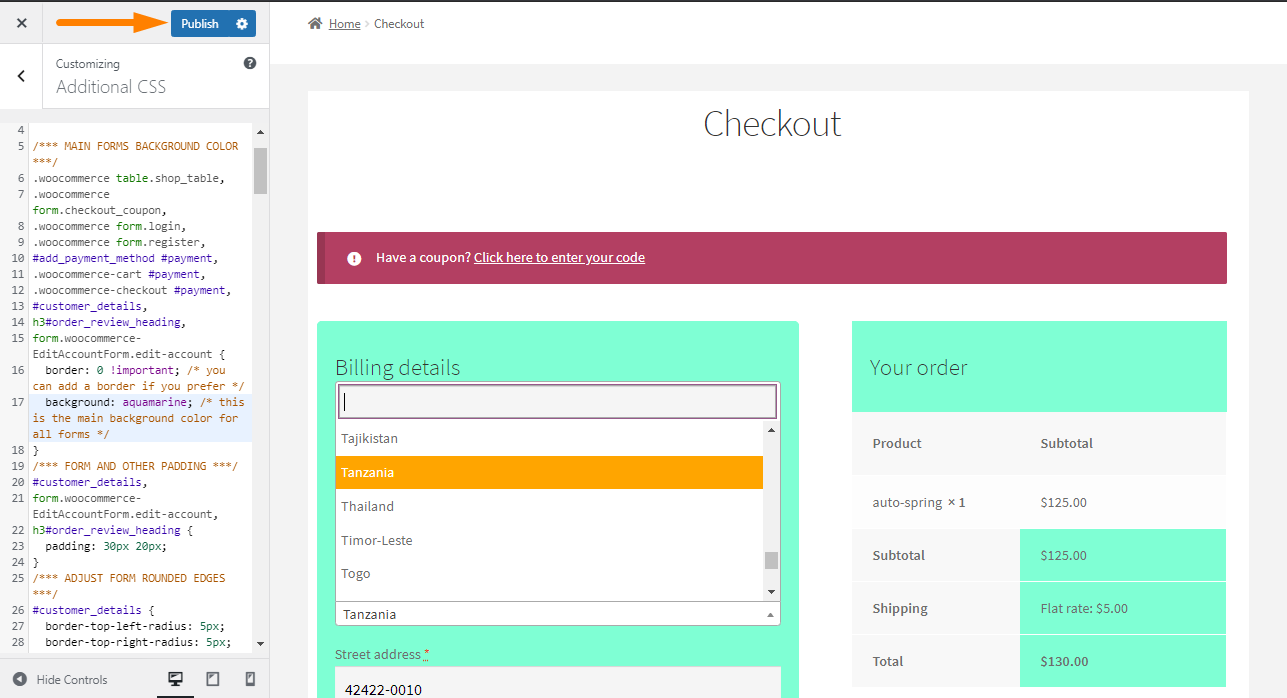
결제 페이지가 표시되는 방식은 다음과 같습니다. 
따라야 할 단계는 다음과 같습니다.
- WordPress 사이트에 로그인하고 관리자로 대시보드에 액세스합니다.
- 대시보드 메뉴에서 모양 > 사용자 정의 를 클릭합니다.
- 그러면 화면 왼쪽에 사용자 정의 패널이 시작됩니다.
- 추가 CSS 링크를 클릭하고 다음 CSS 코드를 추가합니다.
/*** MAIN FORMS BACKGROUND COLOR ***/

.woocommerce table.shop_table,

.woocommerce form.checkout_coupon,

.woocommerce form.login,

.woocommerce form.register,

#add_payment_method #payment,

.woocommerce-cart #payment,

.woocommerce-checkout #payment,

#customer_details,

h3#order_review_heading,

form.woocommerce-EditAccountForm.edit-account {

            border: 0 !important; /* you can add a border if you prefer */

            background: #f5f5f5; /* this is the main background color for all forms */

}

/*** FORM AND OTHER PADDING ***/

#customer_details,

form.woocommerce-EditAccountForm.edit-account,

h3#order_review_heading {

            padding: 30px 20px;

}

/*** ADJUST FORM ROUNDED EDGES ***/

#customer_details {

            border-top-left-radius: 5px;

            border-top-right-radius: 5px;

}

.woocommerce-checkout-review-order table.shop_table {

            border-top-left-radius: 0;

            border-top-right-radius: 0;

}

/*** FIELDS ON CHECKOUT, CART, ACCOUNT PAGES ***/

.woocommerce-account input,

.woocommerce-checkout input,

#order_comments.input-text {

            background-color: #f5f5f5 !important;

            color: black !important; /* not the placeholder, the text color when typed */

            border: 0; /* optional */

}

/*** COUPON FIELD ONLY ***/

.woocommerce-page #coupon_code.input-text { /* if you want your coupon different from other fields */

            background-color: black !important;

            color: blue !important;

            font-size: 16px !important; /* if you don't want the default giant font on the coupon field */

}

/*** PLACEHOLDER TEXT ON ALL WOO PAGES ***/

.woocommerce-page ::-webkit-input-placeholder {

    color: red !important;

}

.woocommerce-page :-ms-input-placeholder {

    color: red !important;

}

.woocommerce-page ::-moz-placeholder {

    color: red !important;

}

.woocommerce-page :-moz-placeholder { /* this isn't the same as above don't delete */

    color: red !important;

}

/*** THIS COMPENSATES FOR SHIP TO DIFF ADDRESS FIELD NOT ALIGNING ***/

h3#ship-to-different-address {

            margin-top: -3px;

}

/*** ALL WOO BUTTONS ***/

.woocommerce button.button.alt,

.woocommerce-page button.button.alt,

.woocommerce a.button,

.woocommerce-page a.button,

.woocommerce button.button,

.woocommerce-page button.button {

            text-transform: capitalize !important;

            background: #ffa500 !important;

            color: #222 !important;

}

.woocommerce button.button.alt:hover,

.woocommerce-page button.button.alt:hover,

.woocommerce a.button.alt:hover,

.woocommerce-page a.button.alt:hover,

.woocommerce a.button:hover,

.woocommerce-page a.button:hover,

.woocommerce button.button:hover,

.woocommerce-page button.button:hover {

            background: #00adad !important;

            color: #fff !important;

}

/*** PAYMENT BOX ON CHECKOUT ***/

#add_payment_method #payment div.payment_box,

.woocommerce-cart #payment div.payment_box,

.woocommerce-checkout #payment div.payment_box {

            background-color: #15bf86;

            color: #fff;

}

#add_payment_method #payment div.payment_box::before,

.woocommerce-cart #payment div.payment_box::before,

.woocommerce-checkout #payment div.payment_box::before {

            border-bottom-color: #15bf86;

}

#add_payment_method #payment ul.payment_methods,

.woocommerce-cart #payment ul.payment_methods,

.woocommerce-checkout #payment ul.payment_methods {

            border-bottom: 0;

}

/*** BORDERS AND TABLES ***/

.woocommerce form .form-row input.input-text,

.woocommerce form .form-row textarea {

            border: 0;

}

.woocommerce table.shop_table td,

#add_payment_method .cart-collaterals .cart_totals tr td,

#add_payment_method .cart-collaterals .cart_totals tr th,

.woocommerce-cart .cart-collaterals .cart_totals tr td,

.woocommerce-cart .cart-collaterals .cart_totals tr th,

.woocommerce-checkout .cart-collaterals .cart_totals tr td,

.woocommerce-checkout .cart-collaterals .cart_totals tr th,

.woocommerce table.shop_table tbody th,

.woocommerce table.shop_table tfoot td,

.woocommerce table.shop_table tfoot th,

.woocommerce-checkout #main-content .cart-subtotal td {

            border-top: 2px solid #fff;

}

.woocommerce table.shop_table_responsive tr:nth-child(2n) td,

.woocommerce-page table.shop_table_responsive tr:nth-child(2n) td {

            background: transparent;

}

.woocommerce-checkout #content-area table th,

.woocommerce-checkout #content-area table td {

            padding-left: 20px;

}

.woocommerce form .form-row input.input-text,

.woocommerce form .form-row textarea {

            font-size: 18px;

}

/*** EXISTING ACCOUNT / ERROR BOXES BACKGROUND COLOR ***/

.woocommerce-message,

.woocommerce-error,

.woocommerce-info {

            background: #b33f62 !important;

}

/*** ORDER NOTES ON CHECKOUT ***/

.woocommerce-checkout .woocommerce form .form-row textarea {

            height: 150px; /* height of optional notes box */

}

/*** STATE DROPDOWN SELECT COLOR ***/

.select2-container--default .select2-results__option--highlighted[aria-selected],

.select2-container--default .select2-results__option--highlighted[data-selected] {

            background: #ffa500;

}

/*** QUANTITY BOX ***/

.woocommerce #content .quantity input.qty,

.woocommerce .quantity input.qty,

.woocommerce-cart table.cart td.actions .coupon .input-text,

.woocommerce-page #content .quantity input.qty,

.woocommerce-page .quantity input.qty {

            color: #fff !important;

            background: #222 !important;

            height: 46px; /* you may need to change this based on your font size */

}
- Divi와 같은 테마를 사용하는 경우 테마 옵션 > 사용자 정의 CSS 상자 를 클릭하여 코드를 추가합니다.
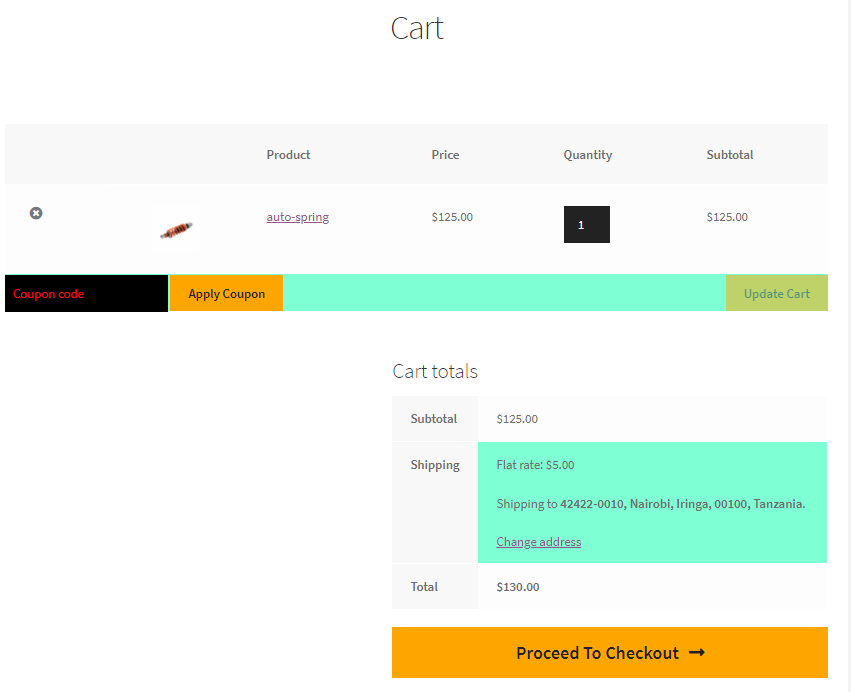
- 결과는 다음과 같습니다.
결론
고객이 구매하기 전 마지막 단계이므로 결제 페이지를 사용자 지정하는 것이 중요합니다. 그러나 변경 사항은 사이트 디자인과 일치해야 합니다.

유사한 기사
- 로그아웃 후 WooCommerce 리디렉션 [궁극적인 가이드]
- 체크아웃 후 WooCommerce 리디렉션: 맞춤 감사 페이지로 리디렉션
- 결제 세부 정보를 수정하는 방법 WooCommerce 결제 페이지
- WooCommerce에서 최소 지출로 무료 배송을 설정하는 방법
- WooCommerce 모바일 결제 최적화 퀵 가이드
- WooCommerce에 통화를 추가하는 방법 [커스텀 통화]
- WooCommerce에서 결제 후 주문 세부 정보를 얻는 방법
- WooCommerce 판매 배지를 숨기거나 변경하거나 제거하는 방법
- WooCommerce Checkout 필드 자리 표시자를 설정하는 방법
- WooCommerce 이메일 색상을 변경하는 방법
- URL을 기반으로 활성 탐색 클래스를 추가하는 방법
- WordPress(PHP)에서 do_shortcode를 사용하는 방법
- WooCommerce에서 쇼핑 페이지에 검색을 추가하는 방법
- WooCommerce에서 사용자 정의 카테고리 페이지를 만드는 방법
- WooCommerce에서 프로그래밍 방식으로 제품을 장바구니에 추가하는 방법
- WooCommerce에서 로그아웃 시 장바구니를 지우는 방법
- 사용자가 WordPress에 로그인했는지 확인하는 방법
- WooCommerce에서 쿠폰을 만드는 방법
- WooCommerce에서 결제 URL을 얻는 방법
- WooCommerce에서 통화 기호를 변경하는 방법