
パート6– WordPressとオブジェクト指向プログラミング:WordPressの例–実装:セクションの登録
公開: 2022-02-04オブジェクト指向プログラミングのシリーズにようこそ。
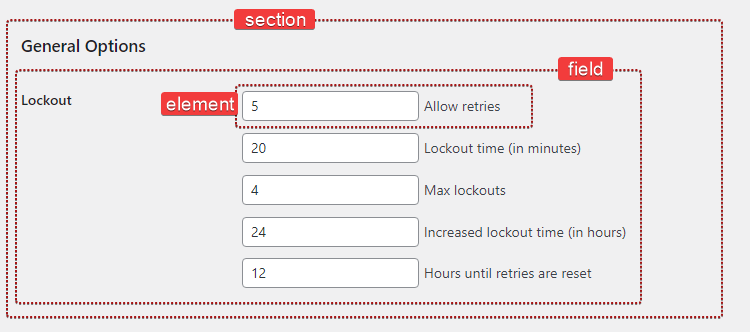
シリーズのデザインの部分で説明したように、管理ページはセクションで構成されています。 各セクションには1つ以上のフィールドが含まれ、これらの各フィールドには1つ以上の要素が含まれます。
それはコードでどのように見えますか?
public function register_sections() { $my_section = $this->register_section( /* ... */ ); $my_field = $my_section->add_field( /* ... */ ); $my_element = $my_field->add_element( /* ... */ ); } 了解しました。これは使いやすいようですSection 、 Field 、 Elementの3つの新しいクラスを作成する必要があることはすでにわかります。
class Section {} class Field {} class Element {}少し時間を取って、これらのクラスについてこれまでに知っていることを自問してみましょう。
-
$my_section->add_field()→Sectionクラスは、新しいFieldオブジェクトを追加(および保存)できる必要があります $my_field->add_element()→Fieldクラスは、新しいElementオブジェクトを追加(および保存)できる必要があります。
通常どおり、Fieldオブジェクトを配列に格納することから始めます。
class Section { /** * @var Field[] Section field objects. */ protected $fields = array(); この$fields変数はクラスメンバーであり、これをプロパティと呼びます。 プロパティはPHP変数であり、クラスに存在し、任意のデータ型( string 、 integer 、 objectなど)にすることができます。
また、 add_field()メソッドを記述して、新しいフィールドを作成および追加します。
public function add_field() { $field = new Field( /* ... */ ); $this->fields[] = $field; return $field; } このメソッドは、新しいFieldオブジェクトを作成し、それをfieldsプロパティに追加して、新しく作成されたオブジェクトを返します。 かなり簡単です。
Fieldクラスについても同じプロセスを繰り返しましょう。
class Field { /** * @var Element[] Field elements. */ private $elements = array(); /** * Create a new element object. * * @return Element */ private function create_element() { return new Element( /* ... */ ); } /** * Add a new element object to this field. */ public function add_element() { $element = $this->create_element(); $this->elements[] = $element; } }それが始まりです! 次は何ですか?
セクションクラス
新しいセクションが作成されたら、add_settings_section()を呼び出す必要があります。 繰り返しになりますが、コンストラクターメソッドは初期化を実行するための優れた方法です。 それをクラスに追加しましょう:
class Section { // ... public function __construct() { add_settings_section( $this->id, $this->title, array( $this, 'print_description' ), $this->page ); } }セクションには、それを識別するためのスラッグ名が必要なようです(タグのid属性で使用されます)。 タイトル、説明を含めることもでき、特定のページに属します。
class Section { /** * @var Field[] Section field objects. */ protected $fields = array(); /** * @var string Section title. */ public $title; /** * @var string Section id. */ public $id; /** * @var string Slug-name of the settings page this section belongs to. */ public $page; /** * @var string Section description. */ public $description;次のようにすると、セクションのタイトルを設定できます。
$section = new Section(); $section->title = __( 'Hello world', 'prsdm-limit-login-attempts' );まあ、それは完全に正しくありません。 上記のコードは完全に有効ですが、実際には期待どおりの動作をしません。
コンストラクターメソッドは、新しいSectionオブジェクトが作成されたときに実行されます。 したがって、タイトルを設定する前に、 add_settings_section()が呼び出されます。 その結果、セクションにはタイトルがありません。

Pressidiumであなたのウェブサイトをホストする
60日間の返金保証
オブジェクトの初期化中にタイトルが使用可能である必要があるため、コンストラクターでこれを行う必要があります。
class Section { /** * @var string Section title. */ private $title; public function __construct( $title ) { $this->title = $title; // ... } // .. $this->titleはタイトルクラスプロパティを参照し、 $titleはコンストラクターの引数を参照することに注意してください。
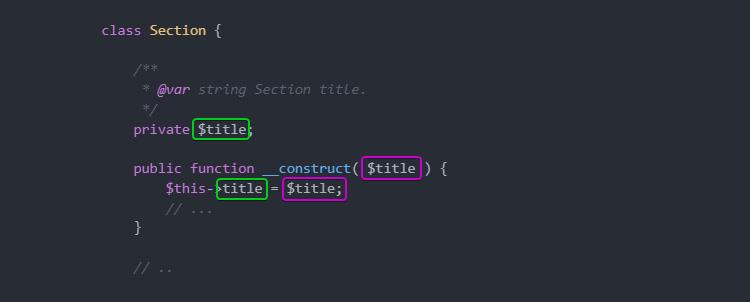
ここでは、可視性も活用しています。 $titleプロパティには、それを定義したクラスからのみアクセスできるため、 privateとして宣言できます。 したがって、クラス外でのアクセスを防止します。
ああ、そして、セクションの説明を出力するprint_description()メソッドも追加する必要があります。
/** * Print the section description. */ public function print_description() { echo esc_html( $this->description ); }まとめると、Sectionクラスは次のようになります。
class Section { /** * @var Field[] Section field objects. */ protected $fields = array(); /** * @var string Section title. */ private $title; /** * @var string Section id. */ private $id; /** * @var string Slug-name of the settings page this section belongs to. */ private $page; /** * @var string Section description. */ private $description; /** * Section constructor. * * @param string $id Section id. * @param string $title Section title. * @param string $page Slug-name of the settings page. * @param string $description Section description. */ public function __construct( $id, $title, $page, $description ) { $this->id = $id; $this->title = $title; $this->page = $page; $this->description = $description; add_settings_section( $this->id, $this->title, array( $this, 'print_description' ), $this->page ); } /** * Print the section description. */ public function print_description() { echo esc_html( $this->description ); } /** * Create and add a new field object to this section. */ public function add_field() { $field = new Field( /* ... */ ); $this->fields[] = $field; return $field; } }フィールドクラス
Sectionと同様に、 add_settings_field() WordPress関数を利用するFieldクラスを作成して構築できます。
class Field { /** * @var Element[] Field elements. */ private $elements = array(); /** * @var string ID of the section this field belongs to. */ private $section_id; /** * @var string Field description. */ private $description; /** * Field constructor. * * @param string $id Field ID. * @param string $label Field label. * @param string $page Slug-name of the settings page. * @param string $section_id ID of the section this field belongs to. * @param string $description Field description. */ public function __construct( $id, $label, $page, $section_id, $description ) { $this->section_id = $section_id; $this->description = $description; add_settings_field( $id, $label, array( $this, 'render' ), $page, $this->section_id ); } }ここでは、フィールドのID、ラベル、および説明のデフォルト値も提供します。 これを行うには、オプション配列をコンストラクターに渡し、wp_parse_args()WordPress関数を使用してこれらのオプションを解析します。
class Field { /** * @var int Number of fields instantiated. */ private static $number_of_fields = 0; // ... /** * Field constructor. * * @param string $section_id ID of the section this field belongs to. * @param string $page Slug-name of the settings page. * @param array $options Options. */ public function __construct( $section_id, $page, $options = array() ) { self::$number_of_fields++; $options = wp_parse_args( $options, array( 'label' => sprintf( __( 'Field #%s', 'prsdm-limit-login-attempts' ), self::$number_of_fields 'id' => 'field_' . self::$number_of_fields, 'description' => '' ) ); $this->section_id = $section_id; $this->description = $options['description']; add_settings_field( $options['id'], $options['label'], array( $this, 'render' ), $page, $this->section_id ); } } wp_parse_args()関数を使用すると、ユーザー定義の値( $options配列)をデフォルト値とマージできます。
array( 'label' => sprintf( __( 'Field #%s', 'prsdm-limit-login-attempts' ), self::$number_of_fields 'id' => 'field_' . self::$number_of_fields, 'description' => '' ) また、フィールドごとに一意のラベルを設定する必要があります。 これを処理するには、ラベルをプレフィックス( 'field_' )の後に数字を設定します。この数字は、新しいFieldオブジェクトが作成されるたびに増加します。 この数値を$number_of_fields静的プロパティに格納します。
/** * @var int Number of fields instantiated. */ private static $number_of_fields = 0;静的プロパティには、最初にクラスのインスタンスを作成しなくても直接アクセスできます。
'id' => 'field_' . self::$number_of_fields selfキーワードは、現在のクラスを参照するために使用され、スコープ解決演算子::一般に「ダブルコロン」と呼ばれます)を使用して、静的プロパティにアクセスできます。
このように、コンストラクターでは、常に同じ$number_of_fieldsプロパティにアクセスし、オブジェクトが作成されるたびにその値を増やします。これにより、各フィールドに一意のラベルが付けられます。
今後、 render()メソッドは、説明(存在する場合)を出力した後、すべての要素を反復処理し、各要素をレンダリングします。
public function render() { if ( ! empty( $this->description ) ) { printf( '<p class="description">%s</p>', esc_html( $this->description ) ); } foreach ( $this->elements as $key => $element ) { $element->render(); } }すべてを一緒に入れて…
class Field { /** * @var int Number of fields instantiated. */ private static $number_of_fields = 0; /** * @var Element[] Field elements. */ private $elements = array(); /** * @var string ID of the section this field belongs to. */ private $section_id; /** * @var string Field description. */ private $description; /** * Field constructor. * * @param string $section_id ID of the section this field belongs to. * @param string $page Slug-name of the settings page. * @param array $options Options. */ public function __construct( $section_id, $page, $options = array() ) { self::$number_of_fields++; $options = wp_parse_args( $options, array( 'label' => sprintf( /* translators: %s is the unique s/n of the field. */ __( 'Field #%s', 'prsdm-limit-login-attempts' ), self::$number_of_fields 'id' => 'field_' . self::$number_of_fields, 'description' => '' ) ); $this->section_id = $section_id; $this->description = $options['description']; add_settings_field( $options['id'], $options['label'], array( $this, 'render' ), $page, $this->section_id ); } /** * Create a new element object. * * @return Element */ private function create_element() { return new Element( /* ... */ ); } /** * Add a new element object to this field. */ public function add_element() { $element = $this->create_element(); $this->elements[] = $element; } /** * Render the field. */ public function render() { if ( ! empty( $this->description ) ) { printf( '<p class="description">%s</p>', esc_html( $this->description ) ); } foreach ( $this->elements as $key => $element ) { $element->render(); } } }要素クラス
今後も同様の方法でElementクラスを構築していきます!

次のようにクラスを書き始めます。
class Element { /** * @var int Number of elements instantiated. */ private static $number_of_elements = 0; /** * @var string Element label. */ private $label; /** * @var string Element name. */ private $name; /** * @var mixed Element value. */ private $value; /** * Element constructor. * * @param string $section_id Section ID. * @param array $options Options. */ public function __construct( $section_id, $options = array() ) { self::$number_of_elements++; $options = wp_parse_args( $options, array( 'label' => sprintf( /* translators: %s is the unique s/n of the element. */ __( 'Element #%s', 'prsdm-limit-login-attempts' ), self::$number_of_elements ), 'name' => 'element_' . self::$number_of_elements ) ); $this->label = $options['label']; $this->name = $options['name']; $this->value = ''; } /** * Render the element. */ public function render() { ?> <fieldset> <label> <input type="number" name="<?php echo esc_attr( $this->name ); ?>" value="<?php echo esc_attr( $this->value ); ?>" /> <?php echo esc_html(); ?> </label> </fieldset> <?php } }クロスサイトスクリプティング攻撃を防ぐために、ここで行っているように、esc_attr()およびesc_html()WordPress関数を使用して出力をエスケープしていることを確認してください。 管理ページでのみ要素をレンダリングしていますが、出力データを常にエスケープすることをお勧めします。
注:クロスサイトスクリプティング(またはXSS)は、Webアプリケーションに通常見られるセキュリティの脆弱性の一種です。 XSSを使用すると、攻撃者は他のユーザーが表示するWebページにクライアント側のコードを挿入できます。 クロスサイトスクリプティングの脆弱性は、同一生成元ポリシーなどのアクセス制御をバイパスするために攻撃者によって使用される可能性があります。
プラグインの要件を収集しているときに、チェックボックス、ラジオボタン、数値フィールドなど、複数の要素タイプがあることに気付きました。設計を思いついたときに、拡張を目的としたElementクラスを作成することにしました。 したがって、要素タイプごとに子クラスが作成されることがわかります。
出力は要素タイプによって異なるはずなので、 render()を抽象メソッドに変換します。 もちろん、それはクラス自体も抽象的でなければならないことを意味します。
abstract class Element { /** * @var int Number of elements instantiated. */ private static $number_of_elements = 0; /** * @var string Element label. */ protected $label; /** * @var string Element name. */ protected $name; /** * @var mixed Element value. */ protected $value; /** * Element constructor. * * @param string $section_id Section ID. * @param array $options Options. */ public function __construct( $section_id, $options = array() ) { self::$number_of_elements++; $options = wp_parse_args( $options, array( 'label' => sprintf( /* translators: %s is the unique s/n of the element. */ __( 'Element #%s', 'prsdm-limit-login-attempts' ), self::$number_of_elements ), 'name' => 'element_' . self::$number_of_elements ) ); $this->label = $options['label']; $this->name = $options['name']; $this->value = ''; } /** * Render the element. */ abstract public function render(); } たとえば、 Number_Elementクラスは次のようになります。
class Number_Element extends Element { /** * Render the element. */ public function render() { ?> <fieldset> <label> <input type="number" name="<?php echo esc_attr( $this->name ); ?>" value="<?php echo esc_attr( $this->value ); ?>" /> <?php echo esc_html(); ?> </label> </fieldset> <?php } } 同様に、 Checkbox_Element 、 Radio_Element 、さらには残りの要素のCustom_Elementクラスを作成できます。
すべて同じように使用できるようにクラスを作成していることに注意してください。 Elementの子でrender()メソッドを呼び出すと、HTMLが出力されます。
これは、オブジェクト指向プログラミングのコアコンセプトの1つであるポリモーフィズムの例です。
ポリモーフィズム
「ポリモーフィズム」は文字通り「多くの形」を意味します(ギリシャ語の「ポリ」は「多く」を意味し、「モーフ」は「形」を意味します)。 Elementの子クラスは、親階層内の任意の形式のクラスをとることができるため、多くの形式を持つことができます。
Number_Element 、 Checkbox_Element 、またはその他のサブタイプは、 Elementオブジェクトが期待される任意の場所で使用できます。これは、すべての子オブジェクトをまったく同じ方法で使用できるため(つまり、 render()メソッドを呼び出す場合)、動作を維持できるためです。異なる方法で(出力は要素タイプごとに異なります)。
おそらくお分かりのように、ポリモーフィズムと継承は密接に関連した概念です。
代替可能性
リスコフの置換原則(またはLSP) 、SOLIDの「L」は次のように述べています。
「コンピュータプログラムでは、SがTのサブタイプである場合、タイプTのオブジェクトをタイプSのオブジェクトに置き換えることができます(つまり、タイプTのオブジェクトをサブタイプSの任意のオブジェクトに置き換えることができます)。プログラムの望ましい特性。」
素人の言葉で言えば、予期しない動作をすることなく、親クラスの代わりに任意の子クラスを使用できるはずです。
工場
Fieldクラスに戻りましょう。現在、 create_element()メソッドで新しいElementを作成しています。
/** * Create a new element object. * * @return Element */ private function create_element() { return new Element( /* ... */ ); } /** * Add a new element object to this field. */ public function add_element() { $element = $this->create_element(); $this->elements[] = $element; }新しいオブジェクトを返すメソッドは、多くの場合、単純なファクトリと呼ばれます(デザインパターンである「ファクトリメソッド」と混同しないでください)。
Element親クラスの代わりに任意のサブタイプを使用できることを知っているので、このファクトリを変更して、任意の子クラスのオブジェクトを作成できるようにします。
/** * Create a new element object. * * @throws Exception If there are no classes for the given element type. * @throws Exception If the given element type is not an `Element`. * * @param string $element_type * @param array $options * * @return Element */ private function create_element( $element_type, $options ) { $element_type = __NAMESPACE__ . '\\Elements\\' . $element_type; if ( ! class_exists( $element_type ) ) { throw new Exception( 'No class exists for the specified type' ); } $element = new $element_type( $this->section_id, $options ); if ( ! ( $element instanceof Element ) ) { throw new Exception( 'The specified type is invalid' ); } return $element; } /** * Add a new element object to this field. * * @param string $element_type * @param array $options */ public function add_element( $element_type, $options ) { try { $element = $this->create_element( $element_type, $options ); $this->elements[] = $element; } catch ( Exception $e ) { // Handle the exception } }まず、要素タイプの前に現在の名前を付けます。
$element_type = __NAMESPACE__ . '\\Elements\\' . $element_type; __NAMESPACE__マジック定数には、現在の名前空間名が含まれています。
次に、指定した要素タイプのクラスがあることを確認します。
if ( ! class_exists( $element_type ) ) { throw new Exception( 'No class exists for the specified type' ); }次に、新しいオブジェクトを作成します。
$element = new $element_type( $this->section_id, $options );そして最後に、新しく作成されたオブジェクトが実際にElementのインスタンスであることを確認します。
if ( ! ( $element instanceof Element ) ) { return; }拡張
プラグインを拡張可能に構築したことを指摘する価値があります。 さまざまな種類のページ、セクション、要素の追加は、 Admin_Page 、 Section 、 Elementなどを拡張する新しいクラスを作成するのと同じくらい簡単です。これらの基本クラスには、新しいページ、セクション、または要素を追加するために変更する必要のあるコードは含まれていません。
SOLIDの「O」であるOpen/Closed Principle(またはOCP)は、次のように述べています。
「ソフトウェアエンティティ(クラス、モジュール、関数など)は、拡張のために開いている必要がありますが、変更のために閉じている必要があります。」
これは、 Admin_Pageのようなクラスを拡張して再利用できるはずですが、それを行うために変更する必要がないことを意味します。
結論
この記事では、セクション、フィールド、および要素を登録しました。 これらを実装する際に、ポリモーフィズムとは何か、なぜそれが役立つのかを詳しく調べました。 また、「リスコフの置換原則」と「オープン/クローズド原則」という2つのSOLID原則についても説明しました。
この旅の次の部分にとどまり、WordPressフックの管理方法を改善する方法を詳しく見ていきます。
オブジェクト指向プログラミングシリーズのパート7を読むには、ここをクリックしてください
関連項目
- WordPressとオブジェクト指向プログラミング–概要
- パート2– WordPressとオブジェクト指向プログラミング:実際の例
- パート3– WordPressとオブジェクト指向プログラミング:ΑWordPressの例–スコープの定義
- パート4– WordPressとオブジェクト指向プログラミング:WordPressの例–デザイン
- パート5– WordPressとオブジェクト指向プログラミング:WordPressの例–実装:管理メニュー