
Parte 6 – WordPress y Programación Orientada a Objetos: Un Ejemplo de WordPress – Implementación: Registro de las Secciones
Publicado: 2022-02-04Bienvenido de nuevo a nuestra serie sobre Programación Orientada a Objetos.
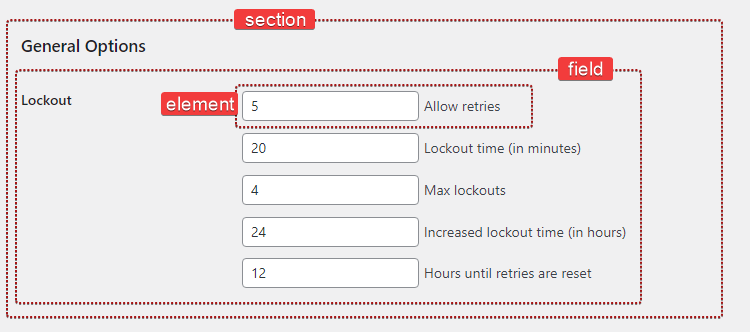
Como explicamos en la parte de Diseño de la serie, una página de administración consta de secciones . Cada sección contiene uno o más campos , y cada uno de esos campos contiene uno o más elementos .
¿Cómo se vería eso en el código?
public function register_sections() { $my_section = $this->register_section( /* ... */ ); $my_field = $my_section->add_field( /* ... */ ); $my_element = $my_field->add_element( /* ... */ ); } Muy bien, eso parece fácil de usar y ya podemos decir que probablemente necesitaremos crear tres nuevas clases: Section , Field y Element .
class Section {} class Field {} class Element {}Tomemos un momento y preguntémonos qué sabemos hasta ahora sobre estas clases.
-
$my_section->add_field()→ La claseSectiondebería poder agregar (y almacenar) un nuevo objetoField -
$my_field->add_element()→ La claseFielddebería poder agregar (y almacenar) un nuevo objetoElement.
Comenzamos almacenando nuestros objetos Field en una matriz, como lo haríamos normalmente:
class Section { /** * @var Field[] Section field objects. */ protected $fields = array(); Esta variable $fields es un miembro de clase y es lo que llamamos una propiedad . Las propiedades son variables de PHP que viven en una clase y pueden ser de cualquier tipo de datos ( string , integer , object , etc.).
También escribiremos el método add_field() para crear y agregar un nuevo campo.
public function add_field() { $field = new Field( /* ... */ ); $this->fields[] = $field; return $field; } Este método crea un nuevo objeto de Field , lo agrega a la propiedad de campos y devuelve ese objeto recién creado. Muy claro.
Repitamos el mismo proceso para la clase Field también.
class Field { /** * @var Element[] Field elements. */ private $elements = array(); /** * Create a new element object. * * @return Element */ private function create_element() { return new Element( /* ... */ ); } /** * Add a new element object to this field. */ public function add_element() { $element = $this->create_element(); $this->elements[] = $element; } }¡Eso es un comienzo! ¿Que sigue?
La clase de sección
Necesitamos llamar a add_settings_section(), cuando se crea una nueva sección. Una vez más, el método constructor es una excelente manera de realizar nuestra inicialización. Vamos a agregarlo en la clase:
class Section { // ... public function __construct() { add_settings_section( $this->id, $this->title, array( $this, 'print_description' ), $this->page ); } }Parece que una Sección necesita un nombre de slug para identificarla (usado en el atributo id de las etiquetas). También puede tener un título, una descripción y pertenece a una página específica.
class Section { /** * @var Field[] Section field objects. */ protected $fields = array(); /** * @var string Section title. */ public $title; /** * @var string Section id. */ public $id; /** * @var string Slug-name of the settings page this section belongs to. */ public $page; /** * @var string Section description. */ public $description;Podríamos establecer el título de la sección, haciendo algo como esto:
$section = new Section(); $section->title = __( 'Hello world', 'prsdm-limit-login-attempts' );Bueno, eso no es del todo correcto. Aunque el código anterior es perfectamente válido, en realidad no hace lo que esperamos que haga.
El método constructor se ejecuta cuando se crea un nuevo objeto Sección. Por lo tanto, se llamará a add_settings_section() antes de que tengamos la oportunidad de establecer el título. Como resultado, la sección no tendrá título.

Aloje su sitio web con Pressidium
GARANTÍA DE DEVOLUCIÓN DE DINERO DE 60 DÍAS
El título debe estar disponible durante la inicialización de nuestro objeto, por lo que debemos hacer esto en el constructor.
class Section { /** * @var string Section title. */ private $title; public function __construct( $title ) { $this->title = $title; // ... } // .. Tenga en cuenta que $this->title se refiere a la propiedad de la clase title, donde $title se refiere al argumento del constructor.
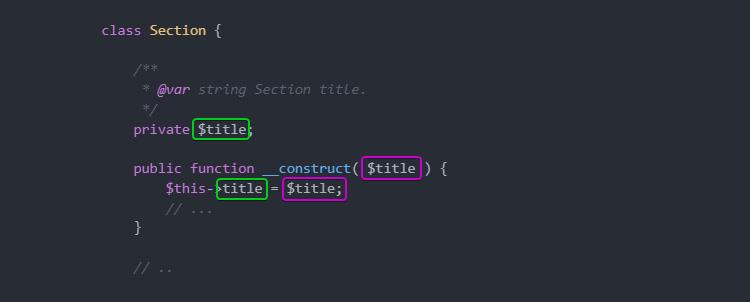
Aquí también aprovechamos la visibilidad . Dado que solo la clase que la definió tendrá acceso a nuestra propiedad $title , podemos declararla private . Por lo tanto, evitamos que se acceda fuera de la clase.
Ah, y también tenemos que agregar un método print_description() que, bueno, imprimirá la descripción de la sección.
/** * Print the section description. */ public function print_description() { echo esc_html( $this->description ); }Poniendo todo junto, nuestra clase Sección se ve así.
class Section { /** * @var Field[] Section field objects. */ protected $fields = array(); /** * @var string Section title. */ private $title; /** * @var string Section id. */ private $id; /** * @var string Slug-name of the settings page this section belongs to. */ private $page; /** * @var string Section description. */ private $description; /** * Section constructor. * * @param string $id Section id. * @param string $title Section title. * @param string $page Slug-name of the settings page. * @param string $description Section description. */ public function __construct( $id, $title, $page, $description ) { $this->id = $id; $this->title = $title; $this->page = $page; $this->description = $description; add_settings_section( $this->id, $this->title, array( $this, 'print_description' ), $this->page ); } /** * Print the section description. */ public function print_description() { echo esc_html( $this->description ); } /** * Create and add a new field object to this section. */ public function add_field() { $field = new Field( /* ... */ ); $this->fields[] = $field; return $field; } }La clase de campo
De manera similar a la Section , ahora podemos continuar y construir la clase de Field , que utilizará la función de WordPress add_settings_field() .
class Field { /** * @var Element[] Field elements. */ private $elements = array(); /** * @var string ID of the section this field belongs to. */ private $section_id; /** * @var string Field description. */ private $description; /** * Field constructor. * * @param string $id Field ID. * @param string $label Field label. * @param string $page Slug-name of the settings page. * @param string $section_id ID of the section this field belongs to. * @param string $description Field description. */ public function __construct( $id, $label, $page, $section_id, $description ) { $this->section_id = $section_id; $this->description = $description; add_settings_field( $id, $label, array( $this, 'render' ), $page, $this->section_id ); } }Aquí, también nos gustaría proporcionar valores predeterminados para el ID, la etiqueta y la descripción del campo. Podemos hacer esto pasando una matriz de opciones al constructor y usar la función de WordPress wp_parse_args() para analizar esas opciones.
class Field { /** * @var int Number of fields instantiated. */ private static $number_of_fields = 0; // ... /** * Field constructor. * * @param string $section_id ID of the section this field belongs to. * @param string $page Slug-name of the settings page. * @param array $options Options. */ public function __construct( $section_id, $page, $options = array() ) { self::$number_of_fields++; $options = wp_parse_args( $options, array( 'label' => sprintf( __( 'Field #%s', 'prsdm-limit-login-attempts' ), self::$number_of_fields 'id' => 'field_' . self::$number_of_fields, 'description' => '' ) ); $this->section_id = $section_id; $this->description = $options['description']; add_settings_field( $options['id'], $options['label'], array( $this, 'render' ), $page, $this->section_id ); } } La función wp_parse_args() nos permitirá fusionar los valores definidos por el usuario (la matriz $options ) con los valores predeterminados.
array( 'label' => sprintf( __( 'Field #%s', 'prsdm-limit-login-attempts' ), self::$number_of_fields 'id' => 'field_' . self::$number_of_fields, 'description' => '' ) También tenemos que establecer etiquetas únicas para cada campo. Podemos manejar esto configurando la etiqueta con un prefijo ( 'field_' ) seguido de un número, que aumentará cada vez que se cree un nuevo objeto Field. Guardaremos este número en la propiedad estática $number_of_fields .
/** * @var int Number of fields instantiated. */ private static $number_of_fields = 0;Se puede acceder directamente a una propiedad estática sin tener que crear primero una instancia de una clase.
'id' => 'field_' . self::$number_of_fields La palabra clave self se usa para hacer referencia a la clase actual y, con la ayuda del operador de resolución de alcance :: (comúnmente llamado "dos puntos dobles"), podemos acceder a nuestra propiedad estática.
De esa forma, en el constructor, siempre accedemos a la misma propiedad $number_of_fields , aumentando su valor cada vez que se crea un objeto, lo que da como resultado una etiqueta única adjunta a cada campo.
Más adelante, el método render() , después de imprimir la descripción (si existe), itera a través de todos los elementos y representa cada uno de ellos.
public function render() { if ( ! empty( $this->description ) ) { printf( '<p class="description">%s</p>', esc_html( $this->description ) ); } foreach ( $this->elements as $key => $element ) { $element->render(); } }Poniendolo todo junto…
class Field { /** * @var int Number of fields instantiated. */ private static $number_of_fields = 0; /** * @var Element[] Field elements. */ private $elements = array(); /** * @var string ID of the section this field belongs to. */ private $section_id; /** * @var string Field description. */ private $description; /** * Field constructor. * * @param string $section_id ID of the section this field belongs to. * @param string $page Slug-name of the settings page. * @param array $options Options. */ public function __construct( $section_id, $page, $options = array() ) { self::$number_of_fields++; $options = wp_parse_args( $options, array( 'label' => sprintf( /* translators: %s is the unique s/n of the field. */ __( 'Field #%s', 'prsdm-limit-login-attempts' ), self::$number_of_fields 'id' => 'field_' . self::$number_of_fields, 'description' => '' ) ); $this->section_id = $section_id; $this->description = $options['description']; add_settings_field( $options['id'], $options['label'], array( $this, 'render' ), $page, $this->section_id ); } /** * Create a new element object. * * @return Element */ private function create_element() { return new Element( /* ... */ ); } /** * Add a new element object to this field. */ public function add_element() { $element = $this->create_element(); $this->elements[] = $element; } /** * Render the field. */ public function render() { if ( ! empty( $this->description ) ) { printf( '<p class="description">%s</p>', esc_html( $this->description ) ); } foreach ( $this->elements as $key => $element ) { $element->render(); } } }La clase de elemento
En el futuro, construiremos la clase Element de manera similar.

Empezaremos a escribir la clase así:
class Element { /** * @var int Number of elements instantiated. */ private static $number_of_elements = 0; /** * @var string Element label. */ private $label; /** * @var string Element name. */ private $name; /** * @var mixed Element value. */ private $value; /** * Element constructor. * * @param string $section_id Section ID. * @param array $options Options. */ public function __construct( $section_id, $options = array() ) { self::$number_of_elements++; $options = wp_parse_args( $options, array( 'label' => sprintf( /* translators: %s is the unique s/n of the element. */ __( 'Element #%s', 'prsdm-limit-login-attempts' ), self::$number_of_elements ), 'name' => 'element_' . self::$number_of_elements ) ); $this->label = $options['label']; $this->name = $options['name']; $this->value = ''; } /** * Render the element. */ public function render() { ?> <fieldset> <label> <input type="number" name="<?php echo esc_attr( $this->name ); ?>" value="<?php echo esc_attr( $this->value ); ?>" /> <?php echo esc_html(); ?> </label> </fieldset> <?php } }Asegúrese de estar escapando de su salida, como lo estamos haciendo aquí, utilizando las funciones de WordPress esc_attr() y esc_html(), para evitar cualquier ataque de secuencias de comandos entre sitios. Aunque estamos representando nuestros elementos solo en las páginas de administración, sigue siendo una buena idea escapar siempre de los datos de salida.
NOTA: Cross-site scripting (o XSS) es un tipo de vulnerabilidad de seguridad que normalmente se encuentra en las aplicaciones web. XSS permite a los atacantes inyectar código del lado del cliente en páginas web vistas por otros usuarios. Los atacantes pueden utilizar una vulnerabilidad de secuencias de comandos entre sitios para eludir los controles de acceso, como la política del mismo origen.
Cuando estábamos reuniendo los requisitos del complemento, notamos que hay varios tipos de elementos: casillas de verificación, botones de radio, campos numéricos, etc. Cuando se nos ocurrió nuestro diseño, tomamos la decisión de crear una clase de Element destinada a ser ampliada. Entonces, sabemos que vamos a terminar con una clase secundaria para cada tipo de elemento.
La salida debe diferir según el tipo de elemento, por lo que convertiremos render() en un método abstracto. Eso significa, por supuesto, que la clase misma también debería ser abstracta.
abstract class Element { /** * @var int Number of elements instantiated. */ private static $number_of_elements = 0; /** * @var string Element label. */ protected $label; /** * @var string Element name. */ protected $name; /** * @var mixed Element value. */ protected $value; /** * Element constructor. * * @param string $section_id Section ID. * @param array $options Options. */ public function __construct( $section_id, $options = array() ) { self::$number_of_elements++; $options = wp_parse_args( $options, array( 'label' => sprintf( /* translators: %s is the unique s/n of the element. */ __( 'Element #%s', 'prsdm-limit-login-attempts' ), self::$number_of_elements ), 'name' => 'element_' . self::$number_of_elements ) ); $this->label = $options['label']; $this->name = $options['name']; $this->value = ''; } /** * Render the element. */ abstract public function render(); } Por ejemplo, una clase Number_Element se vería así:
class Number_Element extends Element { /** * Render the element. */ public function render() { ?> <fieldset> <label> <input type="number" name="<?php echo esc_attr( $this->name ); ?>" value="<?php echo esc_attr( $this->value ); ?>" /> <?php echo esc_html(); ?> </label> </fieldset> <?php } } Del mismo modo, podemos construir una clase Checkbox_Element , Radio_Element e incluso una clase Custom_Element para el resto de nuestros elementos.
Tenga en cuenta que estamos creando nuestras clases para que todas se puedan usar de la misma manera . Llamar al método render() en cualquier elemento secundario de Element generará algo de HTML.
Ese es un ejemplo de polimorfismo , uno de los conceptos centrales de la programación orientada a objetos.
Polimorfismo
“Polimorfismo” significa literalmente “muchas formas” (del griego “poly” que significa “muchas” y “morphe” que significa “forma”). Una clase secundaria Element puede tener muchas formas , ya que puede tomar cualquier forma de una clase en su jerarquía principal.
Podemos usar un Number_Element , un Checkbox_Element o cualquier otro subtipo en cualquier lugar donde se espere un objeto Element , ya que todos los objetos secundarios se pueden usar exactamente de la misma manera (es decir, llamando a su método render() ), sin dejar de ser capaces de comportarse diferente (la salida diferirá para cada tipo de elemento).
Como probablemente sabrá, el polimorfismo y la herencia son conceptos estrechamente relacionados.
sustituibilidad
El principio de sustitución de Liskov (o LSP) , la "L" en SOLID, establece:
“En un programa de computadora, si S es un subtipo de T, entonces los objetos de tipo T pueden ser reemplazados por objetos de tipo S (es decir, un objeto de tipo T puede ser sustituido por cualquier objeto de un subtipo S) sin alterar ninguno de ellos. las propiedades deseables del programa.”
En términos simples, debería poder usar cualquier clase secundaria en lugar de su clase principal sin ningún comportamiento inesperado.
Fábricas
Volvamos a nuestra clase Field , donde actualmente tenemos un método create_element() que crea un Element nuevo.
/** * Create a new element object. * * @return Element */ private function create_element() { return new Element( /* ... */ ); } /** * Add a new element object to this field. */ public function add_element() { $element = $this->create_element(); $this->elements[] = $element; }Un método que devuelve un nuevo objeto a menudo se denomina fábrica simple (que no debe confundirse con el "método de fábrica", que es un patrón de diseño).
Sabiendo que cualquier subtipo se puede usar en lugar de la clase principal Element , seguiremos adelante y modificaremos esta fábrica para que pueda crear objetos de cualquier clase secundaria.
/** * Create a new element object. * * @throws Exception If there are no classes for the given element type. * @throws Exception If the given element type is not an `Element`. * * @param string $element_type * @param array $options * * @return Element */ private function create_element( $element_type, $options ) { $element_type = __NAMESPACE__ . '\\Elements\\' . $element_type; if ( ! class_exists( $element_type ) ) { throw new Exception( 'No class exists for the specified type' ); } $element = new $element_type( $this->section_id, $options ); if ( ! ( $element instanceof Element ) ) { throw new Exception( 'The specified type is invalid' ); } return $element; } /** * Add a new element object to this field. * * @param string $element_type * @param array $options */ public function add_element( $element_type, $options ) { try { $element = $this->create_element( $element_type, $options ); $this->elements[] = $element; } catch ( Exception $e ) { // Handle the exception } }Empezamos prefijando el tipo de elemento con el nombre actual:
$element_type = __NAMESPACE__ . '\\Elements\\' . $element_type; La constante mágica __NAMESPACE__ contiene el nombre del espacio de nombres actual.
Luego, nos aseguramos de que haya una clase para el tipo de elemento especificado:
if ( ! class_exists( $element_type ) ) { throw new Exception( 'No class exists for the specified type' ); }A continuación, creamos un nuevo objeto:
$element = new $element_type( $this->section_id, $options );Y, por último, nos aseguramos de que el objeto recién creado sea de hecho una instancia de Element:
if ( ! ( $element instanceof Element ) ) { return; }Extensión
Vale la pena señalar que hemos creado nuestro complemento para que sea extensible. Agregar diferentes tipos de páginas, secciones, elementos es tan fácil como crear una nueva clase que amplíe Admin_Page , Section , Element , etc. Estas clases base no incluyen ningún código que deba cambiarse para agregar una nueva página, sección o elemento.
El Principio Abierto/Cerrado (o OCP), la "O" en SÓLIDO, establece:
"Las entidades de software (clases, módulos, funciones, etc.) deben estar abiertas para la extensión, pero cerradas para la modificación".
Esto significa que deberíamos poder extender una clase como Admin_Page y reutilizarla, pero no deberíamos tener que modificarla para hacerlo.
Conclusión
En este artículo registramos nuestras secciones, campos y elementos. Al implementar esto, analizamos más de cerca qué es el polimorfismo y por qué es útil. También hemos echado un vistazo a un par de principios SOLID, el "Principio de sustitución de Liskov" y el "Principio abierto/cerrado".
Quédese con nosotros para la próxima parte de este viaje, donde veremos más de cerca cómo podemos mejorar la forma en que administramos nuestros ganchos de WordPress.
Haga clic aquí para leer la Parte 7 de nuestra Serie de Programación Orientada a Objetos
Ver también
- WordPress y la programación orientada a objetos: una descripción general
- Parte 2 – WordPress y Programación Orientada a Objetos: Un Ejemplo del Mundo Real
- Parte 3 – WordPress y Programación Orientada a Objetos: Α Ejemplo de WordPress – Definición del Alcance
- Parte 4 – WordPress y Programación Orientada a Objetos: un Ejemplo de WordPress – Diseño
- Parte 5 – WordPress y Programación Orientada a Objetos: un Ejemplo de WordPress – Implementación: El Menú de Administración